SmartSDR v4.2.20 | SmartSDR v4.2.20 Release Notes
SmartSDR v3.10.15 | SmartSDR v3.10.15 Release Notes
The latest 4O3A Genius Product Software:
The latest 4O3A Genius Product Software and Firmware
If you are needing assistance with FlexRadio products, please refer to the product documentation or check the Help Center for known solutions. Need technical support from FlexRadio? It's as simple as creating a HelpDesk ticket.
TeensyMaestro
Comments
-
I finally figured out how to key a Flex 6000 over a LAN connection, so I have added that functionality to the TeensyMaestro. I have not released the code to GitHub pending a WAN test this week. I will take my laptop, TeensyMaestro, Key and cell phone on a fishing trip this coming week. If I can get good enough cell service at the campsite, I should be able to test this thing out under fairly poor network conditions.
I have been testing it on the LAN for the past couple of days, and it works flawlessly (kind of like having a Maestro hard wired to the router). If I can get it to perform reasonably well over the WAN, I will release the firmware to GitHub when I get back later in the week. If this works, I will finally have a complete remote solution, including CW!
Stan and Lasse, any progress to share on your builds?
0 -
Nothing to report here, weather too good to sit indoors... Still awaiting delivery from Bodnar, they admitted they did foul up on customs declaration, so they are resending, but nothing yet. But I hope to get going this week as I found some cheap encoders in my junk box to start playing with, and summer vaccation has started :)
/Lasse
0 -
Well, the remote keying functionality of the TeensyMaestro works! I am up at fishing camp where there is RIDICULOUSLY poor cell coverage. I have a cell booster in my camper that allows this to work at all, but Internet latency is just crazy bad.
Nonetheless, I was able to break a couple of 13 Colonies special event pile-ups on CW this afternoon and did not get requests for fills. They got my call right the first time, so all seems well. I do need to set 20 - 30 ms of delay so that the PTT (MOX button) doesn't flicker on and off with the keying. Without enough delay, the keying gets very choppy and has occasional dropouts. With enough delay (I just set it to 30 ms to be safe), it sounds really good. I need to do a bit more experimentation to see what delay values are needed for different internet latency, keyer speeds, etc. before I release this version to the wild.
I cannot confirm the CW quality at my current location, so at some point, I will bring my little RSP-1A SDR receiver with me to monitor my own signal from whatever remote location I am operating. I just wish I had thought of that thing when I loaded up for this trip,,,
0 -
Len;
would listening on sdrweb receiver work?
0 -
Hi John, not always. The problem is very limited BW such that I often can't open a web site while operating. I can't even open a second slice sometimes without crashing. I tend to camp where there is extremely poor cell service, so for it to work at all is a miracle. Sometimes I have reasonable cell service, then web based receivers work just fine.
-1 -
I understand. I have the same problem at my house.
0 -
TeensyMaestro V1.017 is now available on GitHub:
https://github.com/KD0RC/Teensy-Maestro-for-Flex-6000-radios/releases/tag/V1.017
***************************** V 1.017 ***************************
Fixed blank profile menu
Added ability to key CW over ethernet (finally!!)
Added menu item to choose local or ethernet CW keying
Added config item to default to local or ethernet keying
Added a 5000 Hz Step to the step selection
Changed menu select so short press goes back to last used menu, long press goes to menu 0
***************************************************************
The big news is the ability to key the rig from the TeensyMaestro keyer over ethernet (LAN or WAN). I had my remote setup in my 5th wheel this past week and had absolutely terrible cell phone service (even with a 50 dB cell booster). Good fishing usually means bad cell service... Despite this, the whole setup worked great, and I was able to operate CW from my camper. My fear was choppy CW due to the horrible latency created by the poor network connection. I expected dropouts and requests for fills, but had none of that. I was able to bust a 13 colonies special event pile-up on 20 and heard my call come back perfectly and no requests for fills. YAY!
I believe that I am using the same command set that the Maestro uses to key the rig, but since I don't have one, I can't really be sure. In any event, it works, so I feel like I finally have a complete solution to remote operation.
A big THANKS to Flex for such a robust, well-engineered API! CW over a WAN connection is very tricky business, and despite atrocious network conditions, the Flex API worked great.
0 -
Finally parts start to show up!
As a starter I tried to load the new 1.07 hex file, and I think it did work OK (have not started to get the RJ-45 jack connected nor display) but the programmer complains of not finding the Teensy41.elf file. Is this normal? Now have to hook up display and the TCP/IP :)
And yes I did begin with a charge-only USB -cable, but after rereading the first two pages here, I got back on track.
0 -
Hi Lasse, glad to hear you are finally getting the parts!
Hmmm... I don't have a Teensy41.elf file anywhere on my computer, so I am not sure what that is.
If you wire up the RJ-45 and connect it to the same LAN segment as your radio, upon powering up the Teensy board, you should get a little SmartSDR pop-up saying that you are connected:

This should work whether or not you have the display connected. It is a good test that the firmware actually loaded and is executing.
If you don't get the pop up, let me know and we can start researching the possible load issue.
0 -
It was just mentioned in the "logfile" from teensy.exe, apparently the hex-file did load properly.
Should know as soon as I get the magjack hooked up :) Nothing is easy... the PJRC-board was not stocked over at this end of the pond, so I have to just do hook up the magjack to the pins. It looks pretty doable, only a 4 wires.
0 -
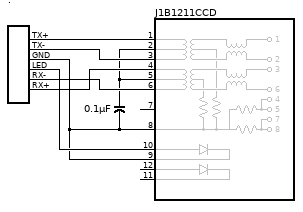
Oh, OK that is good. Well, I think there is a .1 uf capacitor in there as well. I am not sure where it goes, but you might want to check that out. My jack has a 6 pin header connecting the differential pairs, R+, R-, T+, T- and the LED and ground connections.
0 -
Hi Lasse,
Here is the magjack schematic from the PJRC website:
 0
0 -
Thanks Len,
yes I did check PJRC's pages and noticed the .1 uF, guess it helps to balance the transformer.
See if I can get some spare time to play with this tomorrow, far to good weather to be hiding in the shack :)
73
/Lasse
0 -
Slowly getting there... far to hot to play in the shack and no A/C :)

Try get the display running next....
1 -
Excellent! Now you have a known-working base to build on. I am looking forward to seeing your display in action.
0 -
Finally managed to get some time in the Lab :) Display works nice... but my current problem is that the Teensy refuses to boot if I have a SD card mounted. The card is low formatted as ****-32 and it was the smallest I had, 8 GB. Tried on an frugal Teensy, and it shows the same problem so it seems related to the SD card. Pretty impossible to find smaller cards, all seems to be 16 GB or even bigger. Will try a new card tomorrow.
 1
1 -
Excellent! Nice to see it working.
My SDcard is a 32 GB that I picked up at an office supply store. Nothing fancy or expensive.
I think I did a F.A.T -32 format on it, but don't really remember. If you continue to have problems with the card, I will do some looking around to see what I can find out about the library functions that I used.
0 -
After a good night sleep and a cup of coffee I had one more go at the SD card issue. It turned out to be my own fault. The card had been used in a RPi and thus hade two partitions. A format using "SD Card Formatter" wiped the card and removed the partitions. Just loaded my modified ini-file and all looks good. Now to do a temporary front panel so I can start play with the thing. I want to try out some various layouts before comitting to the final design. I rather have look more like a Maestro in form factor, I think :)
0 -
Hi Len,
I just saw your post on the 4th - an indication of how busy the summer is here in Bar Harbor. I complicated my situation here by soldering the 2x3 header for the ethernet kit crooked then messed it up trying to fix it. Once I realized it was 2.0mm pitch instead of 2.54mm, I ordered a replacement header. So annoying needing such a small part! Anyway, it's here and I should be back on track soon.
The slow progress is not an indication of lack of enthusiasm for the project. I'm excited to get moving on it soon.
Stan, K3PW
0 -
Very cool Lasse! I'm glad that the SD card was so easy to fix. I will be very interested to see what layout you come up with.
Sounds good Stan! Glad to see that you are still on it. The cool thing about homebrewing equipment is doing it on your schedule.
0 -
TeensyMaestro V1.018 is now available on GitHub:
Release TeensyMaestro V1.018 · KD0RC/Teensy-Maestro-for-Flex-6000-radios (github.com)
***************************** V 1.018 ***************************
Added code to change AGC-T control to be squelch when in FM, NFM or DFM
Added Band Menu to allow changing band for panadapter containing the active slice
Added code to get slice index letter (A - H) from the API instead of hard-coding "A" and "B"
Added code to sort the memory menu by memory name
***************************************************************
The never-ending project...
0 -
TeensyMaestro V1.019 is now available on GitHub:
Release TeensyMaestro V1.019 · KD0RC/Teensy-Maestro-for-Flex-6000-radios (github.com)
***************************** V 1.019 ***************************
Added code to close all open slices when shutting down in standalone (Client GUI) mode
Fixed frequency rounding error when over 99 MHz (over 2.1 GHz still presents a problem)
Added menu to select client to bind to
***************************************************************
So how are the builds coming along? It sounds like everyone building one has successfully gotten connected to their Flex at this point.
Has anyone else taken the plunge and started one (or thinking about it)?
0 -
It looks like Ben, VR2VIY has completed a really beautiful version of the TeensyMaestro!


He also did a great PC board, making a very neat installation all around. This is the best looking TeensyMaestro yet! Congratulations Ben, you do great work!
1 -
TeensyMaestro V1.020 is now available on GitHub:
Release TeensyMaestro V1.020 · KD0RC/Teensy-Maestro-for-Flex-6000-radios (github.com)
***************************** V 1.020 ***************************
Fixed bug where garbage was left on screen when opening a new slice
Fixed to allow CW to remotely key the connected station, not just the first station connected (station[0])
Added feature to reset the TFT screen by touching the lower right hand corner of the screen
Added code to stop the client connection when shutting down. When in standalone mode, it disconnects the client GUI so that a manual disconnect is not needed.
Updated to only output print statements when DEBUG == 1 (library functions still print)
Fixed so that a long press of Menu Up or Menu Dn will act the same as a short press (thanks Ben, VR2VIY!)
Anyone else building one (it does not have to be as fancy as Ben's 😄)?
0 -
I have not forgotten this marvellous project! But somehow I seems to run out of play-time.... hopefully I can restart my building any day now! Looking forward to get going!
I'll jumpstart by d/l the latest build. Will post pic's when there are any noteworthy to show :)
/Lasse SM5GLC
1 -
Great to hear Lasse! Looking forward to seeing some pics!
0 -
I gave a presentation about my TeensyMaestro to the Boulder Amateur Radio Club this evening.
A video recording of the session will be available soon. I will post a link here once it becomes available.
0 -
TeensyMaestro V1.021 is now available on GitHub:
***************************** V 1.021 ***************************
Added SPOT: to config file to allow setting permanent spots for net freqs, repeaters etc.
Fixed bug introduced in 1.016 that crashes if not connected to a Flex radio (keyer only mode fail...)
Fixed to allow CW speed control with CWX Sync OFF (Client GUI bind makes it possible)
As of Version 1.016, I have been connecting (binding) to the first client found (typically SmartSDR or a Maestro). It finally dawned on me that with a proper bind, I can now use the CW speed as Flex designed it. The idea is to be able to change CW speed of the desired client independently of any other station (client) that is connected. So in a multiFLEX situation, the TeensyMaestro can be connected to either station and change only the CW speed of that station.
When I started this project, I did not understand the client bind process or even why one would want such a thing. As a result, I found a goofy workaround for setting CW Speed that required turning CWX Sync ON. Once I did the client bind properly, I was able to go back to my original code and drop the workaround.
The more simple a radio like the Flex is to operate, the more complicated it is behind the scenes! This project has shown me a whole new appreciation for the work that went into making my 6400 reliable and easy to operate!
0 -
Here is a link to the presentation that I did about the TeensyMaestro to the Boulder Amateur Radio Club at the November, 2021 meeting. I want to thank Dan Quigley, N7HQ for attending and for his kind comments.
Project update: As per the "What's Next?" slide, I just added the PTT switch and PTT jack. I also replaced the cheap, crummy switches, replaced the front panel graphic and am in the process of soldering the wires to the proto-board. Any controls mounted to the plastic part of the case are being left as jumper wires so that I can take things apart more easily. The better connection for the display is already paying off - no more white screens of death!
Here is a link to the HamVan groups if you are interested in more info and pics of Dave, W4WKU's Ham Van and his TeensyMaestro.
As always, I am interested to know if anyone else is building (or has built) one? Any new progress on those who are mid-build?
0 -
TeensyMaestro V1.022 is now available on GitHub:
***************************** V 1.022 ***************************
Fixed bug so that Ethernet keying is not an option in standalone keyer mode
Fixed bug where CW Menu comes up blank in standalone keyer mode
Added a mic switch input to Pin 52. This will detect which mic is selected and
set the corresponding Mic Profile automagically
Added config items to set Mic Profile for each of two mic switch settings
Added config item to allow/disallow Global Profile changes from changing switch-selected Mic Profile
I have been meaning to build a little switch box to plug two mics into so that I don't have to keep going to the back of the radio to change them out. Every time I got the junk out to put it together, I would think of how unlikely it is that I will remember to change profiles when I flip the switch so I just never built it...
I finally decided to put the switch and mic connectors right into the TeensyMaestro. I use a 3PDT switch. Two of the poles switch tip and ring of the mics and the third grounds or opens pin 52 on the Teensy board. I added parameters to the Config file to set the profile for each mic, and whether a global profile change should change the mic profile, or let the switch setting override it.
It works great! If I had been using the headset, but now just want to grab the hand mic for a quick 2 meter QSO, I just flip the switch and the mic profile follows along. No going behind the radio, no forgetting to change the profile. Here is the schematic:

Here is how I added the pin 52 wire. Since I don't use the additional memory chips, I can use the solder pad as a GPIO pin. You can't really see it in the picture, but that wire is super-glued down in a couple of spots for strain relief.

I REALLY REALLY need to stop adding junk to this project...
0


Leave a Comment
Categories
- All Categories
- 401 Community Topics
- 2.2K New Ideas
- 689 The Flea Market
- 8.6K Software
- 196 SmartSDR+
- 6.6K SmartSDR for Windows
- 200 SmartSDR for Maestro and M models
- 458 SmartSDR for Mac
- 279 SmartSDR for iOS
- 268 SmartSDR CAT
- 220 DAX
- 395 SmartSDR API
- 9.6K Radios and Accessories
- 106 Aurora
- 348 FLEX-8000 Signature Series
- 7.2K FLEX-6000 Signature Series
- 999 Maestro
- 58 FlexControl
- 872 FLEX Series (Legacy) Radios
- 975 Genius Products
- 482 Power Genius XL Amplifier
- 358 Tuner Genius XL
- 135 Antenna Genius
- 321 Shack Infrastructure
- 226 Networking
- 483 Remote Operation (SmartLink)
- 145 Contesting
- 847 Peripherals & Station Integration
- 147 Amateur Radio Interests
- 1.1K Third-Party Software