SmartSDR v4.1.5 | SmartSDR v4.1.5 Release Notes
SmartSDR v3.10.15 | SmartSDR v3.10.15 Release Notes
The latest 4O3A Genius Product Software:
The latest 4O3A Genius Product Software and Firmware
If you are needing assistance with FlexRadio products, please refer to the product documentation or check the Help Center for known solutions. Need technical support from FlexRadio? It's as simple as creating a HelpDesk ticket.
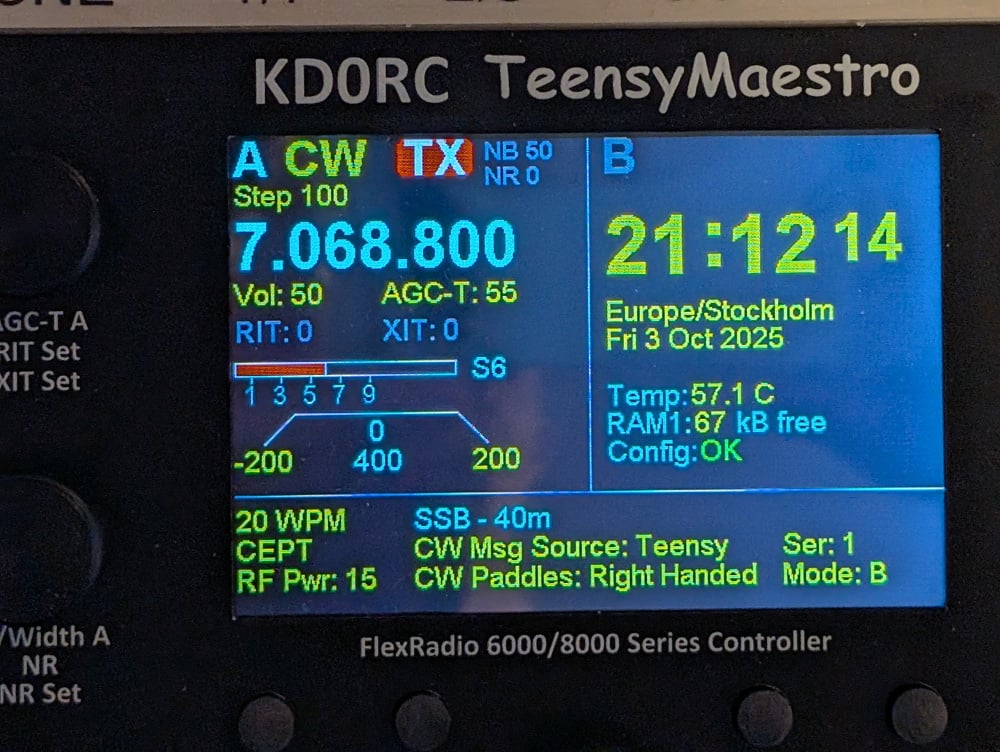
TeensyMaestro
Comments
-
Oleg -
Just curious, why aren’t you using the ribbon cable that comes supplied with the Ethernet kit? That could eliminate a possible variable in your situation.
0 -
Hi Oleg,
I noticed that you're not using the Teensy 4.1 Ethernet Kit for the wires between the Teensy 4.1 and the MagJack. (https://www.digikey.com/en/products/detail/sparkfun-electronics/18615/15775140)
How long is your connection? Is each wire in the R+/R- and T+/T- pair the same length?
Because R+/R- and T+/T- are differential pairs, the wires in each pair should be the same length and shouldn't be too long. I haven't tested what works, but MS Copilot suggests that more than 20cm in length or a difference (skew) of more than about 1cm in a pair might be problematic. (Twisting each pair would help too).
Since the Ethernet PHY only supports 10/100 Mbps its going to be a bit more tolerant of these lengths than 1Gbps. But if you have wires that are a couple of meters long, then it would definitely be an issue.
As Bill said, using the standard kit might eliminate that as a potential issue.
0 -
Hi Len,
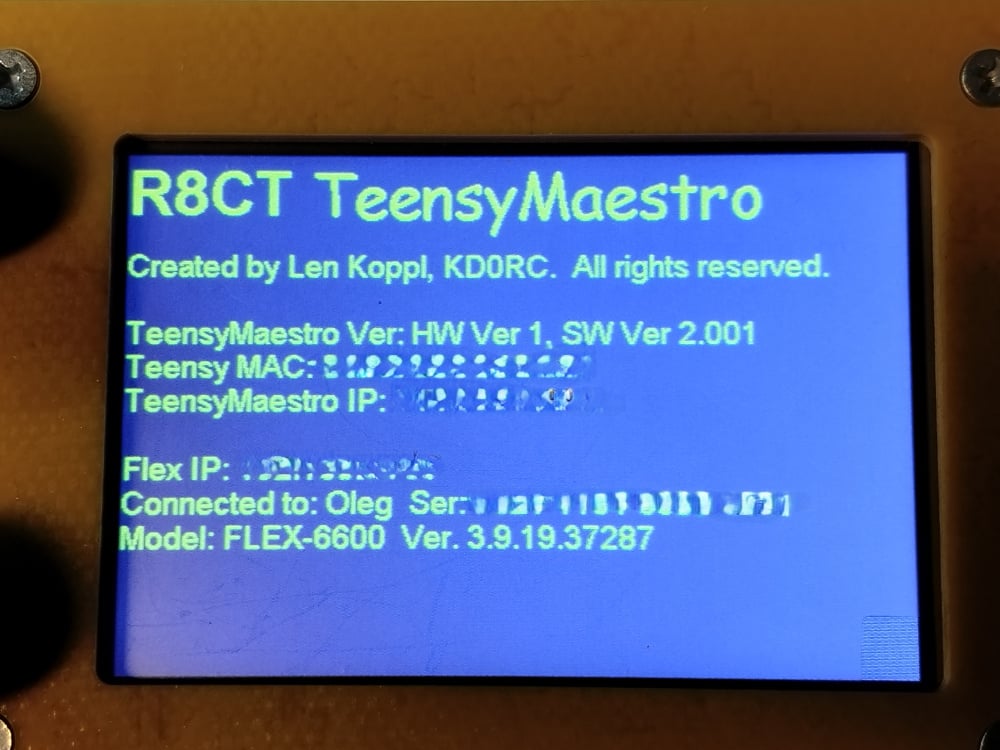
First of all, thank you for making TeensyMaestro available to the community. I am building a V2.001 project on HW V2 and I am very pleased with both the hardware and software, and the functionality it provides.My FlexRadio is located at a remote QTH in the forest, with no PC or server present, just the FlexRadio and a router. I access the radio via VPN (TAP mode), where the router acts as the server. This setup works fine, my PC connects and I can run SmartSDR locally.
Initially, I tried to bridge my PC’s OpenVPN connection to the TeensyMaestro using an external USB Ethernet dongle. While it kind of worked, Windows had difficulty passing DHCP across the bridge, and I had to resort to using a static IP for the TeensyMaestro. Unfortunately, the bridge introduced networking quirks on the Windows side, so I started searching for a cleaner solution.
Connection Modes
I modified the code to support three different connection modes specified in the MMConfig.ini:
Auto Discovery: Behaves like the original TeensyMaestro, using Flex UDP discovery on the local LAN.
Fixed: Connects directly to a specified hostname or IPv4 address (with port).
Fixed + Failover: Tries the fixed hostname/IP first, and if that fails, falls back to Auto Discovery.This means that my TeensyMaestro can now connect to any FlexRadio across the Internet, independent of the PC. I just plug it into any network outlet with Internet access,and it connects directly to my radio. For many Flex owners with remote stations, this is a common use case.
MTP / SD Card Access
The only part I have not been able to get working reliably is MTP (to expose the SD card to Windows as a portable device). With the original precompiled HEX file, I sometimes saw the Teensy SD card appear as a drive in Windows, but after building my own firmware it never shows up. I would very much like to know exactly which MTP and SD libraries you used, which versions, and whether you had to apply any patches or shims to make it work reliably.
Main Question
Do you think it is acceptable that I use and extend your source code in this way for private use? If so, would you also be interested in a pull request or patch set with my changes, so this capability could be included in the official firmware? I currently keep my changes in a private GitHub repo, but I believe many users would benefit from being able to connect their TM directly to their FlexRadio without setting up double SoftEther servers or complex bridging workarounds.
Thank you again for all the work you have put into TeensyMaestro. I am very impressed with what it can do,and I would be happy to contribute back if you think this direction makes sense.
0 -
Hi, yes what you are doing is completely appropriate. I would be interested in adding your functionality. I currently use the SoftEther VPN to connect remotely and it has been very reliable. My bigger challenge is finding camping spots that have enough cell service to allow remote operation!
I am on a road trip this week with very limited cell service, so I may be delayed in any responses here. Once I get home, I will be adding 2BISQ functionality, so that will take precedence. Once that is working, I will have time to look at your code.
1 -
I tried to check Teensy ethernet shield functioning uploaded sketch
https://drive.google.com/file/d/1_dJw_sNbGwf28g2VU3UJabM_xejgI_7N/view?usp=sharing
But still no success.
Router is no determining Teensy board.
I would be grateful for any recommendations.
Regards, Oleg0 -
BILL K3CDY - Thank you.
I am using DIY cable 'cause at nearest electronic shop has no ribbon cable.
Simon, NV0E - thank you.
Lenght of DIY cable is 13 cm long
https://drive.google.com/file/d/1uYmVq5iVXrFdmQ82rSx_IFPPYIOL8wLe/view?usp=sharing
Regards, Oleg0 -
Hello Oleg
I would very strongly recommend you purchase an official ethernet kit for the Teensy. It will be a much more robust and reliable set up with a proven design. I think you are opening yourself up to problems with your setup.
They are fairly inexpensive and available on Amazon.
1 -
BILL K3CDY, thank you.
I ordered Ethernet Kit at market place. Hope i can get one at middle of october.
Amazon did not delivering to my location.
By the way - i am using another board of Teensy with other DIY cable to Magjack.
And have same result as previous attempt.
Regards, Oleg0 -
Len, KD0RC
Will TeensyMaestro work with an external Ethernet adapter? Like Wiznet W5500.
https://elektroweb.pl/pl/moduly-ethernet/1403-w5500-mini-modul-sieciowy-ethernet-rj45-spi-wiznet-33v.html?srsltid=AfmBOorpc39wXFVW-JvOz63i6kfXdZAjd97-oxz_JHlphqYX06FMlsPe
Regards, Oleg0 -
Hi Oleg,
That product you listed is a combination of Ethernet PHY chip (WS5500) and RJ45 connector.
The Teensy 4.1 won't work with that product because the Teensy 4.1 already has it's own Ethernet PHY chip (DP83825I) on the PCB. The ethernet connection on the Teensy 4.1 is designed to connect to just an RJ45 connector.
0 -
Hi Oleg,
Oh, I just realized you may have been considering connecting that device to the SPI bus. The current Teensy Maestro firmware would not support that.
I'm uncertain if the Teensy 4.1 would have the correct Arduino libraries to support a W5500 Ethernet PHY chip connected via SPI. Because the Teensy 4.1 already has an onboard PHY chip, I would think it's unlikely.
0 -
Simon, NV0E - thank you.
I tried checking the signals on the magjack pins with an oscilloscope. Pin 4 (Rx +) shows rectangular input signals, but pins 1 and 3 and Pin6 (RX -) show no signals.
Regards, Oleg0 -
Oleg,
not sure what pins you are refering to, look at the schematics
And make sure the magjack you are using is internally identical to whan used. Having signals on RX+ but not - makes me suspect the magjack, or mixed up pins :)
/Lasse
0 -
Hi Len,
I’ve been investigating why I sometimes get Out_Of_Band spots when switching global profiles in SmartSDR.
- SmartSDR restores the last band memory first (band + whatever freq/mode it had), and only then applies the global profile’s freq/mode. TeensyMaestro can therefore see a short-lived combination like mode=USB @ 5351 .606 before the final mode=CW @ 5352 .000 arrives. If OOB is evaluated in that transient, a false OOB spot can appear.
So, I suggest we don't do anything about it really. Now we know why.
0 -
Hi Neil -
I don't recall anything special except having to hit the refresh icon. I've attached screenshots of perhaps pertinent configuration settings.

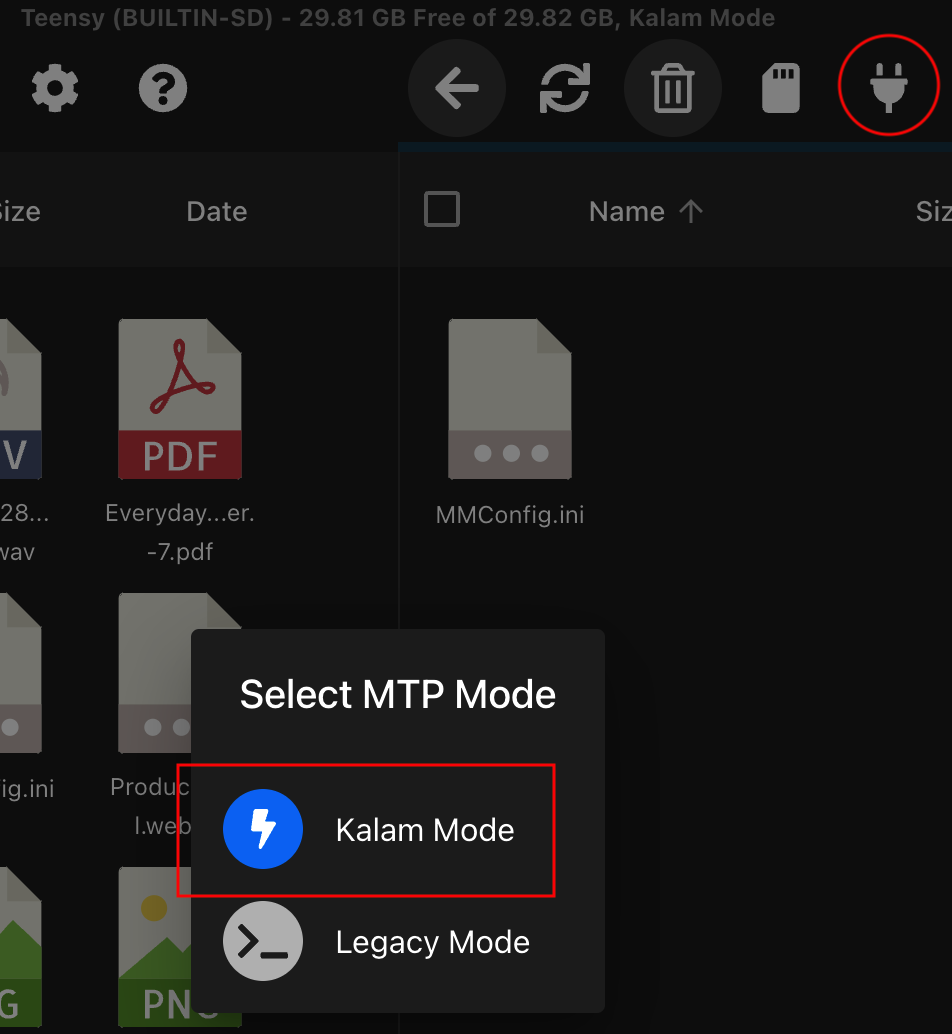
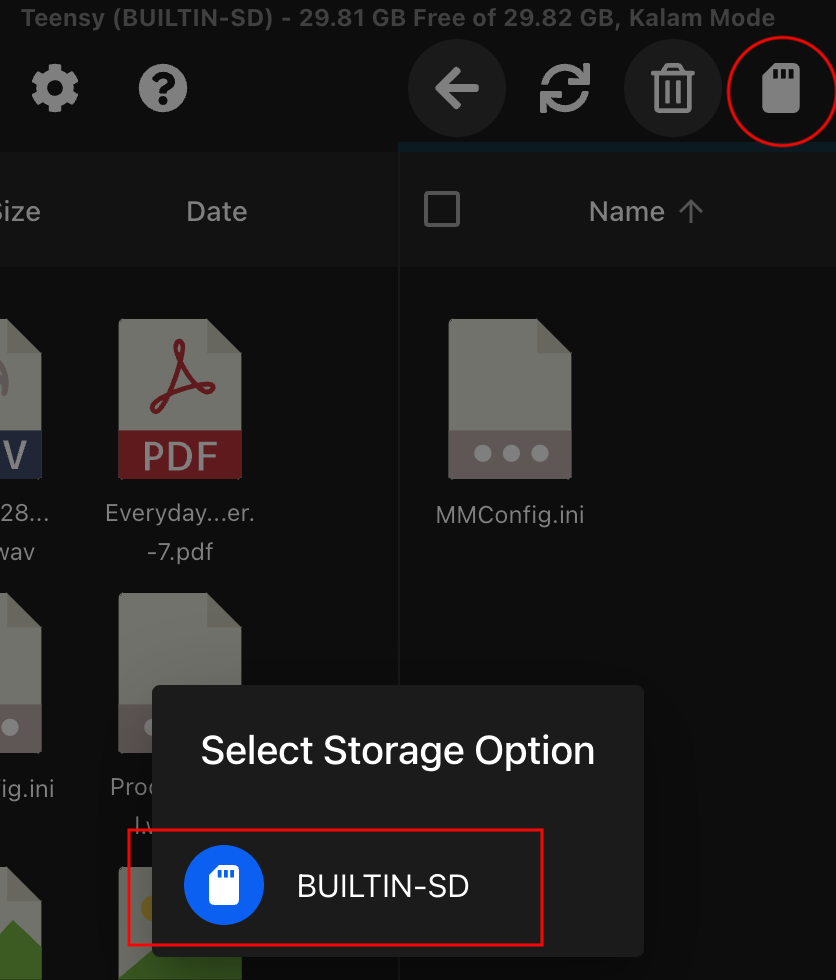
Hope this helps!
To modify the Teensy file, all I needed to do was drag it to the left pane, make my changes, and drag it back to the right pane.
0 -
Hi Bill,
Thanks very much. It looks like the usb mini to usb c adapter I was using was causing me issues. Jonathan who bought one of my kits reached out and suggested a fix* which has it working exactly as you suggested.
*The solution was to use a usb c to usb a cable.
73, Neil.
1 -
Glad it worked for you Neil! And indeed, I am using a USB-C to USB-A cable to the Teensy, which is connected to a powered USB 3.0 hub connected to my Mac M2 Studio, via USB-A.
1 -
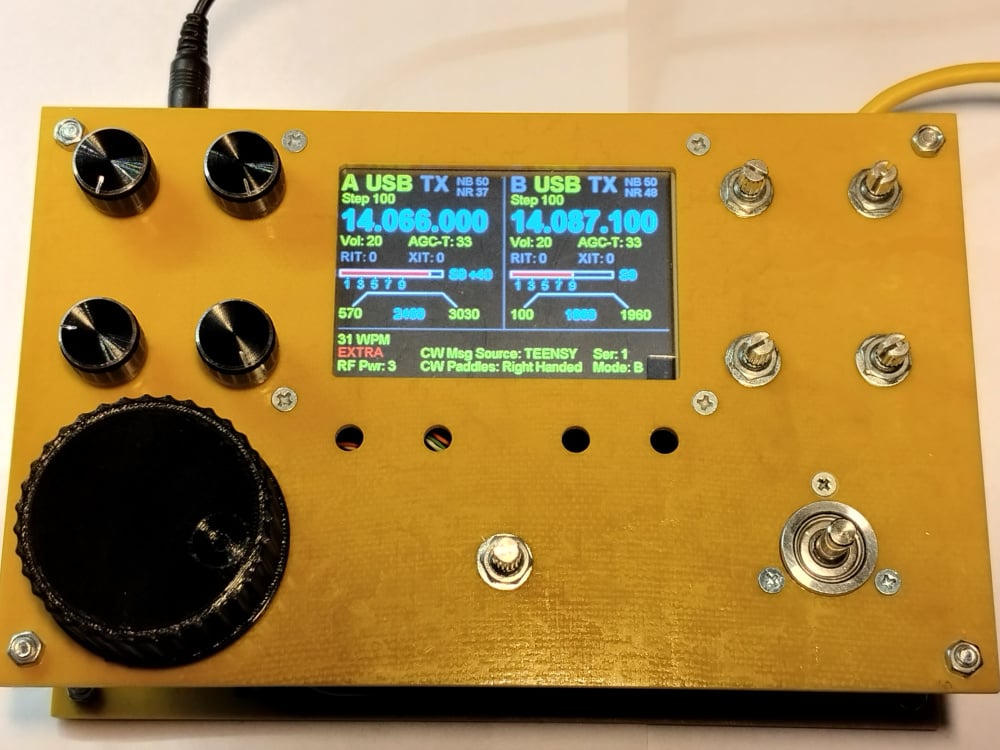
I want to take a moment to express my gratitude once again to everyone involved in this project. It has given me so much, not only the joy of building the hardware itself, but also the opportunity to expand and customize the software with features of my own. That ability to add functionality is truly inspiring and opens up endless possibilities. For me, it has become a really enjoyable side project and hobby alongside amateur radio.
I would also like to share a picture of my setup. In my case, I’ve made use of the often unused area for slice B to display a small clock widget. It shows the time in any time zone, synchronizes with an NTP server, and provides some additional useful information.
Many thanks again to Len, KD0RC, Simon, NV0E, and everyone else who has contributed their time and effort. Your hard work and dedication are very much appreciated.
3 -
Very cool Mikel! There have been a few build variants, but this is the first creative software variant - Well done!
1 -
Hi Len,
I’ve now built a fresh WinKeyer v2–compatible interface for TeensyMaestro (Teensy 4.1) and have been testing it with DXLog.net. Because it follows the WK2 protocol closely, it should also work with other loggers that speak WinKeyer 2.0+. (untested though…)
Highlights
- TCP/IP transport for WinKeyer (tested with DXLog).
Serial transport is planned and already scaffolded in the config (COM name, baud, 8N2, etc.). - Tight integration with the built-in keyer (no external timing engine). WPM changes apply deterministically at character boundaries, and the keyer does the actual timing.
- Unified RX FIFO (ASCII + buffered commands in the same queue, interpreted at dequeue): deterministic ordering, fewer race conditions, simpler mental model.
- Buffered speed (<1C>) behaves like K1EL/K3NG: armed, then applied at the next character boundary.
We also restore the baseline WPM on disconnect (whatever WPM was present when the host opened the session). - Local dial → host sync via WK “speed ****” status bytes, with idle-only notifications to avoid ping-pong with the host.
- Implemented commands (short list):
Admin Open/Close, Set Speed<02>, Speed **** Limits<05>, Clear Buffer<0A>, Request Status<15>, buffered PTT/WAIT/Speed (<18>/<1A>/<1C>).
Set Weighting<03>is accepted and stored (25–75) for compatibility; timing adjustment is not enabled yet.
Practical notes
- RAM1 is kept tight; no parallel queues or special out-of-band flags.
- Config is INI-driven (TCP port, enable/disable, placeholders for COM).
- The current implementation lives in my dev branch (quite a lot has changed there… ). If there’s interest, I can post a ready-to-try HEX in my repo so you can test without merging code.
Totally understand if this isn’t something you want to pull into TeensyMaestro proper. If you’re curious, feel free to cherry-pick anything useful from my dev branch. And if you have any questions or would like me to prep a test build, just drop me an email.
0 - TCP/IP transport for WinKeyer (tested with DXLog).
-
Hi Mikel, Wow, you have been busy! I don't think I will pull this into my TeensyMaestro, but you are welcome to publish this on your site.
0 -
TeensyMaestro V2.002 is now available on GitHub:
*****************************V 2.002 * ***************************
Added 2BSIQ mode functionality to HW V2 only (Thanks to Ron, WV4P and Levi, K6JO for the idea).
Added ability to cancel a CW message by pressing any button.
Fixed issue where stopping a CW message occasionally sends a dot, dash or locks TX on.
Fixed issue where V2 HW does not always turn off the TFT screen at shutdown.
Removed code that automatically sets CW Delay to 30 when using Ethernet to key the rig.
The original purpose was to get rid of truncated code elements when operating over a poor
internet path.  Thanks to Bill, K3CDY for pointing out that this is not really necessary or desirable.
The big news this release is the inclusion of 2BSIQ (2 Band Synchronized Interleaved QSOs) mode. You have to be a hard-core contester with a faster brain than I have to use this one…
If you have a TeensyMaestro using the NV0E PC board set, you would attach the left and right footswitches to ACC8 and ACC9. If you are building this without the benefit of the PC board, use an Adafruit MCP23017 I/O expander board, pins B6 and B7 (see schematic, below). Link to the I/O expander:
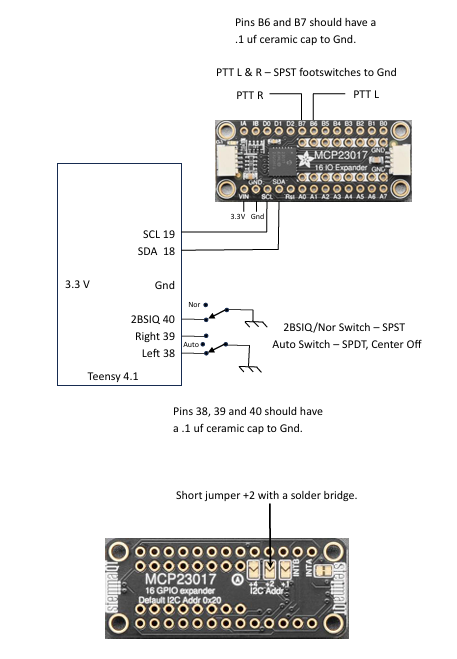
In either case connect the switches directly to pins 38, 39 and 40 on the Teensy board as shown above.
If you don't want 2BSIQ mode but do want a footswitch for slice A and a footswitch for slice B, just connect them as described above. For V1 TeensyMaestro hardware, connect the footswitches from ground to MUX 1 pins C6 and C7. Note that the 2BSIQ mode only works with HW version 2.
The TeensyMaestro will work with as much or as little of the circuit as you want to include. So if you just want this foot switcher, build just the circuit shown above. You can add switches and encoders at any time. If you go so far as to add the TFT display, I would recommend using the PC boards.
So how in the world did I come up with this? I met Ron, WV4P at the Flex banquet at Hamvention this year and he asked if I could build him a 2 footswitch arrangement that would provide PTT to slice A on one switch and slice B on the other such that changing TX slice would be automatic. I told him that I could, and designed it into the TeensyMaestro. Ron and his contest crew tried it and liked it (yay!).
A little later, Levi, K6JO called and asked about adding 2BSIQ capabilities. It took a while for me to get my head around what this entails, but Levi persevered in his explanations, and I eventually got it. I added this functionality and gave a Zoom demo to Ron and Levi once I had the code written. I had it almost right, and with a couple of minor tweaks, here we are - ready to use.
I haven't updated the User Manual yet, but I will in the next few days. I won't go into 2BSIQ operation except to describe that the footswitches do based on the position of the 2BSIQ/Nor and Auto/L/R switches.
If 2BSIQ doesn't interest you at all, you should still upgrade to V2.002 to get the other functions and bug fixes mentioned above.
1 -
Hi Len,
I've cobbled together a UK bandplan config for TeensyMaestro. I've uploaded the changed parts to a gist incase anyone else is interested (updates welcome from any UK hams as admittedly I've not put too effort into the different licence classes).
I notice you've got bands above 6m(/2m) in your plan so I assume that the TeensyMaestro is quite happy working with transverter setups. Would it be possible to make band detection dynamic from the bandplan section? I operate on QO-100 and have transverter configs for 12cm and 3cm (called QOTX and QORX - but I could rename). I did add these to my bandplan (obligatory blog post) but they are not picked up by the TeensyMaestro.
Oh, setting the VFO manually to 2400.145.000 results in a display of 2147.483.647 which seems a bit 'integer-overflow-y'.
0 -
Hi Neil, thanks for the UK band plan. I am sure others in your part of the world will appreciate it.
Yes, the TeensyMaestro works with transverters, and even changes font size to accommodate the longer character strings.
I was able to get most of the VHF and up frequencies to display properly, but once they get high enough, I lose floating point precision. I don't know if that is because of the GNU C++ compiler, limits of the Teensy 4.1 or just me not understanding something.
Not sure what you mean by automatic band detection. Maybe you could elaborate on that point.
0 -
I had to look up 33cm as we don’t have that allocation here. Recognised the frequency though.
My comment about automatic band selection was maybe me making an assumption that this wasn’t a feature, purely based on the precision issue.
What I was meaning is that TeensyMaestro should present additional (txvr) bands based on the config provided (and allowing me to switch to those bands). I expect that is supported either via the file or from the radio itself but I’m not seeing it.0 -
My apologies… The HW2 version of 2.002 had an error. I fixed and recompiled, so if you loaded 2.002 HW2, please download it again.
The only thing affected was the 2BSIQ function.
It looks like quite a few people bought the board sets from Bill, K9HZ. If you bought one (or did it yourself) and have it together, I'd love to hear how it is working for you.
0 -
Greetings.
At this moment i had compile TeensyMaestro in temporary box.
Len, i wonder about buttons marked red arrows - were this buttons connected on PCB ?
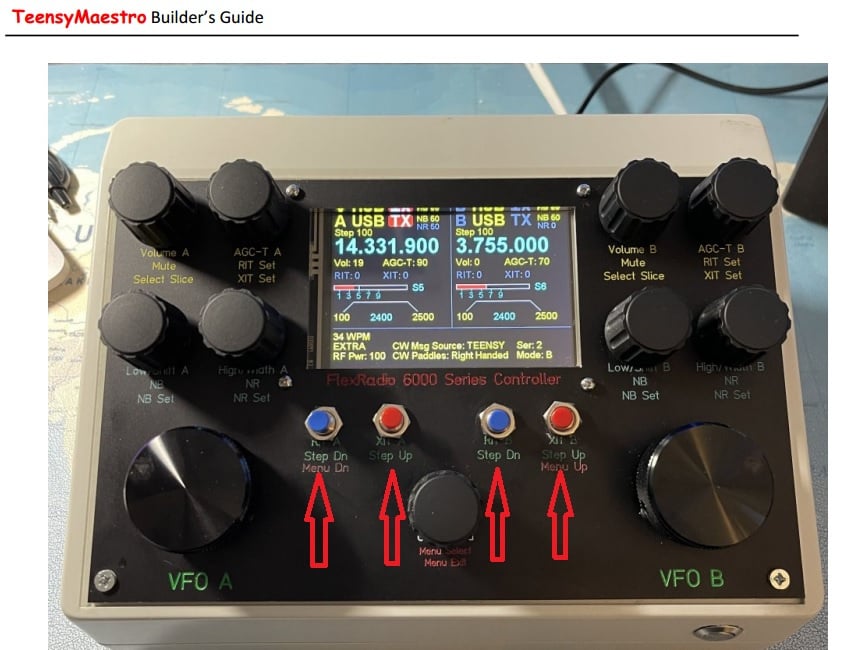
Does it J1 connector?
I am in use this circuit diagramThank you.
regards, Oleg
1 -
Hi Oleg, It looks like you are using hardware version 1, so you need to use the V1 schematic:
They would connect to pins 9, 10, 11 and 12 of MUX 0.
Congratulations on a very nice looking TeensyMaestro!
1 -
Len, thank you.
I have this version of PCB - does HW version is v.2 ?
I had compare schematic diagram V2 and PCB V2.0 and found that they are equal.
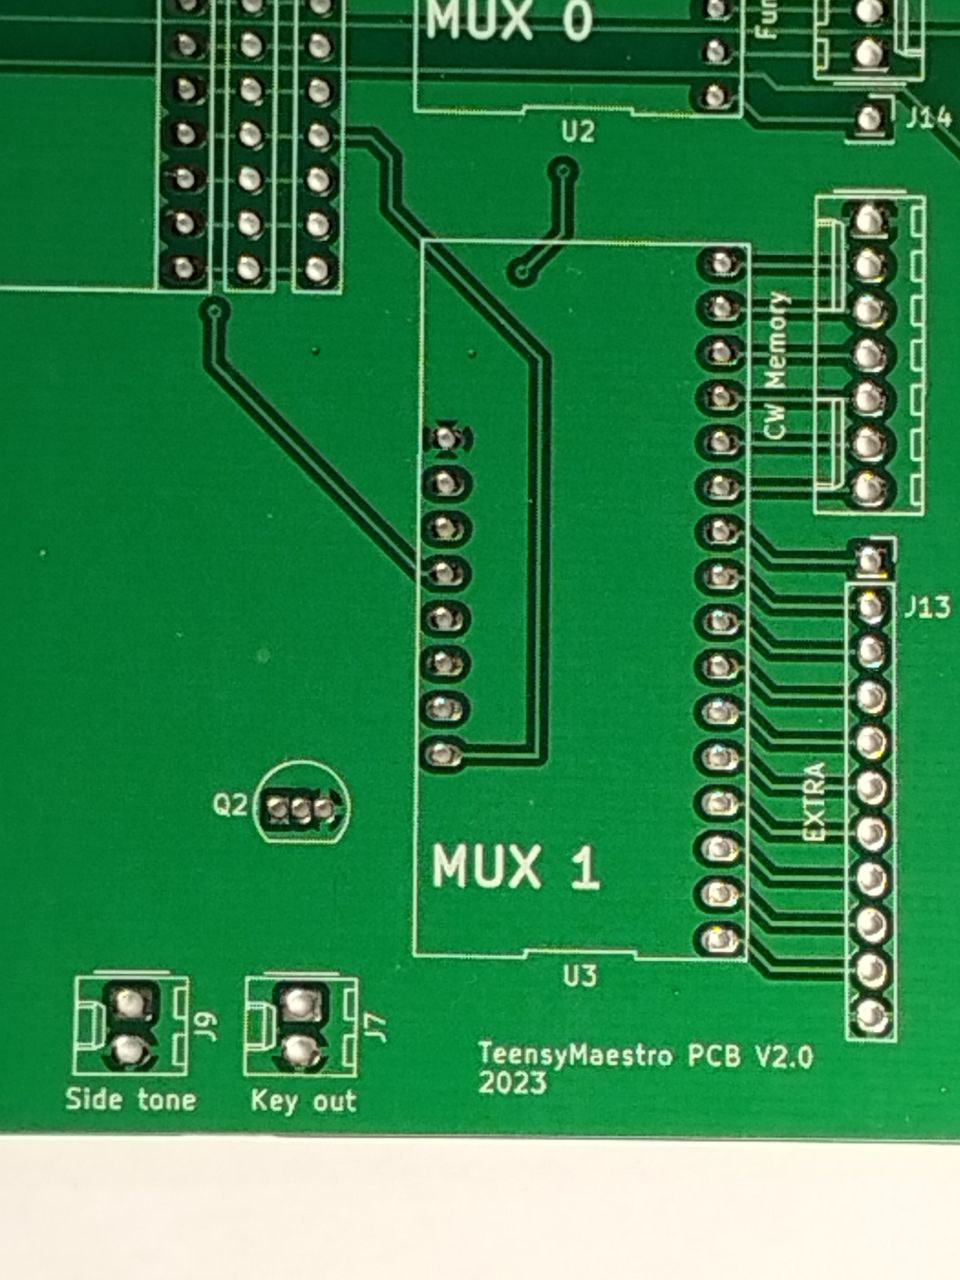
May be i need to substitute SW to version 2.0 ?
Regards,
Oleg
0


Leave a Comment
Categories
- All Categories
- 390 Community Topics
- 2.2K New Ideas
- 661 The Flea Market
- 8.4K Software
- 157 SmartSDR+
- 6.5K SmartSDR for Windows
- 186 SmartSDR for Maestro and M models
- 439 SmartSDR for Mac
- 275 SmartSDR for iOS
- 265 SmartSDR CAT
- 204 DAX
- 386 SmartSDR API
- 9.4K Radios and Accessories
- 54 Aurora
- 297 FLEX-8000 Signature Series
- 7.2K FLEX-6000 Signature Series
- 971 Maestro
- 58 FlexControl
- 867 FLEX Series (Legacy) Radios
- 945 Genius Products
- 472 Power Genius XL Amplifier
- 347 Tuner Genius XL
- 126 Antenna Genius
- 308 Shack Infrastructure
- 216 Networking
- 468 Remote Operation (SmartLink)
- 142 Contesting
- 814 Peripherals & Station Integration
- 144 Amateur Radio Interests
- 1.1K Third-Party Software