SmartSDR v4.1.5 | SmartSDR v4.1.5 Release Notes
SmartSDR v3.10.15 | SmartSDR v3.10.15 Release Notes
The latest 4O3A Genius Product Software:
The latest 4O3A Genius Product Software and Firmware
If you are needing assistance with FlexRadio products, please refer to the product documentation or check the Help Center for known solutions. Need technical support from FlexRadio? It's as simple as creating a HelpDesk ticket.
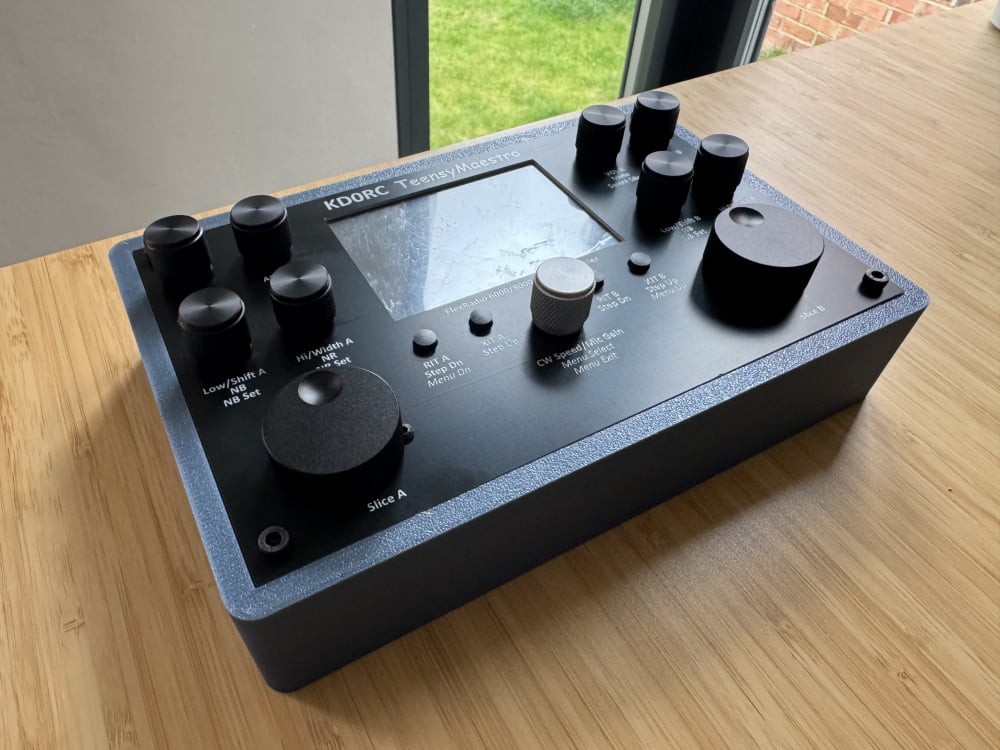
TeensyMaestro
Comments
-
Len, Simon - I'm interested in piping the TeensyMaestro's internal CW sidetone audio to a rear-panel connection so I can plug it into my desktop audio interface. I'm hoping the internal TeensyMaestro sidetone signal chain may offer reduced latency, compared to my existing setup which has several software hops before it hits my headphones.
Currently my signal chain is: CW Key → Halikey USB Interface → USB hub → Mac → SmartSDR → USB Audio Interface → Headphones.
My proposed signal chain would be: CW Key → Teensy Maestro Key input → TeensyMaestro Audio Out → Audio Interface (zero latency) → Headphones.
Electrically, what kind of signal is sent to the internal speaker (line level)? Is there a way to control the sidetone audio level in the TeensyMaestro software? What's the current CW sidetone latency in the TeensyMaestro (i.e., time from keyer paddle press to internal speaker audio generation)?
I'm thinking I would wire up a switching audio jack that disconnects the internal speaker when a plug is inserted. My audio interface can handle anything from line level to mic level.
0 -
Hi Bill, wow… Yes, I can see some latency there! The TeensyMaestro sidetone is just a GPIO pin toggled at the desired frequency. So negative peaks are at 0 V and positive peaks are at 3.3 V. I don't know how that aligns with the audio world in terms of line level to your audio interface. I would start with a 10K p.ot across the sidetone output with the wiper to your interface through a 1 or 10 uf coupling capacitor. I think that will allow you to set the volume reasonably well. I am not sure if you need a headphone amp or not. We can chat more about that over lunch on Wednesday.
While I haven't measured the latency from key close to sidetone output, I would guess that it is under 1 millisecond. Way less than perceptible by the human ear.
I really need to put a controllable amp on the output along with a low pass filter to make the tone more pleasant.
I found a chart that might suggest that we are in the ballpark:

Using the 10K variable resistor (can't say p.o.t here…), you should be able to get a good audio level out.
1 -
Thanks Len!
I'm guessing since you're simply toggling a GPIO digital output, you're essentially generating a square wave (which can sound pretty unpleasant). Adding a true audio output module to the TM would make this a CW monster.
Perhaps something to look forward to in your next revision!
0 -
Know there are a few US based OPs looking to provide boards over on the groups.io but thought I'd cross post this in here as well.
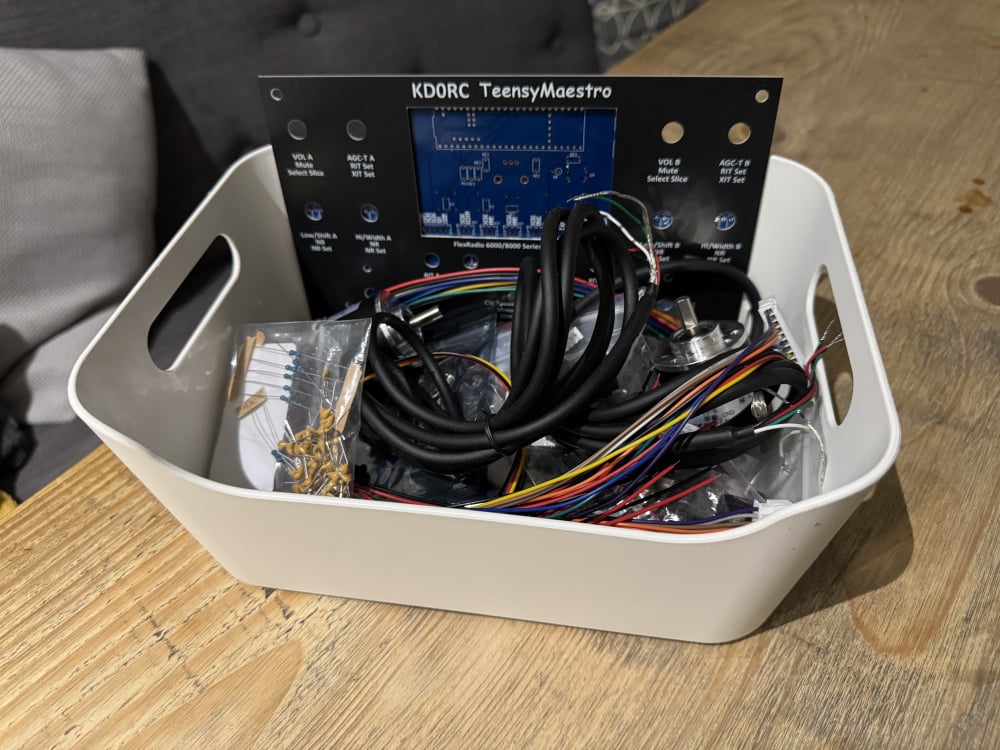
I've been chatting with Simon and Len about making a kit available via my shop.
This is very much in the exploratory stage and I've started putting together sources over this side of "the pond" for the components as well as ordering an (initially) small batch of PCBs. My aim is to provide a kit version of this for people to assemble themselves. I'd also design and make include a 3D printed case (which will also be freely available for download).
In order to gauge how much interest there would be I've added a form here. I won't hold you to a purchase (especially since I can't provide a price yet!) but if there is enough interest I'll start ordering components.
Many thanks to Simon and Len for all their work.
0 -
Hi Neil, I notice on your form that you don't mention the front panel, but I think that you intend to include the PC board as well as the front panel, correct?
You might want to reach out to Bill, K9HZ. He won't be providing kits, but will have boards for sale at a very reasonable price.
0 -
Hi Len,
In short - yes! I'll update that page to be clearer. The small batch of PCBs I've ordered include the front panel.
Slightly longer answer; if I can figure out a nice way to include the front panel into my custom case then it'll likely help reduce the cost a little. My only concerns are that it'll add complexity to the print (nozzle size mainly) and frankly that the 3D printed version may just not look good.
I'll reach out to Bill - thanks for the tip!
0 -
Hi Everyone,
We just discovered there was an error in the BOM in the Github. The BOM contained a Digikey URL to a 'Teensy 4.1 without ethernet'. It turns out this doesn't mean without ethernet RJ45 and cable, but instead without ethernet chip on the Teensy board. The BOM has been corrected and I've listed several sources for the correct Teensy. Apologies for the incorrect link.
73,
Simon, NV0E.
1 -
TeensyMaestro V2.001 is now available on GitHub:
*****************************V 2.001 * ***************************
Fixed bug where HW V2 display is not turned off when power button is used to shut it off.
Fixed bug where second slice cannot be started from TeensyMaestro if RX ant is not ANT1.
Simon, NV0E fixed Flex Discovery to properly use the VITA header instead of arbitrary payload data
   to identify a Flex discovery UDP packet.
Added startup beep so you know that you actually hit the power button (HW V2 screen is a bit slow to start).
I wanted to get this set of minor bug fixes out before tackling the next update request (2BSIQ contesting suggested by Ron, WV4P and Levi, K6JO).
Note that there are now two zip files containing the .hex file to be loaded into the Teensy board.
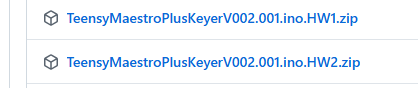
If you are using the new PC board with the ST7796S display, use the file ending in HW2. If you built the original point-to-point wired version with the HX8357 display, use the file ending in HW1.
2 -
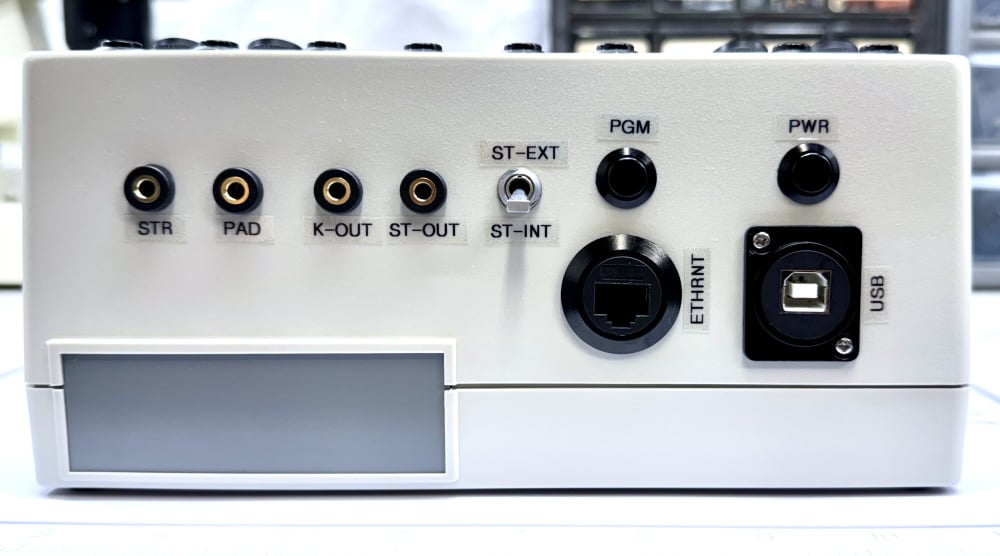
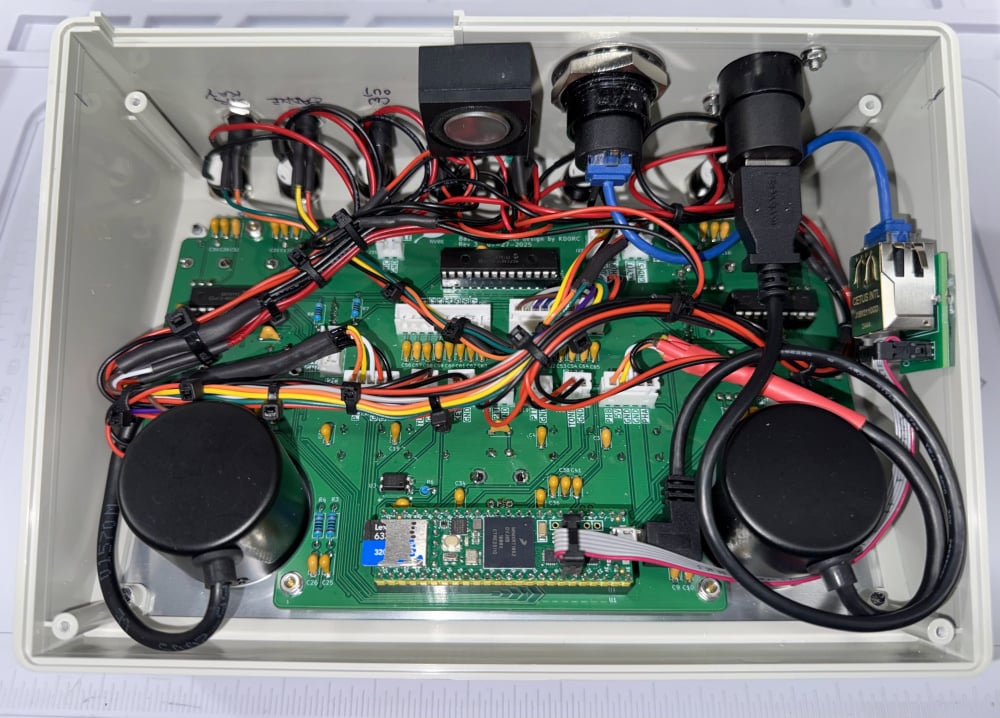
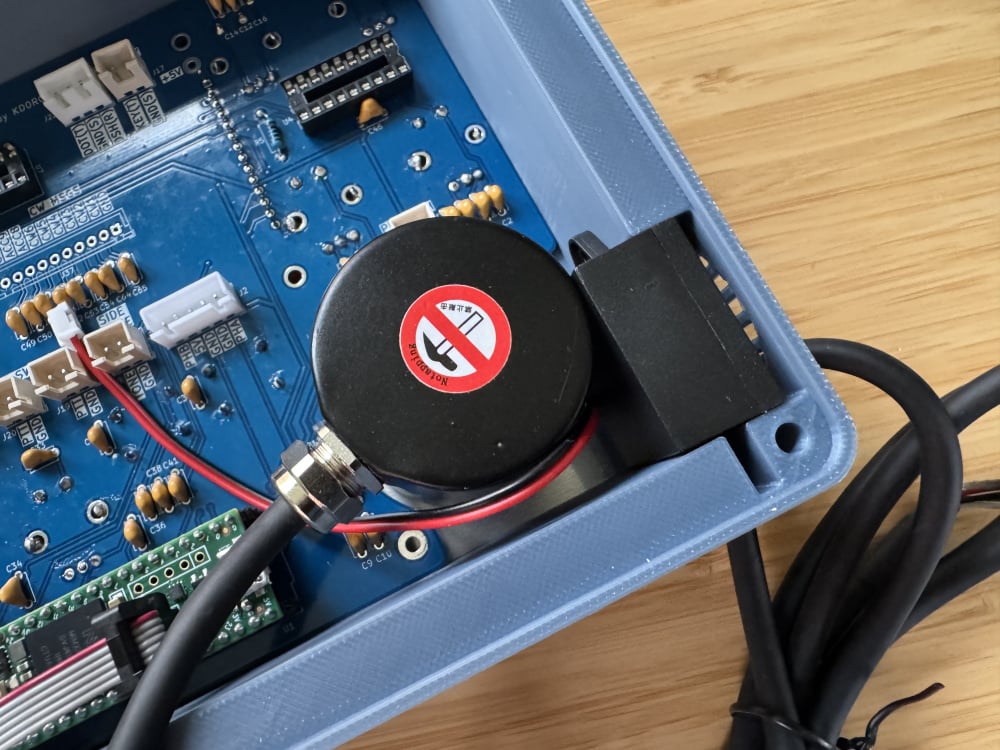
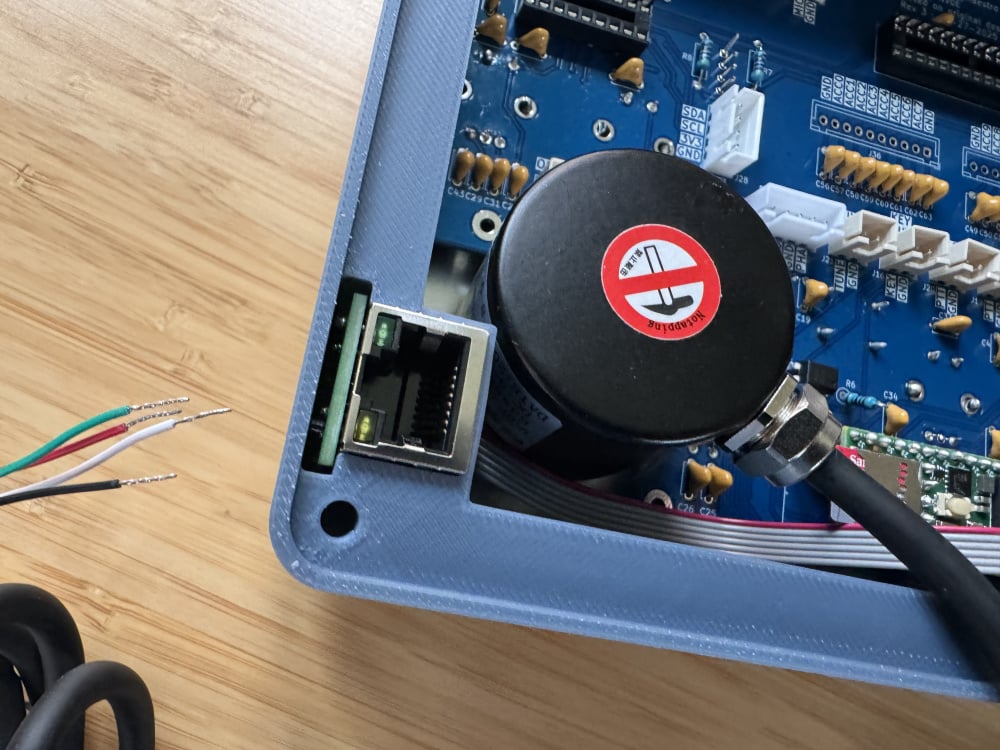
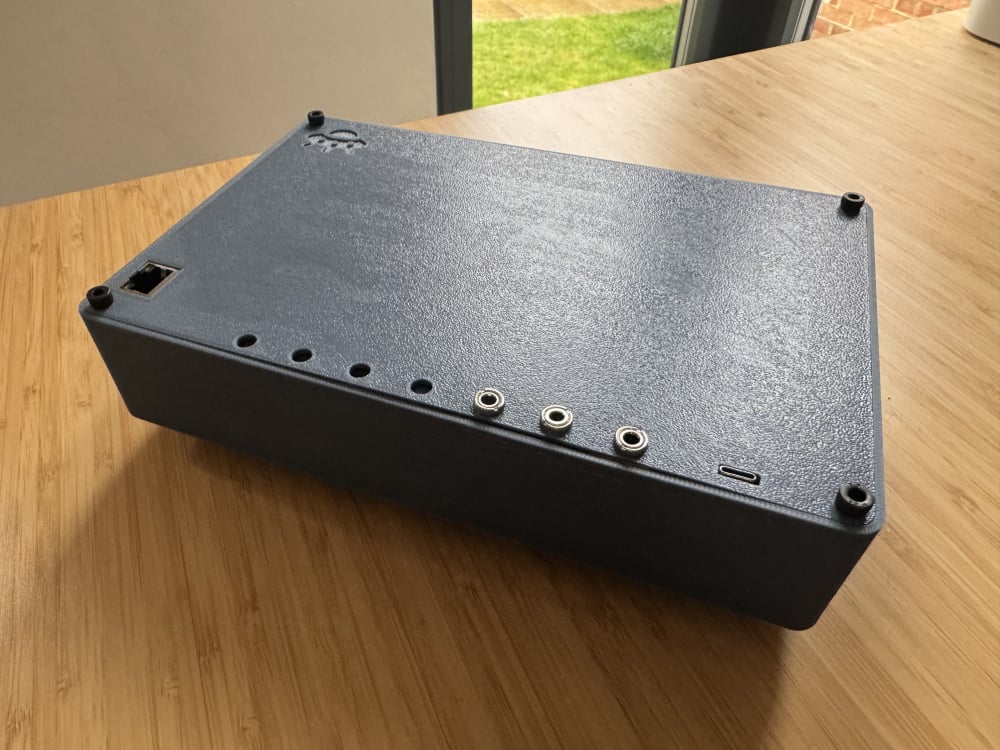
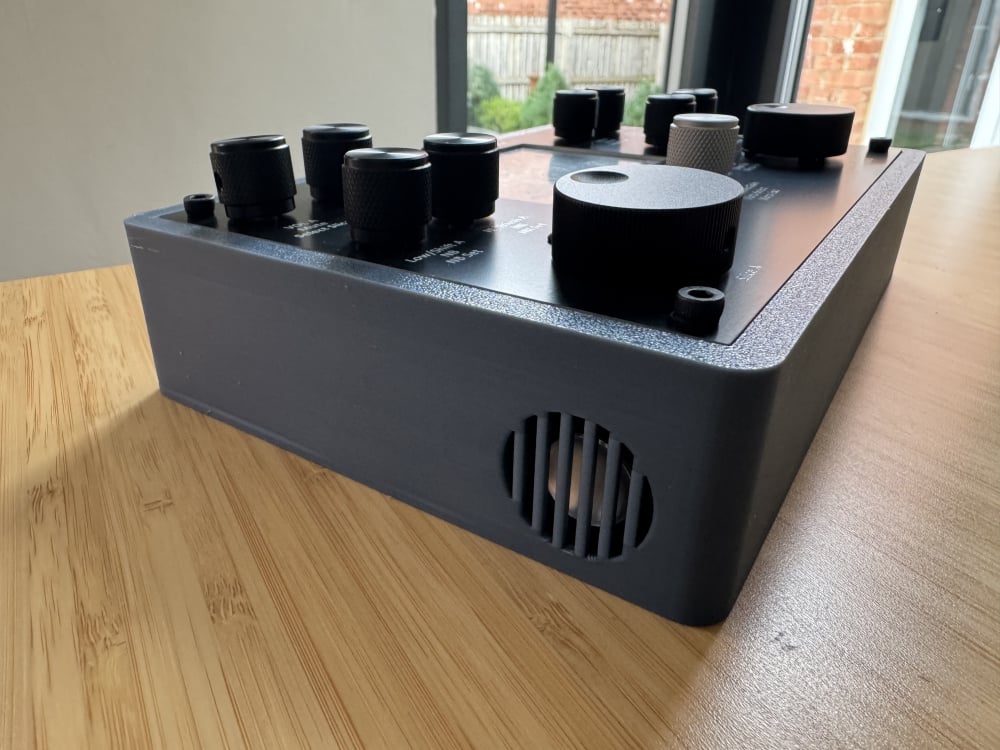
I just finished building my new TeensyMaestro and it is working beautifully. Many thank to Len (KD0RC) and Simon (NV0E) for their excellent software and hardware design. Frankly the toughest part was accurate hole drilling for the buttons (I think I need a new set of drill bits).
I added a switch to route the CW sidetone to either the internal speaker or rear jack. The intent is to use the TeensyMaestro's low latency sidetone as an input to my desktop mixer so I can improve over my MacSmartSDR's somewhat greater latency. Right now the external audio out is way too hot, so I'm anxiously awaiting Len's addition of a controllable audio amplifier to his design.
For enclosure labels, I used a Brother P-Touch labeler with black-on-clear .23" tape, and I think it came out pretty well.
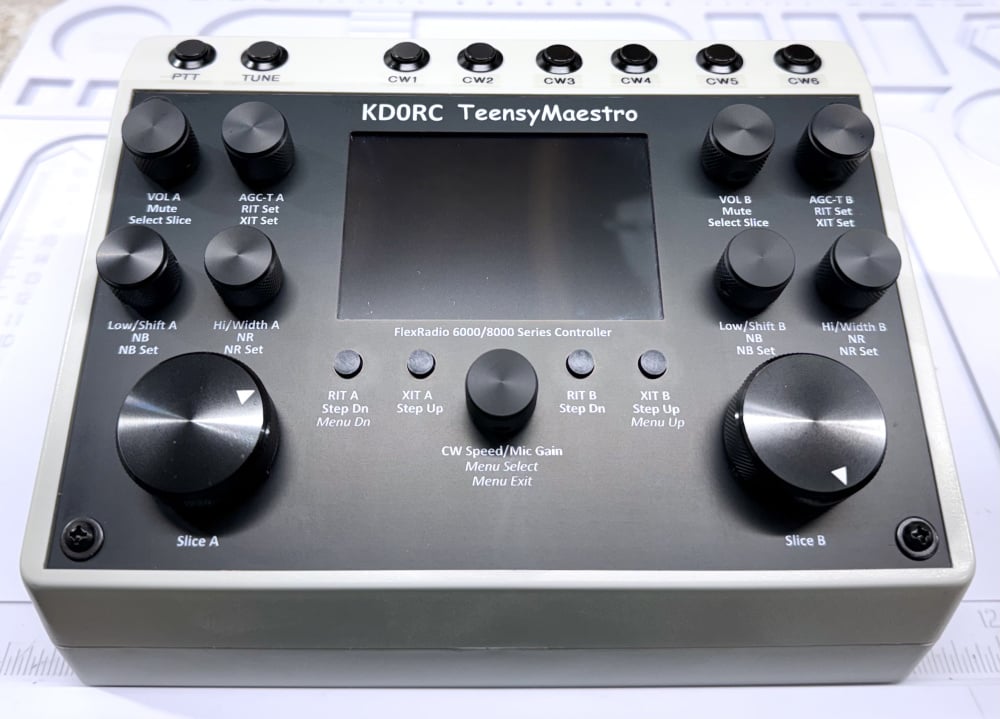
This was VERY fun. 😁
3 -
Wow, nicely done Bill! It looks great inside and out!
1 -
That looks really good, Bill! The low profile look of your CW Message, PTT and Tune buttons is excellent.
1 -
I just tested HW version 1 all the way back to TeensyMaestro V 1.40 and it behaves properly with SmartSDR 3.10.10. HW version 2 needs to be at TeensyMaestro V 2.001 or higher, regardless of SmartSDR version.
If anyone has a HW version 1 TM and is having any problems with SmartSDR 3.10.10, please let me know.
0 -
Looking great Bill, I'm definitely 'borrowing' some ideas - as Simon said, those buttons are vy nice.
1 -
I've yet to update my page here (edit: updated) but here are a few pictures of the case I've been designing.
The intention is to make this mounted and not for it to sit flat. I'll also be looking at incorporating some of the additional features accessed via buttons (yep, thats button envy).
 0
0 -
Bill, K9HZ is also making TeensyMaestro boards available. If you want a set (PC board and front panel), you can get more info here:
Bill is looking for a show of interest to gauge how many boards to order.
0 -
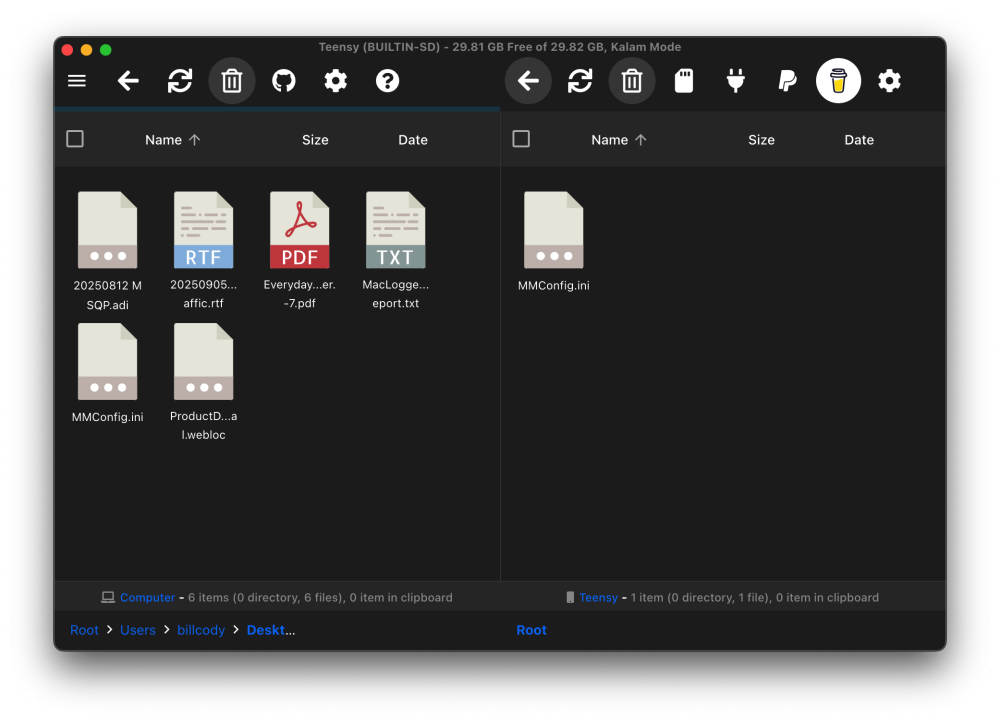
For those of you using Macs (I'm one of them), and building the TeensyMaestro (TM), you'll soon discover that the SD card (which contains the MMConfig.ini file) is not visible in macOS. Modifying the file would normally require a Windows system, a Windows VM, or physically putting the SD card into a reader connected to your Mac.
For Mac users, this is a pain. Until now.
There is a very nice open source app for macOS called OpenMTP, which offers simple drag-and-drop file transfer between the TM and your macOS file system. Below is a screenshot of OpenMTP showing my macOS desktop in the left pane, and the SD card in the Teensy on the right.
To modify the MMConfig file, just drag it to the left pane, and it automagically appears on your desktop. Edit that file using TextEdit, save, and drag it back to the right pane. Easy-peasy.
OpenMTP is available free here:
Enjoy!😀
3 -
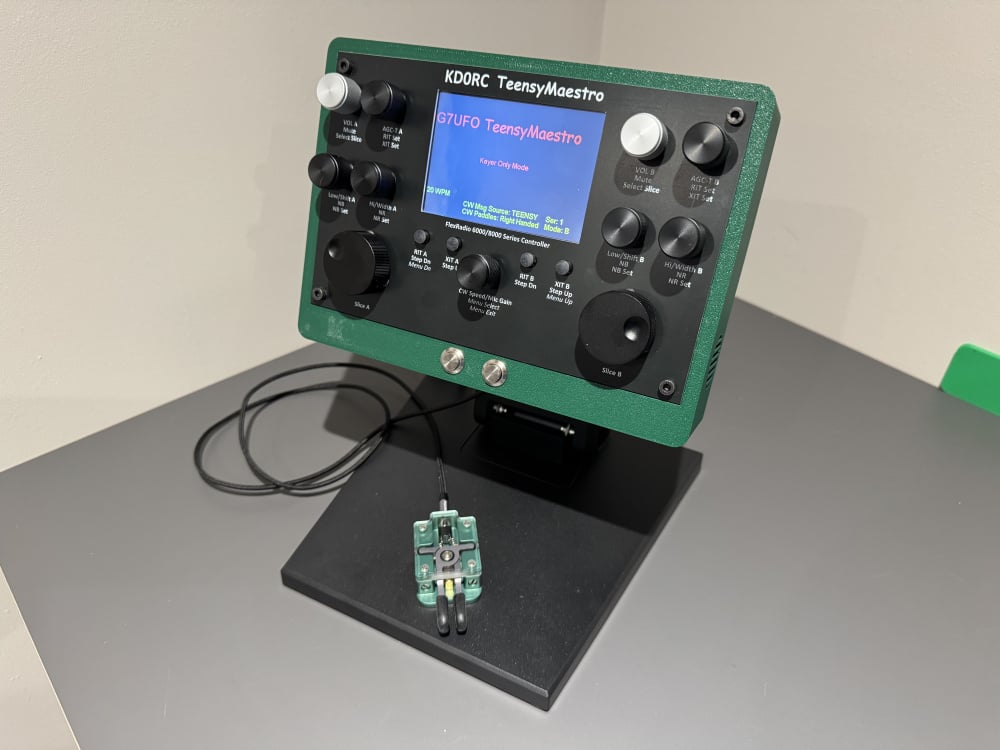
Took a bit longer than expected to get this together (and better pictures will be taken soon) but I'm now accepting orders for a kit over on my shop.
All components are in hand and would just need to be counted and boxed up. There is a limited number in this run but if there is demand I'll be able to make additional kits available.
The cases are printed to order so I can ensure the correct number of connector holes. They will be printed in heat/UV resistant PETG and default to grey (other colours are available - just ask).
The stand I have mine mounted on isn't part of the kit as it is heavy and can be picked up locally. The rear panel uses a VESA mount connection so you could even attach to a monitor arm!
 1
1 -
First, thank you to Len, @KD0RC, and Simon, @NV0E, and everyone involved in TeensyMaestro. I sourced all parts myself before Neil, @G7UFO, offered his kit; otherwise I would have gone that route. The build works well and I am slowly getting used to the workflow. I have actually read the manual carefully, yet I still have a few questions. If this is not the right thread for support,please point me to the correct place.
Environment
- Radio: Flex-6600
- SmartSDR: v3.10.10
- TeensyMaestro: self-built; SD card accessible over USB; config in MMConfig.ini
- SmartSDR “Spots” is enabled; other software can display spots on the panadapter
- TeensyMaestro shows Out-of-Band(OOB) spots on the panadapter, so the publish path to the radio is alive
1) Static “bandplan” spots from MMConfig.ini do not appear (only OOB does)
My goal is to place permanent band plan markers on the panadapter. Even with a minimal stock config,nothing shows except OOB. For example:
ShowSpots:Yes ; May be necessary to turn off spots under high network latency conditionsSpot:14.329 Sunday_Flex_NetVerified so far: SmartSDR “Spots” is ON; TeensyMaestro can publish OOB spots (they appear); other apps can publish spots to the radio; returning to the stock configuration lines above does not change behavior.
2) “Frequency privileges by band and license class” on 60 m meaning of 60A, 60B, etc.
I want correct OOB behavior on 60 m for CEPT Region 1. Common EU allocation is 5351.5–5366.5 kHz.
License Class 1: CEPT ; Full national licenseLicense Class 2: Entry ; Swedish entry-level certificate (national, limited bands)License Class 3: OBSOLETE-3 ; Not used, all privileges set to 0License Class 4: OBSOLETE-4 ; Not used, all privileges set to 0License Class 5: OBSOLETE-5 ; Not used, all privileges set to 0MyLicense: CEPT ; Must match one of the 5 license class names above
In my matrix I set:60 CW: 5351500, 5366500, 0, 0, 0, 0, 0, 0, 0, 0Also tried:
60A CW: 5351500, 5366500, 0, 0, 0, 0, 0, 0, 0, 0I still get an OOB warning at 5.352MHz, which is inside that range. The manual references 60A, 60B, etc. I have tried those too. What do these suffixes actually select (country profiles, channelized vs continuous models, something else)? What is the correct way to express the EU continuous 15 kHz segment so TM does not flag 5352 kHz as OOB?
3) Contest logger use of TeensyMaestro’s keyer, WinKeyer interface
Can common contest loggers, e.g.,DXLog.net, use TeensyMaestro’s built-in keyer directly (WinKeyer-compatible over USB CDC), or is there another supported method? If not, I guess i must keep my old external keyer and feed TM as a straight key input, but I would prefer WinKeyer compatibility if available.
—
Thanks in advance for any pointers,especially on static Spot: publishing to the radio and the exact meaning of 60A/60B in the 60 m configuration.
0 -
Follow-up
After my earlier post I have done some more digging into points (1) and (2). Here is what I have found so far:
1) Static “bandplan” spots
• I followed both the original MMConfig.ini on GitHub (https://github.com/KD0RC/Teensy-Maestro-for-Flex-6000-radios/blob/master/MMConfig.ini) and the TeensyMaestro User Manual (8/7/2025).
• The manual says: “Spotfrequency in MHz and text to display as a permanent spot. Separate frequency and text with a space. Text may not have any spaces (underscore is a good substitute). Useful to mark nets, repeaters or even band edges.”
• Example given:
Spot: 14.329 Sunday_Flex_Net• But in the current source code,the parser does not recognize this format. Instead it requireskey=value pairs:
SPOT: FREQ=14.329 NAME=Sunday_Flex_Net• Using the manual’s example →no static spots appear (only OOB).
• Using the parser’s expected syntax → static spots do appear correctly on the panadapter.
• Additional detail: spot text is limited to 16characters max, otherwise it is truncated in SmartSDR.
So at the moment, the manual and the shipped sample ini are inconsistent with the actual parser logic.2) 60 m privileges (Region 1 continuous segment)
• I confirmed that TM does not actually parse
60 CWat all, only60A CW:, 60B CW:, … 60E CW• OOB warnings persist, but only when i change my global profile on SmartSDR to 60m CW, it appears once at start, even I'm well inside the band limits. After that no more faulty OOB warnings. I can live with that, it's not a big issue.
Cheers! 😀
0 -
Hi, Yes this is the place for questions and discussion about the TeensyMaestro.
Firstly, congratulations on your successful build! I hope you enjoy yours as much as I have enjoyed mine.
I recently changed the spots function to work more like my FlexRepeaterSpots utility. The new format for spots is:
Spot: freq=14.329 name=Sunday_FlexNet
You can find the correctly formatted MMConfig.ini file in the latest release. I forgot, and left the old one on the main page. I will remove that one right away. Sorry for the confusion!
The out of band for 60 meters requires that your TX Filter Hi Cut be set to 2800 Hz. I don't know if that is just a US requirement or if it applies in Sweden. Please let me know and I will take a look at that.
Sorry, no WinKeyer interface.
One other note, you might want to look at FlexRepeaterSpots in my GitHub. They have some additional features not found in the TeensyMaestro version.
1 -
I fixed the manual and re-posted to GitHub. I will have to look at the 60 meter OOB. I use 60 so infrequently, that I probably wouldn't notice an issue 🙂.
0 -
Thanks Len! Great work. Yeah… please see if you can avoid the OOB on 60m CW when changing to a different global profile in SmartSDR. Thanks for all your good work!
0 -
Greetings to all.
I'm building a version 1 project.
Adafruit display.
https://drive.google.com/file/d/1EmQY8qq-bUxh_ZXYhEFC9eiYc47ns9j5/view?usp=sharing
As a result, I get the following screens.
https://drive.google.com/file/d/1ep2NZettwi1DN1vccAmIUDzoqUUrHZiA/view?usp=sharing
https://drive.google.com/file/d/1Dz9VlYXtT4ugqgzOElk44Wx3J6UpaZSz/view?usp=sharing
I use a LAN adapter according to the following diagram.
https://drive.google.com/file/d/18sCjlTKwlG1PBZnMiM2PnD9_8QSznjYt/view?usp=sharing
How can I fix this?
Thank you.
regards, Oleg0 -
Hi Oleg, this indicates that your Teensy board is not connected to your radio. Things to check:
Do you have a Teensy with ethernet? They sell a version with no Ethernet and it will not work in this application.
Is the Ethernet header plugged into the Teensy board and into the connector correctly? It is easy to be off by a row or column of pins.
Is the Ethernet plugged into the same LAN segment as your radio?
Does your router have DHCP enabled? If you are using static IP addressing, you might need to set the appropriate IP address in the MMConfig.ini file.
0 -
Hi Len.
Thank you for answer.
The Ethernet header at the Teensy board i connected to LAN connector exactly as marked.
LAN connector is
https://drive.google.com/file/d/18sCjlTKwlG1PBZnMiM2PnD9_8QSznjYt/view?usp=sharing
BOARD / LAN connector
+T / +T
-T / -T
+R / +R
-R / -R
==============================
At MMConfig file i have this rows
; These TCP/IP items are only used if there is no DHCP server (Field Day mode)
TeensyIP: 192.168.11.145
TeensyGateway: 192.168.11.1
TeensyMask: 255.255.255.0
Radio is locating same segment as TeensyMaestro.
Router has DHCP enabled and address segment for DHCP is over 192.168.11.100
But router can not determine ethernet mac address of adapter TeensyMaestro.
Thank you.0 -
Hi Oleg,
Len also asked if you accidently purchased the "Teensy 4.1 without Ethernet". There is a version of the microcontroller that is sold that doesn't have the Ethernet PHY chip soldered on the PCB. You would not be able to connect to the network without that chip.
Here's a picture of the Teensy 4.1 showing the Ethernet PHY chip soldered and circled in red. If yours doesn't have that chip, it would explain the issue: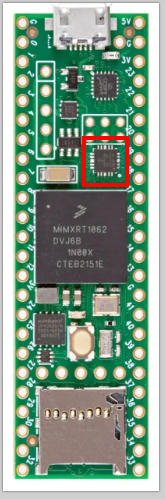
Also, if you do find that the chip is missing, I would not recommend trying to solder it on. Instead just buy the correct microcontroller. The chip uses a QFN 24 package and is a challenge to solder.
0 -
Simon thank you for reply.
In my own i have Teensy board v4.1
https://drive.google.com/file/d/1H5CGMCYZ_UpXXlK9z9zIqWxLkvLkjvSf/view?usp=sharing0 -
You have not attached ground to the MagJac, and also missing a decoupling capacitor. This may be important. The schematics is here: https://www.pjrc.com/store/ethernet_kit.html
0 -
Lasse thank you.
Now i made wire connection between GND pin at Magjack and GND at Teensy board.
Placed capacitor as recommended.
But still no success.
TeensyMaestro has no real ip address as defined in config file and still not found radio at local network.
Is anywhere some software to check Teensy 4.1 ethernet connection ?
Thank you.
Regards, Oleg0


Leave a Comment
Categories
- All Categories
- 390 Community Topics
- 2.2K New Ideas
- 661 The Flea Market
- 8.4K Software
- 157 SmartSDR+
- 6.5K SmartSDR for Windows
- 186 SmartSDR for Maestro and M models
- 439 SmartSDR for Mac
- 275 SmartSDR for iOS
- 265 SmartSDR CAT
- 204 DAX
- 386 SmartSDR API
- 9.4K Radios and Accessories
- 54 Aurora
- 297 FLEX-8000 Signature Series
- 7.2K FLEX-6000 Signature Series
- 971 Maestro
- 58 FlexControl
- 867 FLEX Series (Legacy) Radios
- 945 Genius Products
- 472 Power Genius XL Amplifier
- 347 Tuner Genius XL
- 126 Antenna Genius
- 308 Shack Infrastructure
- 216 Networking
- 468 Remote Operation (SmartLink)
- 142 Contesting
- 814 Peripherals & Station Integration
- 144 Amateur Radio Interests
- 1.1K Third-Party Software