SmartSDR v4.1.5 | SmartSDR v4.1.5 Release Notes
SmartSDR v3.10.15 | SmartSDR v3.10.15 Release Notes
The latest 4O3A Genius Product Software:
The latest 4O3A Genius Product Software and Firmware
If you are needing assistance with FlexRadio products, please refer to the product documentation or check the Help Center for known solutions. Need technical support from FlexRadio? It's as simple as creating a HelpDesk ticket.
TeensyMaestro
Comments
-
Hi Len,
Interested to build one and thinking to design a PCB, that will be as a backplane holding all parts.
Encoders, buttons, Teensy, display, TSC2007I touch controller, Ethernet soldered directly to the PCB.
PCB to be manufactured and SMT parts (R,C, 74HC4067, TSC2007I) to be soldered by JLCPCB.
Builder needs to acquire and solder trough hole part's - Encoders, buttons, Teensy, Ethernet connector. No messy wires. I can make a Digikey BOM.
Front panel can be a black PCB with white silkscreen, drilled and machined.
Will start working and ordering parts as time permits.
Any suggestions are welcome…
Stefan / AF6SA.com
0 -
Stefan,
that was my initial plan too, but scrapped as mounting the encoders and buttons along with the display turned out to be too much work. I did a small board holding 4 encoders, but realized there was no real advantage (for me). I was not sure how I would like to have the front panel layout, thus a PCB with all parts would have to be a final revision.
BTW if I recall there was a design similar to what you intend, made by Ben, VR2VIY. Have a look at page 6 in this thread.
0 -
Hi Stefan, thanks for your interest in the project. Simon, NV0E is just embarking on that exact project as we speak. He wants to convert to a cheaper, but same-sized touch-enabled display (ST7796S) and plans on using through hole MCP23017 mux chips instead of the SparkFun MUX boards.
The display change will require re-working the code to accommodate it, and it is unknown if the same fonts are available (or can be made to work) for the ST7796. The ST7796 has a built-in touch controller that would replace the TSC 2007.
The other big issue is getting component heights so that everything lines up height-wise when fitted to the front panel.
0 -
"The other big issue is getting component heights so that everything lines up height-wise when fitted to the front panel."
I have ideas about how to do this and help designing the PCB.
Will prefer to design it mostly with SMT parts, available on JLCPCB for easy manufacturing.SMT PCB assembly is cheap - trough hole gets expensive and it's almost impossible to acquire all parts from this supplier.
Ethernet kit is not available - we can use the connector mounted directly.Will QRX for news about the new display.
0 -


Slow progress. Not much time for hobbies with a 1 yr old.
Got my little breakout header pcbs in and printed off a mounting bracket for the boards and some rear panel mount connectors.
The cheapo sd card extenders need a longer ffc cable
0 -
Wow, nicely done! I hope you enjoy it as much as I have enjoyed mine.
0 -
Simon was unable to post this, so I am posting on his behalf:
Hi All, Len (KD0RC) and I have been working on a project to design PCBs for his Teensy Maestro. Our goal is to simplify the build process, make it easier to produce a polished final product, and lower the cost of some components.PCBs
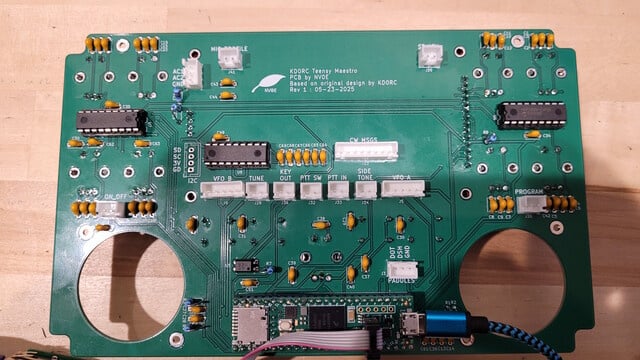
I've designed two PCBs, and once tested, will make the Kicad and Gerber files available for download. We don’t intend to sell the PCB ourselves, but instead make it easy to order them from a PCB fabricator like jlcpcb.comFront Panel PCB: This will replace the standard enclosure front panel and will have openings for the encoders, switches, and the display. It can be ordered in black, made from either FR4 or aluminum. A black aluminum PCB front panel is cost-effective, easy to order, and gives the project a commercial look.Main PCB: This will hold the encoders, pushbuttons, and display on the front side. The Teensy 4.1 board, capacitors, ICs, and header connectors will mount on the rear. All components will be thru-hole for ease of assembly.The main PCB will be mounted directly behind the front panel.
Hardware ChangesMultiplexers (CD74HC5067M) → I2C I/O Expanders (MCP23008)
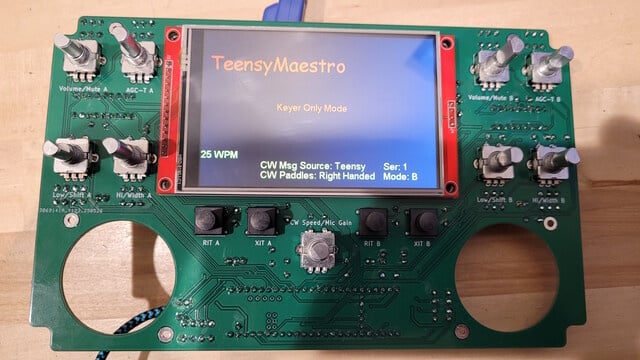
This change frees up some GPIOs on the Teensy for other uses.Adafruit LCD (HX8357D) & Touch Controller (TSC2007) → ST7796S LCD
The new LCD has an integrated touch controller, reducing cost from ~$45 to ~$19. It’s slightly larger (4.0” vs. 3.5”) but retains the same 480x320 resolution.Panel-Mounted Switches → PCB-Mounted Switches
The four switches (RIT-A, XIT-A, RIT-B, XIT-B) are now directly mounted on the PCB.
Firmware ChangesThe hardware changes will require firmware updates.Version 2.0 will be released to support the new hardware.Version 1.0 will continue to be supported.
As long as the hardware supports it, new features will be added to both firmware versions.TimelineThe first prototype PCBs have been ordered and should arrive next week.Firmware updates for the ST7796S LCD have been completed and tested—everything is working perfectly.Remaining tasks:Firmware changes for the I2C I/O ExpandersTesting the main PCBChecking the fit of the front panel and main PCB within the enclosure
Approximate PCB Costs (jlcpcb.com)We don’t plan to sell the PCBs, but ordering them yourself is straightforward and relatively inexpensive. Here are some estimated costs (excluding shipping, taxes, and tariffs).
The minimum order quantity is 5.
5 x Main PCB $15
5 x Front Panel PCB (FR4, black) $15
5 x Front Panel PCB (Aluminum, black) $30Front PanelMain PCB (front)Main PCB (rear)Testing the ST7796S 4in Display73,Simon, NV0E2 -
Wow, this looks like a great project. I'll want to build one for sure!
Len and Simon, Thanks for putting this together!
1 -
Hey Dave! Well, Simon did all the design work to get the boards built and ordered. He also did the conversion from the HX 8357 display to the ST 7796S display. Fortunately, most of the code worked as is, so I am hoping to maintain one set of source code by using conditional compilation to care for the two different builds.
Simon is currently adapting the code to use the new I2C MUX boards. Given his recent progress with this thing, I don't expect that will take long.
0 -
Thanks Dave! Hopefully the prototype boards will work correctly and we won't have to do any revisions.0
-
Hi all
I'm back home from my holidays. Seeing the input from Simon, NV0E, I'm thinking it would be as well to hold off ordering until the PCBs have been through testing. If this is not the case, I'll get on ordering now just in case tariffs get in the way (unlikely over here, but you never can tell these days)
0 -
Hi Gareth, that sounds like a good idea. Simon is expecting the boards any day now, so we will get a chance to test them very soon. We will also publish a complete Bill Of Materials (with links) so that you can easily order the correct parts.
I did notice that the Teensy 4.1 boards are on backorder. SparkFun is now manufacturing and distributing them, so watch their website for more info there. So far, they have not given an anticipated availability date.
0 -
Good news, I just looked at the SparkFun site and the Teensy4.1 ($31.50 USD) and Ethernet kit ($3.95 USD) are both back in stock.
0 -
A quick update on Simon and my progress. We have the code working for the new display, touch controller and MUX boards that will be used with the PC board. The original hardware still works as it did (yay!). We are meeting tomorrow to merge our code and do some more testing on hardware versions 1 and 2. Once we get that all done, we will be in wait mode until the boards arrive (hopefully very soon now). Once they come in, we will build and do final testing before releasing it to GitHub.
I have gotten questions about using other displays, and generally, the answer is no, they won't work without re-working the code. If anyone wants to do that, I do provide the source code (Arduino-flavored C++).
0 -
The code merge was successful and easier than we thought, so this is looking really good! We successfully tested the original hardware as well as the new. Once the boards are built, I anticipate some changes to accommodate encoder rotation (half are likely to be backwards), but everything else seems to be working properly.
The PC boards have cleared customs in NY, so they should arrive soon (this coming week, hopefully).
0 -
The Teensy Maestro PCBs finally arrived today. I assembled one and ran a startup test. What I've tested so far appears to be working correctly, but we'll be doing more extensive testing before we make the PCB designs available.
73,
Simon, NV0E0 -
Here are the pictures that Simon took of the new boards.
These look really great, Simon! We will get a chance to do a preliminary test using my Flex 6400 at Field Day this year.
0 -
A quick update on PC board progress.
Simon and I took a few days off for Field Day and a few POTA activations. Had a great time!
I borrowed Simon's board to do final testing, and it works great! I still have some functionality to port over from a previous, unpublished release and Simon has some cosmetic changes for the board. That will all be done this week, then once we get the new boards and parts, we will do a final round of testing and make everything available on GitHub.
The new software will be version 2.000. We used compiler directives to create HW versions 1 and 2. So going forward, there will be two load images but only one source code file.
For those builders who will not be modifying the code, you will just pick the load image that matches your version of the hardware (new ST7796 display and I2C MUXs or old HX8357 display and old MUX boards). The PC board will only work with the new components.
We will post again once everything is out on GitHub.
1 -
Thanks for the update Len! Hope you and Simon had a great Field Day.
0 -
Dave, we had a great Field Day, and we have plenty of ideas for improving out setups for next year. The best part was I got to operate Len's Flex for a couple of POTAs on the following days. I might need to buy one. :)0
-
Hi Simon,
Glad ya'll had a good time. Yes, the Flex rigs are amazing, and even more so with the TeensyMaestro!
0 -
TeensyMaestro V2.000 is now available on GitHub:
*****************************V 2.000 * ***************************
Fixed bug where spots were not properly parsed from the MMConfig.ini file (Thanks to Simon, NV0E for finding that!).
New version to accommodate Simon's, NV0E, PC board.  HW_VERSION 2 supports the ST7796S display with
     XPT2046 touchscreen controller.  Also supports 2 MCP23008 MUX boards and an MCP23016 board.
Added two pedal PTT for SO2R operation. One switch for A, one for B.  (Thanks Ron, WV4P for the idea!)
Added ability to select a specific Flex on the network.  Connect: ANY will connect to first Flex found.
Rewrote sections of FlexRigTeensy-2.0.19.cpp to properly parse the UDP discovery packet.  Original code
     got data positionally.
Renamed lib to FlexRigTeensy.cpp.  Enzo had the 2.0.19 label to identify the version of SmartSDR.
     Not really needed in this application.
Here is the software to go with Simon's PC board. There are now two versions of the load image - one for the original design with the 3.5 inch HX8357 display and one for the new PC board with the 4.0 inch ST7796S display.
Simon will open his GitHub to the public shortly. It contains a wealth of information on building the PC board version including the schematic, bill of materials and instructions for ordering PC boards and front panels.
I met Ron, WV4P at the 2025 Flex banquet at Hamvention this year. He asked about the ability to have two foot-switches for SO2R contesting. The idea is to have two slices open, one on the run frequency and one searching for multipliers. Each switch is associated with a specific slice such that stepping on a switch puts the corresponding slice into transmit whether it is flagged as the TX slice or not. This way, you don't have any goofing around setting the transmit slice, just step on your pedal and talk. If the other slice is already transmitting, it holds until that slice stops transmitting. The regular PTT switch still operates strictly off the TX slice.
You don't need to build the entire TeensyMaestro for this to work, you just need the Teensy board, a MUX and a couple of connectors for the foot switches.
Ron also mentioned needing the ability to select a rig to connect to. If you have multiple Flex radios all on one network, you need the ability to choose which one to connect to. That capability is now in the TeensyMaestro and will soon be in my Windows-based Flex utilities.
Note that Simon and I are not providing kits, but are making it (I hope) pretty easy to order all the parts and boards. The BOM has links to all sources of parts except for the very mundane things like stereo jacks, screws and things like that.
Simon has his built and working. Mine is awaiting a few parts and a case. I will post pictures here when I get it all buttoned up. If you decide to tackle this (now much easier) project, please post progress and results here - we'd love to see what you are doing.
0 -
Hi Everyone,
I've just made the TeensyMaestro-Hardware github repository public. This project includes a PCB and a front panel (that should be fabricated in aluminum for the best result).
https://github.com/rimuadmin/TeensyMaestro-Hardware
The repository README describes the PCB ordering process from jlcpcb.com and the build steps in detail with plenty of pictures of the finished result and the steps along the way.
As Len mentioned, I've built it and it's working. We anticipate that with the PCB and front panel, more people will be able to make a great looking TeensyMaestro.
Incidentally, I just ordered my first Flex Radio this week. I seem to have done this out of order, apparently you're supposed to have the radio before the TeensyMaestro.
73,
Simon, NV0E3 -
Well done Simon!!


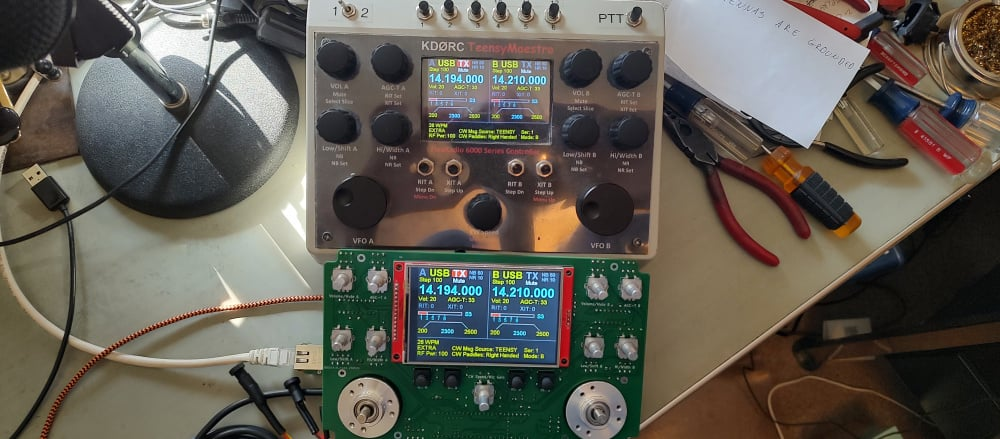
It should be noted that Simon designed this board and updated my software to accommodate it without the benefit of a Flex radio. When he needed to do some testing, he wrote a Flex emulator complete with panadapter and waterfall. While I was up fishing in WY, I lent him my Flex 6400 which he used to get through his final hurdles with the UDP waterfall data. Not everything is implemented, but it was enough to verify that the TeensyMaestro was working properly. In the pic above, you can see that no mode is showing on the TeensyMaestro screen - direct evidence that he is hooked up to the emulator and not a real Flex.
Only after he had a working TeensyMaestro did Simon order a refurbished 6400 from FLex. Now I am waiting for my sales commission from Andy, @VA3CW 😁
0 -
The minimum order from JLCPCB is 5 (5 boards, 5 front panels) so if people are contemplating building this project, I would recommend finding others to share orders and reduce costs. In minimum quantities, it is around $47 for the 5 boards and 5 panels. Add shipping, tariffs, taxes, etc, and it goes up a bit from there depending on fast or slow delivery. There are quantity discounts for every additional 5 boards ordered.
Please feel free to use this Community forum to coordinate group buys of boards.
0 -
Count me in. AJ8B
0 -
I also would be interested, anyone else in Canada, eh ?
0 -
For anyone building a TeensyMaestro using Simon's boards, I would suggest placing additional panel nuts under the front panel on each encoder (except for the slice tuning ones). Without them, the panel warps and compresses the display when you tighten the panel nuts on the top.
You will still need the 8 mm spacers that Simon shows in his GitHub. To make this work, place panel nuts on each control and s.crew them down far enough that with the panel in place, the nuts don't touch it.
Now place the panel on the controls so that it rests on the spacers and put washers and nuts on the controls. Only tighten them enough to hold the panel with no slack (i.e. just touching).
Next, use a small screwdriver to turn the bottom nuts until they just touch the panel.
Finally, tighten the top nuts hand-tight and you are done.
I believe that the nuts are 1/4 x 32, but I can't confirm that yet (I stole a bunch from my stash of encoders...). I will order some and make sure that is the right size. Once confirmed, I will report back here.
If you elect to build without the additional panel nuts, be careful not to tighten the panel down very much. More than finger-tight will be too much.
1 -
OK, the nuts are M7 X 0.75. Thanks to Simon for reminding me that these would most likely be metric. I verified that these are indeed the proper ones to order.
We will add these to the BOM in GitHub.
1 -
The BOM on the GitHub page has been updated. The build instructions are fairly detailed and draw from both Len’s and my experiences assembling our TeensyMaestros. If you build a unit, we’d appreciate it if you shared any tips or techniques that helped you along the way. We’d also love to see your build photos!
Also, I'm now the proud owner of a Flex 6400. Thanks Len for all your help setting it up.
73,
Simon, NV0E1


Leave a Comment
Categories
- All Categories
- 391 Community Topics
- 2.2K New Ideas
- 664 The Flea Market
- 8.4K Software
- 157 SmartSDR+
- 6.5K SmartSDR for Windows
- 186 SmartSDR for Maestro and M models
- 441 SmartSDR for Mac
- 275 SmartSDR for iOS
- 265 SmartSDR CAT
- 206 DAX
- 386 SmartSDR API
- 9.5K Radios and Accessories
- 59 Aurora
- 297 FLEX-8000 Signature Series
- 7.2K FLEX-6000 Signature Series
- 974 Maestro
- 58 FlexControl
- 867 FLEX Series (Legacy) Radios
- 947 Genius Products
- 473 Power Genius XL Amplifier
- 347 Tuner Genius XL
- 127 Antenna Genius
- 308 Shack Infrastructure
- 216 Networking
- 470 Remote Operation (SmartLink)
- 142 Contesting
- 816 Peripherals & Station Integration
- 144 Amateur Radio Interests
- 1.1K Third-Party Software