SmartSDR v4.2.20 | SmartSDR v4.2.20 Release Notes
SmartSDR v3.10.15 | SmartSDR v3.10.15 Release Notes
The latest 4O3A Genius Product Software:
The latest 4O3A Genius Product Software and Firmware
If you are needing assistance with FlexRadio products, please refer to the product documentation or check the Help Center for known solutions. Need technical support from FlexRadio? It's as simple as creating a HelpDesk ticket.
Remote operating and Node Red
Comments
-
I wish to take this moment to give thanks to Alan (WA9WUD) who with patience spent over 1 hour with me on the phone, on his Saturday morning helping me recover from disaster (lost 3 SD Cards, al my Flows, and a Pi4 I haven't been able to boot). We managed to start a new card from scratch, installing Node Red, nodes, flows, FRStack et all. Now I've gotten back my flows with the Pi3 and gained remote control again. Also to Dave (WO2X) who did the same couple of months back, even though I thanked him at the moment, I wanted to reiterate it again.
Now, I'm copying my image and safeguarding it in a couple of safe places.
Now that I got the Pi3 back on track and got control of my station, I have more time to troubleshoot the Pi4.
Thanks guys for the help. Really appreciate.
73, Santiago
1 -
Awesome!0
-
Anyone working with NODE-RED think of a way to have a option to tie DAX to DIGU and DIGL and let the remote MIC / PTT work correctly while running remote without having to always switch DAX OFF and ON, this is PROBABLY the biggest issue that I have? Maybe FRStack can add this feature.
73's
Bret
WX7Y
0 -
Hi Bret,
try this Flow, it turns TX DAX on when you switch to DIGU or DIGL and go to transmit.
I limited RF-Power when i go to DIGU or DIGL.
http://git.stephankregel.de/dg1hxj/NodeRed-FR-Community.git0 -
That is great Stephan, I'll give it a try, might be just the ticket
one of these day's MAYBE I'll get node-red flows wrapped around my thick skull
73's and thanks again
Bret
WX7Y
0 -
I'll give it a try, might be just the ticket
one of these day's MAYBE I'll get node-red flows wrapped around my thick skull
73's and thanks again
Bret
WX7Y
0 -
Anyone figure out how to add a Panadapter or Waterfall to any of these projects? Decoding the Vita49 is beyond me.
0 -
adding Stephan's NODE-RED Flow to my Node-Red seems to work for automating the radio so when I bring up DIGU or DIGL it turn on DAX and LSB and USB mode's turn DAX off.
Thanks Stephan
Bret
WX7Y
0 -
Alan, I am trying to pull your repository https://github.com/n61ab/Node-Red-Flows-WA9WUD.git I am able to pull it into Node-Red but it is looking for package.jason file. I am a total beginner and assumed that If I imported your flows I should be able to get the flows into node red. Can you advise? thanks0
-
Alan’s latest flows are located in the file section of the Groups.io group. Here is a https://groups.io/g/nodered-hamradio
you will need to join to see the files. It is free.
the files are .json not .jayson
Alan has done some nice work on his flows.
Dave wo2x
1 -
Micheal
Dave has pointed you to the latest flows.
Let me know if you would like specific help.
Be sure to see the guild from Dave, W02X on how to install FRStack. Most of my flows now need FRS to get inputs/outputs from the Flex and from the SteppIR. Dave or I can help you with FRS install if you need it.
Alan WA9WUD
0 -
Micheal
Good. My flows are slimmed down versions of Mark's full set of FRStack/Node-Red files and have context variables specific for interfacing to my flows.
If you want Mark's full set of flows with many more Flex Radio controls, Mark includes his "frstackNodeRedV106.json" file in the zip file you downloaded from his web site into the Raspberry Pi. Just click on this link in your desktop browser, unzip and look for the "frstackNodeRedV106.json" file, import into node-red.
The "Read Me" file, in this same zip, is also an excellent reference to using FRS / Node-Red.
Alan
WA9WUD
0 -
Well I am drinking from a fire hose at the moment. I think it may make sense to do something simple with Node-Red to start with. Our club has a Flex 6400 that we use remotely. We control it currently using php on a raspi pi. I have used the telnet cli to parse frequency data from the flex but would like to be able to do more sophisticated views like I see the node-red folks using. Would just connecting to the radio and listening for freq changes be a good starter?0
-
If you want to have a full set of Flex controls on a Raspberry Pi, accessible on a web browser, without programing yourself, suggest you use Mark's Node-Red flows, referenced earlier.
Install the Pi at the remote site. Open up the 1880 port pointed to the IP address of the Raspberry Pi, thru your remote site's firewall, and you will have full set of Flex Server Controls on a Web Browser of choice. Mark also has flows for SteppIR antennas, PG-XL and SPE amps.
Alan
0 -
Thanks Alan... Hopefully I can get this up and running..0
-
Micheal
I use "MOX" for TX indication, either Tune or PTT.
How to get MOX Status?
Lesson: Node-Red uses "Messages" and "Context Variables". Messages, like "msg.payload" flow thru each node and only exits in the nodes for the instant they are flowing. Context variables are stored in Node-Red memory. "Flow Variables" are available to any node on the same "tab". "Global Variables" are available to any node on any tab on the same Node-Red.
Mark has populated the entire "Flex Info" output to Context Variables. You can see list of Context Variables by looking at the far right pane and clicking on "Context Data". Be sure to hit the "refresh" button on the pane to update the data.

Ok, now, use the "Change Node" to set the "msg.payload" to MOX Status by setting the context data "flow" to the path for MOX status, "radioinfo.MOX". Add an inject node to the input of the change node and set it to inject at "x" second interval. Add whatever you want on the output of the change node for indication or control (i.e an LED). Use a "debug" node to examine the output and type of variable. In this case, the MOX output is a string, "ON" or "Off".

Repeat for any Flex Status Variable you want.
In my FRS flows, I re-produced the nodes, from Mark's flow, used only to get the Flex Status and move the status into Context Variables. I discarded everything else, to streamline the process.
You can also send "commands" to the Flex Server using FRS. See Mark's "Read Me" for a list of available REST commands and formats. If you look over Mark's flows, you can pick out the nodes he used to build the commands for each of the many available Flex commands. Just copy those nodes to your flow. No need to use all of Mark's flow, unless you want too.
For example, to set TX power to 36, use the REST command, "http://127.0.0.1:5025/Radio/RFPOWER?param=36". Mark used the "Change" node to build the command, set the command to "msg.url" and used the "HTTP Request" node to send the command to FRS (in this case on the same Raspberry Pi, using the loopback IP);
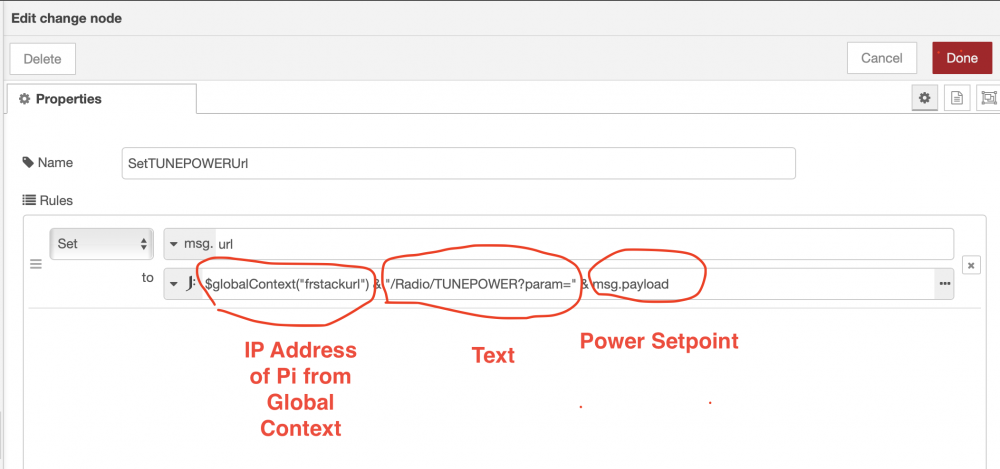
You set the IP address of the device running FRS on the Connection Tab. The IP is then stored in a Global Variable "frstackurl" and used throughout other flows that need to know where to send and received commands:

Alan
0 -
0
-
Thank you sir. I will get cracking on this...I took today off to do outside work...Finding it hard to leave the computer. I will report back some time soon.
0 -
Alan, thanks so much for your help. I have the dashboard where I want it. I plan to embed the ui in a web page we all ready have developed. Here is what I have currently...
 0
0 -
Micheal
Looks like you are getting the hang of it.
Now, to clean up and customize your dashboard.
You can adjust the size of the text by adding <xxxxx=****> in front of the desired label or value to be displayed on the dashboard. Here is an example where I adjusted the text size:

Some examples are:
<font size = 5>
<font size = 5, font color = red>
Or, more advanced, like I do to make the dashboard colors dependent on other variables:
To change the background color based on some other logic, ie MOX On or MOX Off:
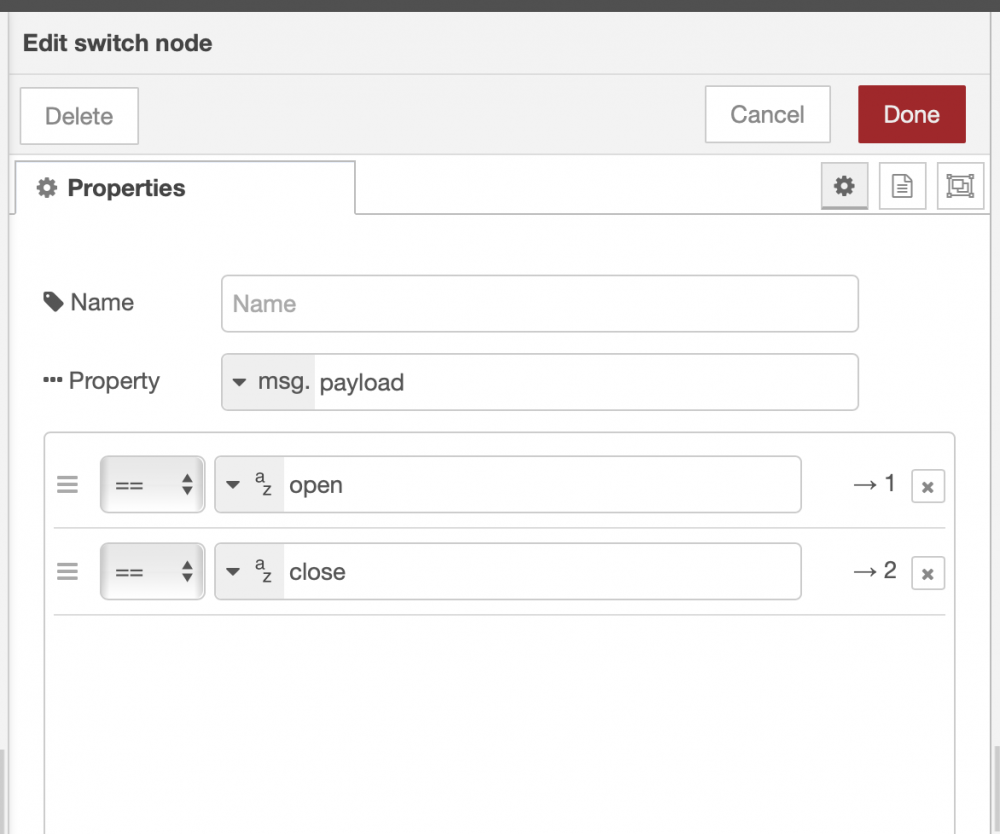
In a "switch node" define each output to correspond to a MOX input. For example, for your MOX example, set up output one to be =="ON" and output two to be =="Off".
Next, make a "change node" wired to output one of the switch node to "Set" "msg.background to red" On output two of the switch, make a "change node" to "Set" msg.background to green".
Wire each of the change nodes to the input of the dashboard node of choice. On the dashboard, set background to {{msg.background}}.
Your background will now change to red, when you MOX and return to green when no MOX.
You can do the same for other dashboard elements, just give each unique "msg.****" name.
Here is an example of a switch I use in my SWR Sweep Flow to set up the "Arm" button configuration on the dashboard. It changes background color and label text depending on gate status, and changes the payload for the button to send on the next push (toggles the gate open/closed) :
Here is the "Change Node" for "open" wired to output 1 of the switch. Make another for switch output 2. Wire both to the input of the button node:

And, here is the button configuration:


Alan
0 -
Great lesson that last one. Made me break out the debug....Made a couple quick changes and will do more based on the last lesson...However I do have a couple of questions...
Frequency is currently trailing out to 6 digits. Way overkill. I would like to truncate it 4 digits. Looking on line I found toFix() and tried that but it did not seem to work... Also I wanted to create a level for SWR (green from 1 - 2, yellow 2.1 - 2.5, and red upto 3). I tried using this on {{msg.payload.SWR}} . Using debug it appears it's not an int. I am having way to much fun...Here is the new screen shot.
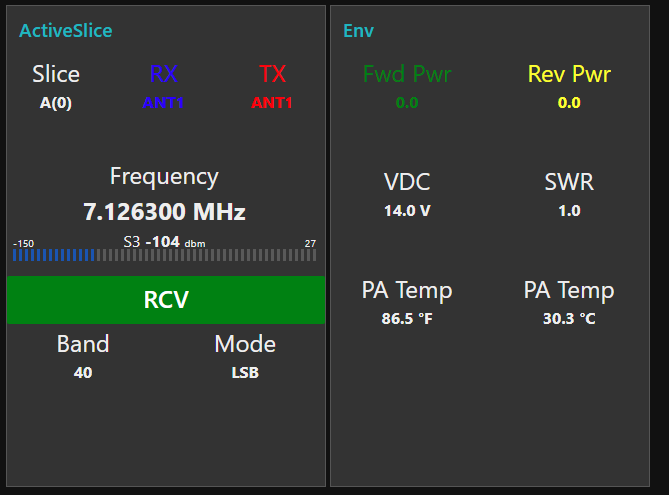
 0
0 -
Nice job on the RCV/TX tiles.
For setting number of decimals, I like using several nodes for the job.
Use the "smooth" node if you want to get a mean of "x" messages. It also allows you to set the decimal.
I also like the "string" node. It has many tools for modifying variables of all kinds. For your purpose choose "ToFloat" and set the number of decimals. You can also use "ToInteger" for no decimals. You need to add the "string" node to your pallet using "Manage pallet" on the far right pull down menu. In the add volume, do a search for "string" and add the node to your pallet.
Not sure what you are using for SWR. It looks like the "ui_lineargauge". Take a look at the "ui_level" node. It has more options for setting the range colors and other special effects. I do not recall, but you may need to also add this to your pallet.
Alan
0 -
Thanks for the advice on decimals. I did not get back sooner as our club was reinstalling the 6m beam today. Regarding the SWR.
See the Meters flow from Mark.

The update Meters function pulls the data from the meters array...
if (msg.payload.smeters) {
global.set("smeters", msg.payload);
return [null, msg];
}
var omsg = {};{{msg.payload.SWR}}
var existing = global.get("meters");
if (existing)
omsg = Object.assign({}, existing);
if (msg.payload.station)
omsg.station = msg.payload.station;
if (msg.payload.callsign)
omsg.callsign = msg.payload.callsign;
if (msg.payload.nickname)
omsg.nickname = msg.payload.nickname;
if (msg.payload.ipaddr)
omsg.ipaddr = msg.payload.ipaddr;
if (msg.payload.meters) {
if (msg.payload.meters["+13.8A"])
omsg.VOLTS = msg.payload.meters["+13.8A"];
if (msg.payload.meters["PATEMPF"])
omsg.PATEMPF = msg.payload.meters["PATEMPF"];
if (msg.payload.meters["PATEMPC"])
omsg.PATEMPC = msg.payload.meters["PATEMPC"];
if (msg.payload.meters["FWDPWR"])
omsg.FWDPWR = msg.payload.meters["FWDPWR"];
if (msg.payload.meters["REVPWR"])
omsg.REVPWR = msg.payload.meters["REVPWR"];
if (msg.payload.meters["SWR"])
omsg.SWR = msg.payload.meters["SWR"];
if (msg.payload.meters["AMP PWR"])
omsg.AMPPWR = msg.payload.meters["AMP PWR"];
if (msg.payload.meters["AMP ID"])
omsg.AMPID = msg.payload.meters["AMP ID"];
if (msg.payload.meters["AMP SWR"])
omsg.AMPSWR = msg.payload.meters["AMP SWR"];
if (msg.payload.meters["AMP TEMPF"])
omsg.AMPTEMPF = msg.payload.meters["AMP TEMPF"];
if (msg.payload.meters["AMP TEMPC"])
omsg.AMPTEMPC = msg.payload.meters["AMP TEMPC"];
}
global.set("meters", omsg);
msg.payload = omsg;
return [msg, null];
Here is the parsed SWR part of the function
omsg.REVPWR = msg.payload.meters["REVPWR"];
if (msg.payload.meters["SWR"])
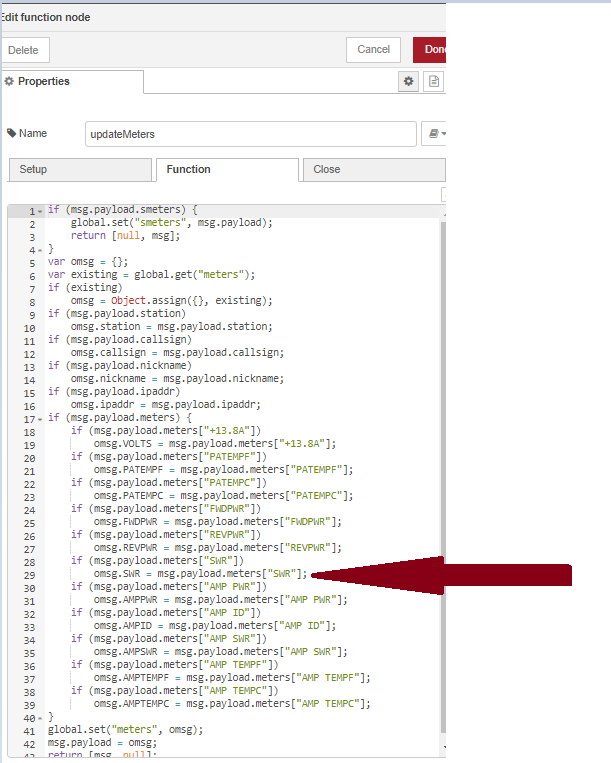
The SWR text node refers to the label = {{msg.payload.SWR}}. This is what I was trying to use. I assumed I could use that to run the level node. When I try to use the msg.payload.SWR id, debug throws an error that the data is a string? Here is the view of the SWR node.

Here is a view of the function

Hopefully this will clue you in... Thanks again.
0 -
So the screen shots from the pi did not post. Here are the screen shots of the Meters Flow for reference...
Meters:

updateMeters:
SWR:
 0
0 -
Micheal
Let's talk about using Mark's FRStack meter flow. I will use your SWR case, but the same applies to all of his meters.
Mark provides meter data in two ways, "message" variables and "context" variables. Recall, messages flow thru each node and then are gone, poof! Context variables are held in Node-Red memory as "Flow" variables and as "Global" variables.
Mark's meter dashboard indicators use "msg.payload" variables. Here, I added a debug node so you can see the "msg.payload" meter data in the debug window. The path for Flex SWR is, "msg.payload.SWR". Open up the SWR dashboard meter, and you will see this path.
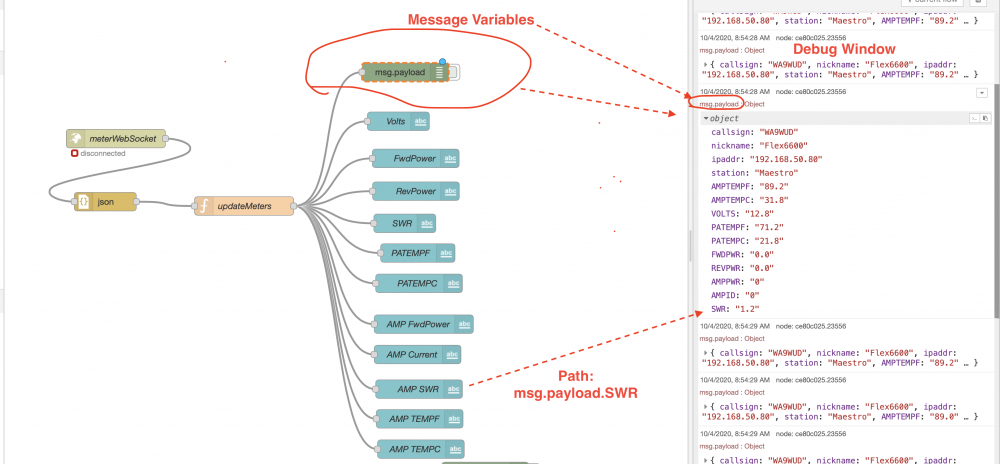
To illustrate, enter the Path, "msg.payload.SWR" into an "Inject" node, add a debug node to see the output. Each time you hit the inject button, you will see he SWR in the output.

Now, meters as "Context" Variables (Held in Node-Red Memory).
Here is a "Change Node" set up to "set" the "msg.payload" to "flow.meters.SWR". The "Inject" node triggers the flow. The change nodes takes SWR from "flow.meters.SWR" and sets the result into "msg.payload". The "Debug" nodes listens for the msg.payload from the Change Node and displays the result in the debug window. You could add any device you want on the output set to listen on "msg.payload" for the SWR value.

Take a look at my meter flow for more in-depth examples. Did you notice that FRStack SWR does not return to "0"? In my flow, I added additional nodes to return the indication with "MOX" is "off". I then set the result to a new context variable, which I use in a number of other flows including "SWR Sweep", and "SWR Alarm". You could add your device of choice to the output of the "gate' and "trigger" node to get the same SWR reading.....or use the "Change" node as in example above for Context variables on any of your Node-Red tabs...point to the path, "global.swr.flex".

Alan WA9WUD
0 -
0
-
Alan , thanks for getting back.. So trying your steps one at a time. Hitting a road block with the inject. Using PATEMPC since the value is workable


Here is my context data for reference..
 0
0 -
My bad, I steered you wrong. Message Variables "flow" thru the nodes, so must be "wired" into a source.
To continue with the "inject" node example, you can set a path to a "context" variable, since they are not "wired".
Your list of meters is from the "context" variable listing....good. All you need to do on the "inject' node is change the path to, "flow.meters.PATEMPC". Do this by change the pull down selector and replace "msg" with "flow" and then "meters.PATEMPC".
Alan
0


Leave a Comment
Categories
- All Categories
- 401 Community Topics
- 2.2K New Ideas
- 684 The Flea Market
- 8.6K Software
- 194 SmartSDR+
- 6.6K SmartSDR for Windows
- 200 SmartSDR for Maestro and M models
- 456 SmartSDR for Mac
- 278 SmartSDR for iOS
- 268 SmartSDR CAT
- 219 DAX
- 394 SmartSDR API
- 9.6K Radios and Accessories
- 102 Aurora
- 347 FLEX-8000 Signature Series
- 7.2K FLEX-6000 Signature Series
- 994 Maestro
- 58 FlexControl
- 872 FLEX Series (Legacy) Radios
- 970 Genius Products
- 481 Power Genius XL Amplifier
- 357 Tuner Genius XL
- 132 Antenna Genius
- 321 Shack Infrastructure
- 226 Networking
- 482 Remote Operation (SmartLink)
- 144 Contesting
- 845 Peripherals & Station Integration
- 147 Amateur Radio Interests
- 1.1K Third-Party Software