SmartSDR v4.2.18 | SmartSDR v4.2.18 Release Notes
SmartSDR v3.10.15 | SmartSDR v3.10.15 Release Notes
The latest 4O3A Genius Product Software:
The latest 4O3A Genius Product Software and Firmware
If you are needing assistance with FlexRadio products, please refer to the product documentation or check the Help Center for known solutions. Need technical support from FlexRadio? It's as simple as creating a HelpDesk ticket.
Flex radio controller on the cheap!

Many of you may have seen my CTR2-Mini and Mini+ posts and probably thought "that's nice but I don't need all those extras with my Flex". And you're probably right. If you don't have any other radios in your shack there is no need for a device that provides serial CAT control or has a keyer and sidetone built in. You just want a physical knob for your radio!
With that in mind I boiled the Mini's design down to the bare essentials that almost anyone can build in an hour or two. And if you want a physical knob for each slice, just build more :)
Here's the schematic. It only requires a Wio Terminal, encoder and three 10k resistors. If you want the function keypad (trust me, you will), add six resistors, six pushbuttons, and a .01uF cap.

Here's the part list with links:
Rotary Encoder w/switch: (smooth): PEC11R-4020K-S0024 or (detent) PEC11R-4220K-S0024 ($1.88) - I like the smooth encoder personally
Three 10k resistors (.10 each)
Knob ($2.39)
To add the keypad:
Colored pushbuttons (from Amazon) - you can use any pushbuttons you want
4.3K resistor ($.14)
7.5K resistor ($.10)
12K resistor ($.10)
20K resistor ($.10)
37.4K resistor ($.10)
.01uF cap ($.10)
You can build this in almost any enclosure. For the Mini+ I chose the PacTec KEU-5 sloped enclosure. It looks nice and is easy to modify. Just cut out a slot for the GPIO bus and drill two holes to attach the Mini and holes for the encoder and pushbuttons. Use point to point wiring to wire it up and DuPont male jumpers to connect to the Wio GPIO bus. I'm not offering this as a kit or assembled unit.
You'll need to power the Wio Terminal from its USB-C connector. Just plug it into your PC.
Finally, download the Mini's software from my blog and copy it to your Wio. You now have a physical knob for your Flex... and it's on steroids. Everything works but serial CAT, keyer, and sidetone. You can find out more than you ever thought you'd want to know about the Mini on my blog.
A couple of more things...
I just updated the Mini's firmware to v1.09.01. This update gives you the ability to program each button on the function key pad with two functions (a normal and a shift function). You can assign Flex specific controls to each button for instant access along with the other Mini functions.
I've also added a new External Tuner mode to the Mini. This mode is handy if you use an external tuner on your Flex. When you enter this mode the Mini automatically sets your radio to AM mode and reduces the Tx power down to 15 watts. You can adjust power with the encoder between 5 and 15 watts. Just press the [C] button or the PTT button on the keypad to key your radio, then start your tuner. When you're done, exit External Tuner mode and the Mini resets the radio's mode and power out back to the original settings.
Enjoy!
73, Lynn, KU7Q
Comments
-
Lynn,
This look very interesting - thanks for sharing.
Unfortunately the link to your blog isn't working for me, I get an error ERR_SSL_PROTOCOL_ERROR
Martin - G4ENZ0 -
Martin,
That's odd. They work for me. The URL is https://ctr2.lynovation.com
Are you having problems with the other links in my post or just to my blog? Are others seeing the same problem? It might be my service provider.
Thanks for letting me know,
73, Lynn, KU7Q
0 -
Hi Lynn, the links all work fine for me. Nice job on your latest work!
1 -
Hi Lynn,
Just to test it, I tried to go to http://ctr2.lynovation.com and this is what I got from my ISP...
"We've restricted access to this page as we believe it contains content that isn't suitable for under 18s."
I am guessing I am getting the same message when I attempt HTTPS but, of course, there's a certificate mismatch between your domain and the page returned by my ISP. Hence the ERR_SSL_PROTOCOL_ERROR.
Not too sure what to do now as I don't want to have my ISP turn off content protection.
Regards,
Martin0 -
Martin,
I have no idea what your ISP would find objectionable in my site. Maybe it's because it has an order form and they don't want younger folks ordering stuff without their parents permission.
The SSL protocol error might be from the reCAPTCHA site. I use reCAPTCHA to filter out the spammers. I was shocked when I first turned the blog up at the number of robot messages that got posted. Since I turned reCAPTCHA on the robots went away. But it might be causing conflicts with other ISPs too. I have heard from others that some of the URL links to Mouser BOMs aren't working either but they work fine here.
Anyone having problems getting into my blog can email me direct and I'll send them copies of the operations and assembly manuals. They're too big to post here. They will give you a good idea about what the Mini/Mini+ is and how to build it. My email address is good on QRZ.com.
73, Lynn, KU7Q
0 -
Len,
Thanks for checking my site. It's always a concern when odd behavior is reported because of all the hackers out there. I get hackers trying to log into my site every day. I've filtered it down to where even I can't log in if I'm not on my own ISP :( Luckily I don't travel as much as I used to so that hasn't been a big problem. Someday it will probably bite me.
Thanks for the support and help!
73, Lynn, KU7Q
0 -
Hello again,
I want to update the group on a couple of new features I've recently added to CTR2-Mini.
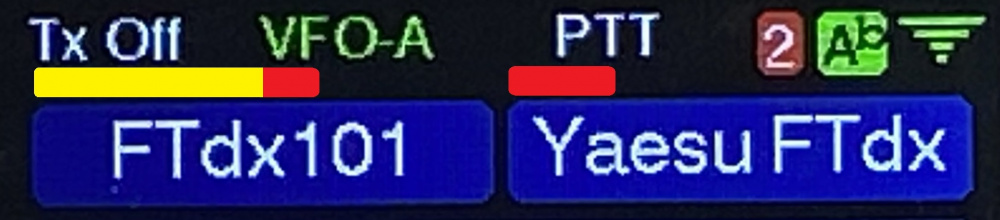
I've added a metering mode. To support this mode I've added polling for S-meter, Tx Power Out, SWR, Compression, and ALC readings on all radios with expanded CAT support (Flex, Icom, PCR1000, Kenwood, and Yaesu FTdx). On the Home page I've added two small bar graphs below the [A], [B], and [C] button labels for the S-meter and power output, shown in the first photo below. In the Mode menu you'll find a new Meter Mode option. Selecting this option opens a full screen meter display with the S-meter, power out, and one of three user selected meters, SWR, Comp, or ALC, shown in the second and third photos below. Just press the [B] button to select one of the three optional meters. I didn't display all five meters in this mode because I wanted them big enough to be visible at a distance. I might be persuaded to make the last three meters smaller vertical bar graphs so they're all visible all the time. Let me know what you think. The Meter mode is 'sticky' meaning that once you turn it on it will stay on until you turn it off, even through a power cycle. This way you can use your Mini as a remote meter display until you want to use it to control your radio. You can temporarily exit the meter display by turning the encoder slightly. This allows you to return to the Home page where you can tune your radio, change modes, or do other housekeeping tasks. After 10 seconds of inactivity the Mini reverts back to the meter display. Pressing the [A] button (Esc) in the meter display turns it off and returns you to normal operation on the Home page.
Here's some screenshots of the meter display on the Home page and in Meter mode.
Home page with 'mini' S and Pwr bar graphs

Meter page in Receive mode

Meter page in transmit mode
Another new addition is the External Tuner mode. I know, the Flex already does this, but many radios don't. The External Tuner mode switches your radio to CW mode and sets the power to the level you've defined for turning. Normal levels are 5 to 15 watts but you can set it up to 100 watts. Anything over 15 displays a red banner to remind you that you have higher than normal power set. Pressing the [C] button (after you've enabled Tx with the [B] button keys the radio up. Press [C] again to drop the carrier. You can also use the PTT switch on the function keypad or an external PTT foot switch to momentarily key the radio for your tuner. Exiting this mode with the [A] (Esc) button resets your radio back to the original operating mode and power out... I know, just like the Flex :) The advantage is that if you have more than one radio you can use this mode on all of them, including the Flex, so you don't have to remember different procedures for each radio.

The last change I made allows the Mini to control the speed of the radio's keyer when the Mini's keyer speed is changed. This allows you to use your radio's keyer instead of the Mini's keyer and use the Keyer Speed window in the Mini for instant speed changes.
I've updated the Mini's Operations Manual with the latest changes and posted the new firmware here for those running a CTR2-Mini.
For those that are wondering, "What's a CTR2-Mini", you can find the answer here.
73, Lynn, KU7Q
3 -
Hello, Lynn,
Thanks for sharing the news and congratulations on the great work you've been doing.
Is the source code open (or is there any way I can edit a few parameters)? I'm asking because I've got a spare rotary encoder that outputs a very high number of pulses per rotation (2000 PPR, if my memory serves me well), and I'm wondering if I could use it with the firmware you developed.
Code-wise, it would probably be a matter of implementing some form of counting and dividing the number of pulses before sending a command to the radio, which should be simple enough, but I'd like to check on that with you before starting the project.
Best regards,
Erik
PY2YAS0


Leave a Comment
Categories
- All Categories
- 393 Community Topics
- 2.2K New Ideas
- 668 The Flea Market
- 8.5K Software
- 174 SmartSDR+
- 6.5K SmartSDR for Windows
- 191 SmartSDR for Maestro and M models
- 448 SmartSDR for Mac
- 275 SmartSDR for iOS
- 266 SmartSDR CAT
- 215 DAX
- 388 SmartSDR API
- 9.5K Radios and Accessories
- 70 Aurora
- 313 FLEX-8000 Signature Series
- 7.2K FLEX-6000 Signature Series
- 980 Maestro
- 58 FlexControl
- 869 FLEX Series (Legacy) Radios
- 952 Genius Products
- 474 Power Genius XL Amplifier
- 349 Tuner Genius XL
- 129 Antenna Genius
- 310 Shack Infrastructure
- 217 Networking
- 473 Remote Operation (SmartLink)
- 143 Contesting
- 830 Peripherals & Station Integration
- 145 Amateur Radio Interests
- 1.1K Third-Party Software