Welcome to the FlexRadio Community! Please review the new Community Rules and other important new Community information on the Message Board.
Need the latest SmartSDR or 4O3A Genius Product Software?
SmartSDR v4.1.5 | SmartSDR v4.1.5 Release Notes
SmartSDR v3.10.15 | SmartSDR v3.10.15 Release Notes
The latest 4O3A Genius Product Software and Firmware
SmartSDR v4.1.5 | SmartSDR v4.1.5 Release Notes
SmartSDR v3.10.15 | SmartSDR v3.10.15 Release Notes
The latest 4O3A Genius Product Software and Firmware
If you are having a problem, please refer to the product documentation or check the Help Center for known solutions.
Need technical support from FlexRadio? It's as simple as Creating a HelpDesk ticket.
Need technical support from FlexRadio? It's as simple as Creating a HelpDesk ticket.
Tutorial: Setting up fldigi with SmartSDR
fldigi is one of my favourite programs, because it is easy to setup, is very stable and
shows everything on one screen, making it IMHO the best program for portable use.
I will concentrate on fldigi only, although there are a lot of other very interesting programs
on David, W1HKJ's page.
There have been other tutorials both from FlexRadio and on this forum on digital
modes. My tutorials refer to the newest versions at this date September 2015.
I run all programs on Windows 7 Home Premium both 32 and 64 bit.
Setup for Windows 10 should be the same as for Windows 7, although there have been
reports about problems with virtual ports. Be careful to totally remove SmartSDR
from your PC before you install Windows 10, then reinstall, having saved your
profiles beforehand.
Setup of digital mode programs often opens server ports. You have to allow them
on your system, so have a look at both your firewall and antivirus programs if
there is no connection. The OS can also create a problem concerning user
permissions
Please tell me about improvements to the tutorials and issues not reported here.
C. fldigi
1. Download fldigi http://www.w1hkj.com/download.html and the RigCat xml files for
your Rig. In our case that would be SmartSDR SliceA and SmartSDR SliceB written
by Tim, W4TME and recently updated to include the new RTTY mode.
2. In SmartSDR CAT notice the port which was created at installing it and to which
3rd party programs will connect, in my case COM6:
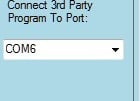
3. Create a virtual PTT port in the Serial ports tab clicking "Add a port", then
"PTT" and you should get a COM port pair (COM7-17) in this case:
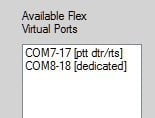
Notice that I have also created a dedicated CAT port pair (COM8-18) which you
need only if you want to connect other programs which can't use a HRD server.
The COM port numbers can vary on your pc! Be careful that the newly created
COM ports are not used by other, already existing, devices! You can create a
little batch file, which I call "View Devices". Just copy the lines into your editor
and save the batch file as "view devices.bat"
set devmgr_show_nonpresent_devices=1
set devmgr_show_details=1
start DEVMGMT.MSC
Now you can see all your COM ports, even the hidden ones, if so clicked.
This is my list, yours will show different ports:
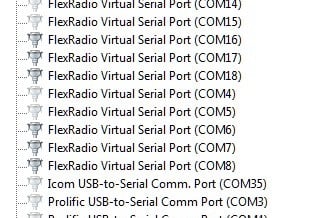
Sometimes two ports with the same number can crash Windows. In that case
you have to restart in protected mode and change the numbers or deinstall
the offending driver.
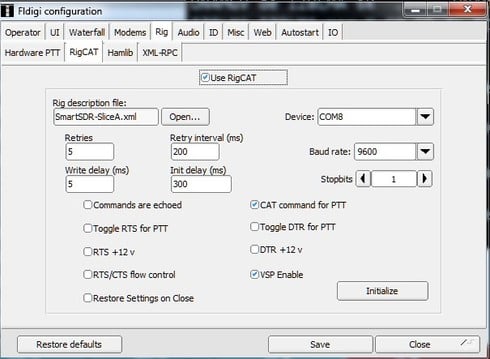
4. To connect fldigi to SmartSDR you need only RigCAT.
Notice that I have used COM8 here, which I have created in
SmartSDR CAT, leaving the main CAT port 6 open for my HRD Logbook and
it's corresponding HRD server MiniDeluxe. If you log directly with fllog you
don't need to create this extra port in SmartSDR CAT.
Don't forget to click "Initialize" in fldigi, which is necessary each time you
change settings on diffent tabs.
How to use fldigi with two slices has already been explained on this forum
https://community.flexradio.com/flexradio/topics/new-fldigi-rigcat-files-for-so2r-capability
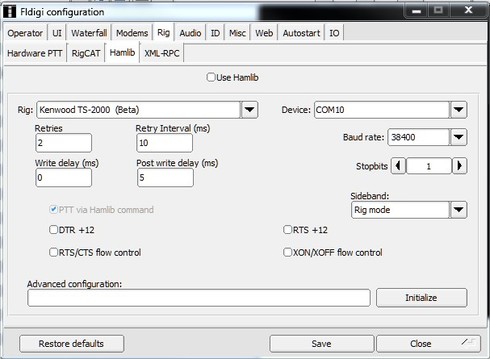
3. If you want to connect to another TRX, a TS-2000 in this case,
you can use Hamlib, untick it and change TRX by selecting the corresponding
CAT file, a very nice touch.
Notice that COM10 is used here because I use a microHAM DigiKeyer II
to connect my TS-2000X.
The COM port numbers can vary on your pc! Be careful that the newly
created COM ports are not used by other, already existing, devices!
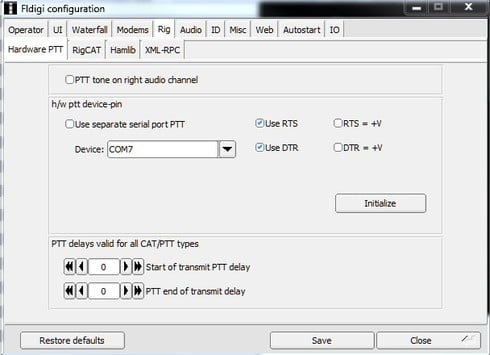
4. Setting up PTT:
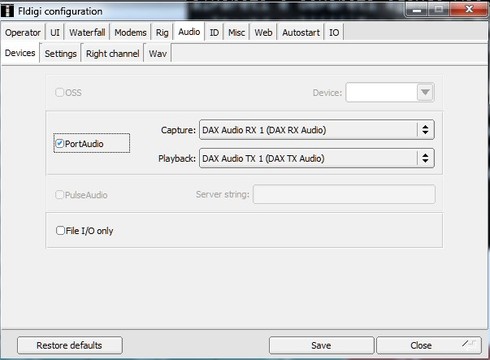
5. Setting up Audio:
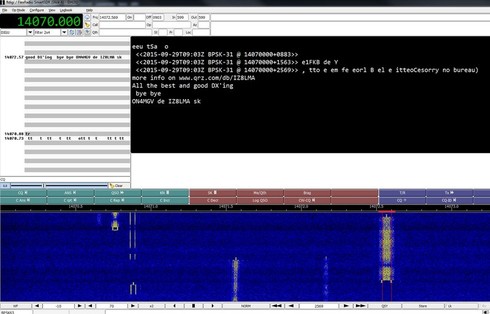
6. Main screen (PSK63), SmartSDR set to DIGU, 5.0K slice bandwidth.
7. Main screen (RTTY), SmartSDR set to RTTY, 400Hz bandwidth
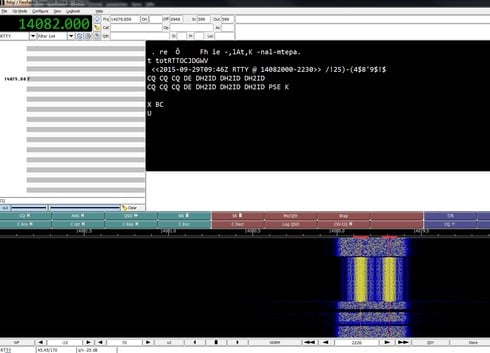
RTTY is spot on.
Our club A07 of the German Amateur Radio Club (DARC) will have a fieldday
from October 16 to 18 on a mountain called Teufelsmühle (Devils Mill) in
the Black Forest (Let's hope that we get back again ;-).
This will give me an opportunity to extensively test fldigi both with my Flex-3000
and my Elecraft KX3.
shows everything on one screen, making it IMHO the best program for portable use.
I will concentrate on fldigi only, although there are a lot of other very interesting programs
on David, W1HKJ's page.
There have been other tutorials both from FlexRadio and on this forum on digital
modes. My tutorials refer to the newest versions at this date September 2015.
I run all programs on Windows 7 Home Premium both 32 and 64 bit.
Setup for Windows 10 should be the same as for Windows 7, although there have been
reports about problems with virtual ports. Be careful to totally remove SmartSDR
from your PC before you install Windows 10, then reinstall, having saved your
profiles beforehand.
Setup of digital mode programs often opens server ports. You have to allow them
on your system, so have a look at both your firewall and antivirus programs if
there is no connection. The OS can also create a problem concerning user
permissions
Please tell me about improvements to the tutorials and issues not reported here.
C. fldigi
1. Download fldigi http://www.w1hkj.com/download.html and the RigCat xml files for
your Rig. In our case that would be SmartSDR SliceA and SmartSDR SliceB written
by Tim, W4TME and recently updated to include the new RTTY mode.
2. In SmartSDR CAT notice the port which was created at installing it and to which
3rd party programs will connect, in my case COM6:

3. Create a virtual PTT port in the Serial ports tab clicking "Add a port", then
"PTT" and you should get a COM port pair (COM7-17) in this case:

Notice that I have also created a dedicated CAT port pair (COM8-18) which you
need only if you want to connect other programs which can't use a HRD server.
The COM port numbers can vary on your pc! Be careful that the newly created
COM ports are not used by other, already existing, devices! You can create a
little batch file, which I call "View Devices". Just copy the lines into your editor
and save the batch file as "view devices.bat"
set devmgr_show_nonpresent_devices=1
set devmgr_show_details=1
start DEVMGMT.MSC
Now you can see all your COM ports, even the hidden ones, if so clicked.
This is my list, yours will show different ports:

Sometimes two ports with the same number can crash Windows. In that case
you have to restart in protected mode and change the numbers or deinstall
the offending driver.
4. To connect fldigi to SmartSDR you need only RigCAT.
Notice that I have used COM8 here, which I have created in
SmartSDR CAT, leaving the main CAT port 6 open for my HRD Logbook and
it's corresponding HRD server MiniDeluxe. If you log directly with fllog you
don't need to create this extra port in SmartSDR CAT.
Don't forget to click "Initialize" in fldigi, which is necessary each time you
change settings on diffent tabs.

How to use fldigi with two slices has already been explained on this forum
https://community.flexradio.com/flexradio/topics/new-fldigi-rigcat-files-for-so2r-capability
3. If you want to connect to another TRX, a TS-2000 in this case,
you can use Hamlib, untick it and change TRX by selecting the corresponding
CAT file, a very nice touch.
Notice that COM10 is used here because I use a microHAM DigiKeyer II
to connect my TS-2000X.
The COM port numbers can vary on your pc! Be careful that the newly
created COM ports are not used by other, already existing, devices!

4. Setting up PTT:

5. Setting up Audio:

6. Main screen (PSK63), SmartSDR set to DIGU, 5.0K slice bandwidth.

7. Main screen (RTTY), SmartSDR set to RTTY, 400Hz bandwidth

RTTY is spot on.
Our club A07 of the German Amateur Radio Club (DARC) will have a fieldday
from October 16 to 18 on a mountain called Teufelsmühle (Devils Mill) in
the Black Forest (Let's hope that we get back again ;-).
This will give me an opportunity to extensively test fldigi both with my Flex-3000
and my Elecraft KX3.
7
Comments
-
Thank you1
-
Addendum I to the fldigi tutorial:
1. Set the RTTY sweet spot to 2210 in the Configure-Misc-Sweet Spot Tab.
Clicking on the mark tone in the SmartSDR panadapter will center the RTTY
signal for decode.
(Thanks to Bob N7ZO)
https://community.flexradio.com/flexradio/topics/fldigi-rigcat-files-need-updated-for-rtty-mode?topi...
2. Verify that you have got the new and updated xml files from the fldigi page,
their status comment in their header should read:
"....Date: 8-Aug-2015"
Right click and "save as" in a folder under your documents. I made one
and named it "fldigi files" for all my TRX.
If you want to look at xml files, you can open it with this free program:
https://notepad-plus-plus.org/ or in your browser.
0 -
Addendum II to the fldigi tutorial:
With the arrival of SmartCAT 1.6.21 it is much easier now to create and change ports by using the "advanced" mode.
1. open any port by clicking "Edit"
2. Right click anywhere in the opening window
3. tick "Advanced"
4. This setting will persist until you untick "Advanced"!
Note that my CAT port is 25, as I am running some other programs
in parallel.
Be careful about choosing port numbers, control
your ports in Windows by using this batch file:
set devmgr_show_nonpresent_devices=1
set devmgr_show_details=1
start DEVMGMT.MSC
making sure to click "show all devices".
In fldigi use this setup:
Note that I use "CAT command for PTT" !
Using "Hardware PTT" is not necessary!
Please post comments.
Alex - DH2ID1 -
Thank Alex, very useful!0
-
Thanks for the updates Alex. Could you possibly make this and your other tutorials available as PDFs? I like to download such useful information.
I know I could print to PDF, but the end result looks awful, especially if comments have been posted as in this case.
Tnx,
Guy0 -
Thanks for all the great information. I have only one issue that I can not identify: upon launching or closing fldigi, my 6300 is keyed! I have to click MOX to unkey the radio. I've double checked all my settings.Any ideas? Tnx, Eric0
-
I have have the same problem upon launching or closing fldigi, my 6300 is keyed! I have to click MOX to unkey the radio. I've double checked all my settings. Thanks Russ
0
Leave a Comment
Categories
- All Categories
- 383 Community Topics
- 2.1K New Ideas
- 640 The Flea Market
- 8.3K Software
- 147 SmartSDR+
- 6.4K SmartSDR for Windows
- 188 SmartSDR for Maestro and M models
- 435 SmartSDR for Mac
- 274 SmartSDR for iOS
- 262 SmartSDR CAT
- 201 DAX
- 383 SmartSDR API
- 9.4K Radios and Accessories
- 47 Aurora
- 279 FLEX-8000 Signature Series
- 7.2K FLEX-6000 Signature Series
- 958 Maestro
- 58 FlexControl
- 866 FLEX Series (Legacy) Radios
- 934 Genius Products
- 466 Power Genius XL Amplifier
- 342 Tuner Genius XL
- 126 Antenna Genius
- 304 Shack Infrastructure
- 213 Networking
- 464 Remote Operation (SmartLink)
- 144 Contesting
- 796 Peripherals & Station Integration
- 142 Amateur Radio Interests
- 1K Third-Party Software

