SmartSDR v4.1.5 | SmartSDR v4.1.5 Release Notes
SmartSDR v3.10.15 | SmartSDR v3.10.15 Release Notes
The latest 4O3A Genius Product Software:
The latest 4O3A Genius Product Software and Firmware
If you are needing assistance with FlexRadio products, please refer to the product documentation or check the Help Center for known solutions. Need technical support from FlexRadio? It's as simple as creating a HelpDesk ticket.
TeensyMaestro
Comments
-
Hi Kuno, yes, the screen should clear first. This is starting to sound like the Teensy 4.1 board.
I will look to see if I have another display so that I can recreate your test setup today. I will let you know what I discover.
0 -
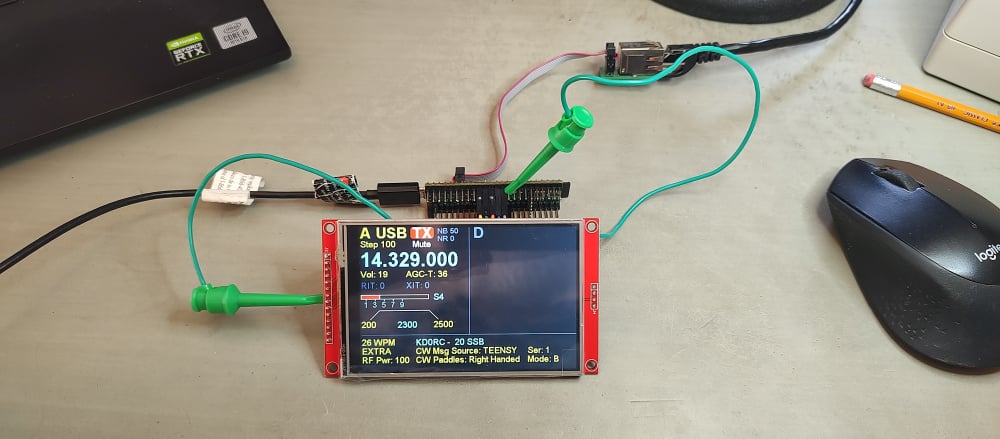
Hi Kuno, I found a display (I'm glad I bought a spare!) and it works with just the following connected:
VCC to 5V
GND to G
CS to pin 10
RESET to pin 8
DC/RS to pin 9
SDI(MOSI) to pin 11
SCK to pin 13
LED to 3V
SDO(MISO) to pin 12
If this is how you are connected, then I suspect a problem with the Teensy 4.1 board. Here is mine with only these connections.
You might try re-loading the HW2 version (V002.003B4) from my post above, just in case there was a problem with the firmware load.
Also, do you have SmartSDR running when you boot up the TeensyMaestro? If not, try it with SmartSDR already running.
If none of this helps, then there is most likely a problem with your Teensy 4.1 board.
0 -
Len,
it looks like I have to get another Teensy. I also tried the latest Beta version and wired the same way you did, but without any change. Many thanks for your patience, it will take a while till I get the new Teensy.
vy 73 de DF1SD, Kuno
0 -
Hi Kuno, sorry that you had so much trouble. Hopefully a new Teensy board will be all you need.
0 -
TeensyMaestro V2.003 is now available on GitHub:
Be sure to select the correct HW version for your build. HW1 is for point-to point wired units using the original KD0RC BOM. HW2 is for those using Simon, NV0E's PC board set or point to point wiring using his BOM.
*****************************V 2.003 ****************************
Fixed problem with more than 2 slices open at once.
Fixed library to allow frequencies over 1,000 MHz to show correctly (thanks to Neil, G7UFO for pointing this out!).
Fixed issue with S Meter readings of 60 dB over S9 and up.
Fixed occasional keyer lock-up condition when in C (cootie-key) mode.
Fixed library to use max panadapters and max slices from discovery packet instead of hard-coding them to 2.
Changed so that SDC doesn't cancel the screen saver when it automatically adjusts AGC-T.
Added ability to select any two slices to be displayed.  A and D are the default.  If the requested slices aren't open, it uses the lowest named open slices.  Default can be set on the SD card.
Added ability to display s-meters C - H (2 - 7).
Slice selection defaults to slices A and D. The default can be changed in the MMConfig.ini file. There is a new menu, Slice Menu, that allows changing which slice is shown on the left side and which is shown on the right.
A and D are the default values to make Diversity operation easier. On a 4 slice radio, A opens first, and if not in use, D opens when DIV is selected. If DIV is off, then the lowest named open slice is shown. So if you have A and B open, you will see them both. Now engage DIV, and it will open as D. Since D is one of the specified slices, it now takes precedence over B. Shut of DIV, and B reappears. 6700 owners will want to set A and H as the defaults.
This release mostly benefits Flex owners who have rigs with more than 2 slices (6600, 6700, 8600, AU520). I have tested this with a 6400 and an 8600, but not any of the other rigs. If anyone is using a TeensyMaestro with an Aurora, I would love to hear how it is working.
If you are building a TeensyMaestro, post your progress here - it is interesting to see what others are doing with the project.
1 -
Hi Len,
I just finished building the TeensyMaestro using the kit Neil G7UFO provides. His kit is well made and I am glad I went with it. When I saw the kit on his website, I thought I need to try it, even though I do not have any experience with soldering electronic components. The maximum I did is soldering wires. I tested a digital clock kit I purchased as a way to check if I could manage. That kit has similar components to the TeensyMaestro - and it worked. Long story short - you designed a PCB that is manageable even for someone with very little experience. So, thanks.
Here at the club in Essen, Germany, where our clubstation has a 6700, folks were quite impressed with the TeensyMaestro. At this stage, I am trying to work it remotely from home. We use SoftEther and zerotier. I have not been able to get it working, though. You mentioned that you setup a bridge connection. I would appreciate if you could share how you got the TeensyMaestro find the Flex that way.
vy73 Michael DL1MC0 -
Hi Michael, thanks for your thoughts. One little correction - Simon, NV0E designed the beautiful boards and front panels. He did a great job, and I think a lot of people have been able to build one who would not want to tackle the point-to-point version that I originally created.
My method for using SoftEther was to have a computer at the radio site running SoftEther Server. At the operator site, I have a computer running SoftEther Client with the Ethernet port bridged to the server. I plug the TeensyMaestro into the computer at the operator site and connect to the Internet using the computer's WiFi. The term used by SoftEther is "Cascade" to connect the LAN at the radio site to the equipment at the operator site.
I have SmartSDR running on the operator computer and connected to the radio using SmartLink.
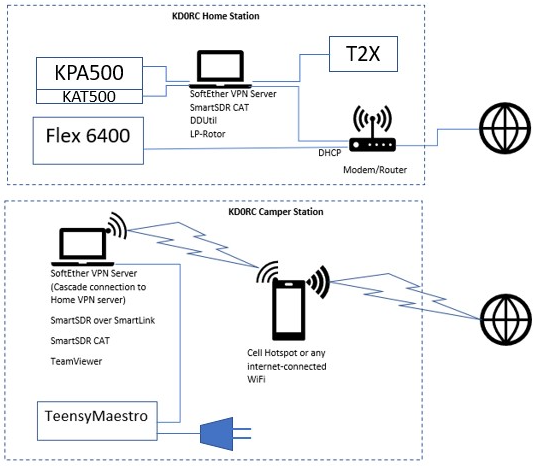
By the way, the blue thing at the bottom of the diagram is paddles, not a giant line plug! Use the CW Menu in the TeensyMaestro to set Keyer Output to ETHERNET if you want to use paddles or a straight key to send CW. I also find that I need a fairly high setting of CW Delay (200 - 350), depending on the quality of the Internet link. Too short of a delay causes choppiness in the CW keying.
Let me know if this helps.
0 -
Thanks for the diagram. I got it working in the end and quite pleased so far. In parallel, I would like to test it with Zerotier as well. Most of the info I found was about setting up the remote site. There was one post about integrating a Maestro but that config did not work for me. Do you happen to know other Hams who made it work?0
-
Hi Michael, I think that ZeroTier has some issue (UDP, perhaps?).
The Maestro is capable of using SmartLink, so no VPN is required.
0


Leave a Comment
Categories
- All Categories
- 388 Community Topics
- 2.2K New Ideas
- 658 The Flea Market
- 8.4K Software
- 156 SmartSDR+
- 6.5K SmartSDR for Windows
- 186 SmartSDR for Maestro and M models
- 439 SmartSDR for Mac
- 275 SmartSDR for iOS
- 265 SmartSDR CAT
- 204 DAX
- 386 SmartSDR API
- 9.4K Radios and Accessories
- 53 Aurora
- 297 FLEX-8000 Signature Series
- 7.2K FLEX-6000 Signature Series
- 970 Maestro
- 58 FlexControl
- 866 FLEX Series (Legacy) Radios
- 944 Genius Products
- 471 Power Genius XL Amplifier
- 347 Tuner Genius XL
- 126 Antenna Genius
- 306 Shack Infrastructure
- 215 Networking
- 468 Remote Operation (SmartLink)
- 142 Contesting
- 811 Peripherals & Station Integration
- 144 Amateur Radio Interests
- 1.1K Third-Party Software