Welcome to the new FlexRadio Community! Please review the new Community Rules and other important new Community information on the Message Board.
Need the latest SmartSDR, Power Genius, Tuner Genius and Antenna Genius Software?
SmartSDR v3.7.4 and the SmartSDR v3.7.4 Release Notes | SmartSDR v2.12.1 and the SmartSDR v2.12.1 Release Notes
SmartSDR v1.12.1 and the SmartSDR v1.12.1 Release Notes
Power Genius XL Utility v3.8.8 and the Power Genius XL Release Notes v3.8.8
Tuner Genius XL Utility v1.2.11 and the Tuner Genius XL Release Notes v1.2.11
Antenna Genius Utility v4.1.8
If you are having a problem, please refer to the product documentation or check the Help Center for known solutions.
Need technical support from FlexRadio? It's as simple as Creating a HelpDesk ticket.
Need technical support from FlexRadio? It's as simple as Creating a HelpDesk ticket.
SO2R Antenna Switching with FLEX 6600?
Options
Al Dewey
Member ✭✭
I am considering purchase of FLEX 6600. I will use primarily for SO2R contesting with N1MM. I have seen KE5DTO and K9CT's document and it is useful. One thing is not clear to me however. Is there some kind of output from the FLEX that will allow me to operatie my SixPack antenna switch. With my current radios (ICOM 7600 and FT2000), I use WX0B band decoders. Will I still need these or is there some way to do it directly from the FLEX? In other words, when I change bands on the FLEX, I will want the correct antenna to be selected on the Six Pack.
1
Answers
-
Yes. There are a variety of options.
You can use your band master with a BCD cable. The radio can output Yaesu style BCD.
You can also skip the band decoder and set up something like a Denkovi or SainSmart relay board (must have genuine FTDI chip). You set it up as BIT cables and the relays can activate on any bands you choose. Or you can get one of the FTDI USB to parallel and set it up as bit cables. Same deal. Check out the USB interface guide.
With a USB hub you can have as many as you want.
Ria1 -
Or do what I did, sold my micro ham 6 port antenna two radio switch and bought a two radio x 8 port 4o3a antenna genius switch, as that connects onto my lan and will follow the flex radio ant 1 and ant 2 band changes in auto mode and so2r selected on the antenna genius switch app. Eventually ssdr will support the antenna genius switch without the need for its own desktop app to be running. 73 Steve gw0gei / gw9j1
-
Al & Ria,
I purchased two denkovi 8 relay boards but have given it a mild twist.
One board I plugged the USB into the computer and run DDUtil.
Via DDUtil I select the A side of the Six-pak for RX antennas on the slice I am using using a Genovation keypad. The keypad also selects RX antenna ports as well. This is really handy for DXing and RX antenna quick selecting.
The second denkovi board is set to auto select TX antennas on the B side of the Six-pak.
The USB is plugged in to the radio's USB Jack.
I use the extra power outputs in the Six-pak wafer switches so you can easily override and manually select as well.
Al I set this all up and had it working perfectly on my 6300 before I traded it in.
Once the 6600 arrives I plan to do a full write-up on it in a web page and on community site.
I have part of the page done with pics if you'd like to give it a look.
I also plan to include setting up the Genovation keypad as well.
I like my Six-pak and plan to keep it.
This may give you a little better idea of what I have done.

 1
1 -
Nice thing too about the Antenna Genius (AG) is that by changing the DIP switch setting Port A and B can have 4 different methods of selecting antenna ports.
1. LAN control - In this mode AG gets band data from any 6000 series using the TCP/IP network. The AG must be connected to the same subnet, you configure the PC app and assign what band and/or frequency ranges you want to be assigned to what antenna port. Works great, but downside is have to have the PC on all the time.
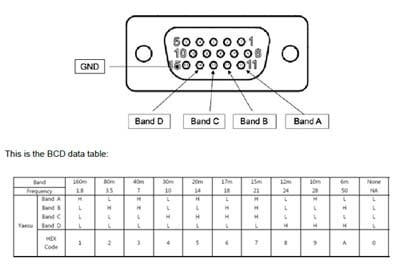
2. BCD control - In this mode AG gets band data from radios using the standard BCD protocol. A USB to parallel adapter would send the BCD to the AG. There is a 25 pin male connector just like a VGA monitor connector on the AG. Big advantage is that no PC is needed, so great if you operate remotely.
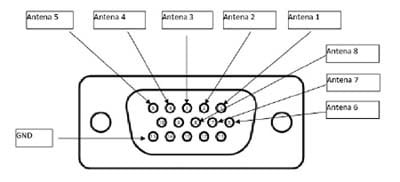
3. Pin-to-Port control - In this mode you can use an external switch for manual switching. You can buy a control box or DYI, just apply appropriate voltage to one of 8 pins of the 15pin connector to select one of 8 antenna ports.
4. Interface Genius control - In this mode AG gets band data from Interface Genius, using the TCP/IP network. Interface Genius is a product also by http://www.4o3a.com
I just got a USG to parallel adapter in this week and will be hooking it up this weekend if I can find some time, probably a Sunday afternoon project. I use LAN control but the software is not perfected yet. There is no way to control AG from Maestro but it is planned. I can see myself eventually building a box with 2 rotary switches with LEDs so to manually control things, this will be especially useful when I want to use a different radio with Port A or B on the AG.
1 -
Thanks to Ria, Clay, Steve , and Mike for the suggestions. I really like my WX0B Six pack and really don't want to have to replace it unless there is a compelling reason to do so. Initially, I think I will just hang on to my Band Master band decoders and use Yaseu BCD type interface as Ria suggests. Ultimately, I am intrigued by the solution that Clay proposes and might ultimately go with that approach. Of course, I have to make the leap to purchase a 6600 first. Thanks again for the suggestions. de Al, K0AD
1 -
You're very welcome Al.
Everyone in this thread hit on all the best possible routes to take this, there may be a couple additional tangents but I am certainly not aware of any.
My Six-Pak has in the past been controlled SO2R with a pair of FT-920 Yaesus using their BCD out to drive a pair of BCD Decoders from Unified Micro Systems. They in turn drove a pair of ICE filters and a relay bank to drive the Six-Pak. ICE is sink to ground, Six-Pak is source to VCC 12+. I gave that decoder box to a DXer down state to experiment and learn with. I no longer need ICE filters with my Flex Radio.
The point is that this was only BCD out via the radio.
With the Flex you can still go BCD or the Bit cable Ria mentioned. I have a couple bit cables but chose to go the Denkovi USB relay route with the Six-Pak.
I love the choice I made with the Genovation Virtual USB keypad.
Quick access to any antenna is wonderful. The keypad also does other tasks on the Flex Radio much easier.
BTW: With the Virtual USB version of the keypad NO FOCUS is required for the keypad, it just works regardless of where the mouse is.
Once you have your new radio on the bench and decide which route you want to go we will all be more than happy to give you a hand.
In the mean time I will be working on my info page if you still want to keep your Six-Pak.
I am good in QRZ, 73'
Clay N9IO
0 -
UPDATE: Made separate tutorial of this: https://community.flexradio.com/flexradio/topics/antenna-genuis-band-changing-tutorial-lan-bcd-pin-t...
How to Interface the AG to a Flex 6xxx for BCD control
You will need a USB to parallel adapter for Port A and Port B for SO2R but for simplification I will detail just connecting just to Port A. The DIP switch must first by set to BCD control for Port A which the AG manual indicates select switch 2 to ON. For Port B switch 4 to ON. Again, I've reference manuals with links below.
This USB to parallel adapter I used was:
https://www.amazon.com/gp/product/B00HKK4SCO/ref=oh_aui_detailpage_o00_s00?ie=UTF8&psc=1
but Flex also has one you can buy, http://cart.flexradio.com/USB-to-Parallel-adapter-for-the-FLEX-6000-series_p_1001.html
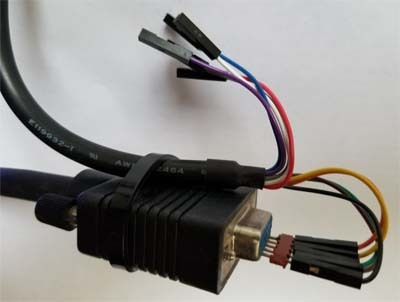
Luckily I found an old shielded 10' VGA cable which gave me lots of length to get to my radio. Was going to cut the end off the cable but decided just to use 5 pins of this header plugged into the female VGA connector pins 11 - 15.
The USB to parallel adapter has color coded wires with jtab connector on each, this is what I used from adapter to VGA connector:- black (ground) on adapter to VGA pin 15 on VGA connector
- brown (BIT4) on adapter to VGA pin 15 on VGA connector
- green (BIT3) on adapter to VGA pin 15 on VGA connector
- yellow (BIT2) on adapter to VGA pin 15 on VGA connector
- orange (BIT1) on adapter to VGA pin 15 on VGA connector

Plugged the VGA cable into the Port A connector on the AG and the other end, plugged the adapter into a USB hub that I have connected to my 6700, I selected USB Cables in the SmartSDR menu, saw the new cable, made these changes:- Name: Antenna Genius
- Cable Type: BCD
- Source: TX Slice
- Type: HF-BCD
- Polarity: Active High (default)
Ideally, until the AG app can be run remotely on a computer to control the AG antenna switching and/or AG control added to the Maestro I would like the AG software modified to sense control method instead of having to manually select the DIP switch. So if the AG does not see a LAN connection to the App on a PC, then it should default to BCD control, if no BCD is sensed then look for Pin to Port control. Simple enough right.
Here is some links to PDFs that are needed:0
Leave a Comment
Categories
- All Categories
- 246 Community Topics
- 2.1K New Ideas
- 488 The Flea Market
- 7.1K Software
- 5.9K SmartSDR for Windows
- 134 SmartSDR for Maestro and M models
- 331 SmartSDR for Mac
- 243 SmartSDR for iOS
- 222 SmartSDR CAT
- 163 DAX
- 348 SmartSDR API
- 8.6K Radios and Accessories
- 6.9K FLEX-6000 Signature Series
- 765 Maestro
- 41 FlexControl
- 836 FLEX Series (Legacy) Radios
- 733 Genius Products
- 393 Power Genius XL Amplifier
- 255 Tuner Genius XL
- 85 Antenna Genius
- 228 Shack Infrastructure
- 152 Networking
- 370 Remote Operation (SmartLink)
- 120 Contesting
- 583 Peripherals & Station Integration
- 115 Amateur Radio Interests
- 812 Third-Party Software


