Welcome to the FlexRadio Community! Please review the new Community Rules and other important new Community information on the Message Board.
Need the latest SmartSDR or 4O3A Genius Product Software?
SmartSDR v4.1.5 | SmartSDR v4.1.5 Release Notes
SmartSDR v3.10.15 | SmartSDR v3.10.15 Release Notes
The latest 4O3A Genius Product Software and Firmware
SmartSDR v4.1.5 | SmartSDR v4.1.5 Release Notes
SmartSDR v3.10.15 | SmartSDR v3.10.15 Release Notes
The latest 4O3A Genius Product Software and Firmware
If you are having a problem, please refer to the product documentation or check the Help Center for known solutions.
Need technical support from FlexRadio? It's as simple as Creating a HelpDesk ticket.
Need technical support from FlexRadio? It's as simple as Creating a HelpDesk ticket.
Antenna Genuis Band Changing Tutorial LAN/BCD/Pin to Port

Mike VE3CKO
Member ✭✭✭
Thought it might be useful to some to detail my experience with the 8 x 2 Antenna Genius Plus. I've had a cluster of Alfa-Delta switches to select the multiple beam/wire antennas and it was messy and clumsy. Then got a used 8 x 2 8-Pak from Array Solutions which really cleaned up and simplified antenna switching, but when the Antenna Genius (AG) came out with the automated antenna/band switching, I had to get it and never looked back. It was the first and most logical step to station automation with four different methods of selecting antenna ports. The DIP switch must be set to the control mode desired and are detailed in the manual referenced below. There is a 25 pin male connector (just like a VGA monitor connector) for Port A and another for Port B.
1. LAN control - In this mode the AG gets band data from any 6xxx using the TCP/IP network. The AG must be connected to the same sub-net, you configure the AG via PC app and can assign what band and/or frequency ranges you want to be assigned to what 1 of 8 antennas connectors. Works great, but downside is have to have the shack PC on all the time.
2. BCD control - In this mode AG gets band data from any 6xxx using the standard BCD protocol. A USB to parallel adapter would send the BCD to the AG. Big advantage is that no PC is needed, so great if you operate remotely.Unlike the LAN control where you can assign frequency ranges to certain antenna ports, the BCD control method is just band data and does not select any antenna if outside of the standard ham bands.


3. Pin-to-Port control
- In this mode you can use an external switch for manual switching. You
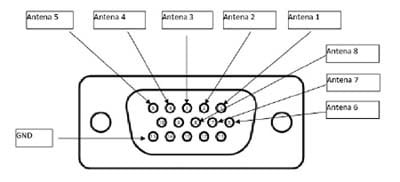
can buy a control box or DYI, just apply appropriate 12 volts to one of 8 pins of the 15pin connector to select one of 8 antenna ports.

4. Interface Genius control - In this mode AG gets band data from Interface Genius, using the TCP/IP network. Interface Genius is a product also by http://www.4o3a.com
I use LAN control and the application software run on the PC is pretty good and useful if your in the shack, it is not perfected yet for remote use. At this time there is no way to control AG from Maestro but it is planned in an upcoming SmartSDR release. I can see myself eventually building a box with 2 rotary switches with LEDs so to manually control things, this will be especially useful when I want to use a different radio with Port A or B on the AG.
How to Interface the AG to a Flex 6xxx for BCD control
You will need a USB to parallel adapter for Port A and Port B for SO2R but for simplification I will detail just connecting just to Port A. The DIP switch must first by set to BCD control for Port A which the AG manual indicates select switch 2 to ON. For Port B switch 4 to ON. Again, I've reference manuals with links below.

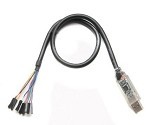
This USB to parallel adapter I used was:
https://www.amazon.com/gp/product/B00HKK4SCO/ref=oh_aui_detailpage_o00_s00?ie=UTF8&psc=1
but Flex also has one you can buy, http://cart.flexradio.com/USB-to-Parallel-adapter-for-the-FLEX-6000-series_p_1001.html
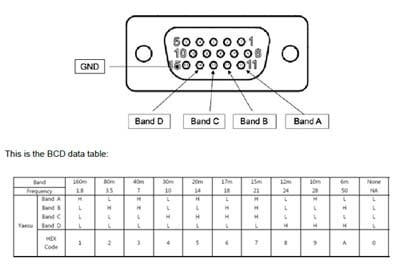
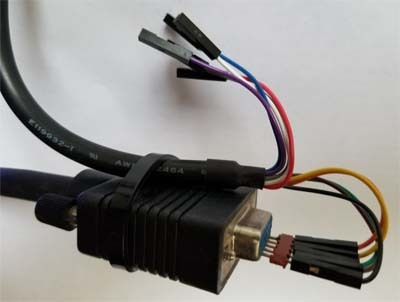
Luckily I found an old shielded 10' VGA cable which gave me lots of length to get to my radio. Was going to cut the end off the cable but decided just to use 5 pins of this header plugged into the female VGA connector pins 11 - 15.

The USB to parallel adapter has color coded wires with jtab connector on each, this is what I used from adapter to VGA connector:
Plugged the VGA cable into the Port A connector on the AG and the other end, plugged the adapter into a USB hub that I have connected to my 6700, I selected USB Cables in the SmartSDR menu, saw the new cable, made these changes:
Ideally, until the AG app can be run remotely on a computer to control the AG antenna switching and/or AG control added to the Maestro I would like the AG software modified to sense control method instead of having to manually select the DIP switch. So if the AG does not see a LAN connection to the App on a PC, then it should default to BCD control, if no BCD is sensed then look for Pin to Port control. Simple enough right.
Here is some links to PDFs that are needed:
1. LAN control - In this mode the AG gets band data from any 6xxx using the TCP/IP network. The AG must be connected to the same sub-net, you configure the AG via PC app and can assign what band and/or frequency ranges you want to be assigned to what 1 of 8 antennas connectors. Works great, but downside is have to have the shack PC on all the time.
2. BCD control - In this mode AG gets band data from any 6xxx using the standard BCD protocol. A USB to parallel adapter would send the BCD to the AG. Big advantage is that no PC is needed, so great if you operate remotely.Unlike the LAN control where you can assign frequency ranges to certain antenna ports, the BCD control method is just band data and does not select any antenna if outside of the standard ham bands.


3. Pin-to-Port control
- In this mode you can use an external switch for manual switching. You
can buy a control box or DYI, just apply appropriate 12 volts to one of 8 pins of the 15pin connector to select one of 8 antenna ports.

4. Interface Genius control - In this mode AG gets band data from Interface Genius, using the TCP/IP network. Interface Genius is a product also by http://www.4o3a.com
I use LAN control and the application software run on the PC is pretty good and useful if your in the shack, it is not perfected yet for remote use. At this time there is no way to control AG from Maestro but it is planned in an upcoming SmartSDR release. I can see myself eventually building a box with 2 rotary switches with LEDs so to manually control things, this will be especially useful when I want to use a different radio with Port A or B on the AG.
How to Interface the AG to a Flex 6xxx for BCD control
You will need a USB to parallel adapter for Port A and Port B for SO2R but for simplification I will detail just connecting just to Port A. The DIP switch must first by set to BCD control for Port A which the AG manual indicates select switch 2 to ON. For Port B switch 4 to ON. Again, I've reference manuals with links below.

This USB to parallel adapter I used was:
https://www.amazon.com/gp/product/B00HKK4SCO/ref=oh_aui_detailpage_o00_s00?ie=UTF8&psc=1
but Flex also has one you can buy, http://cart.flexradio.com/USB-to-Parallel-adapter-for-the-FLEX-6000-series_p_1001.html
Luckily I found an old shielded 10' VGA cable which gave me lots of length to get to my radio. Was going to cut the end off the cable but decided just to use 5 pins of this header plugged into the female VGA connector pins 11 - 15.

The USB to parallel adapter has color coded wires with jtab connector on each, this is what I used from adapter to VGA connector:
- black (ground) on adapter to VGA pin 15 on VGA connector
- brown (BIT4) on adapter to VGA pin 15 on VGA connector
- green (BIT3) on adapter to VGA pin 15 on VGA connector
- yellow (BIT2) on adapter to VGA pin 15 on VGA connector
- orange (BIT1) on adapter to VGA pin 15 on VGA connector

Plugged the VGA cable into the Port A connector on the AG and the other end, plugged the adapter into a USB hub that I have connected to my 6700, I selected USB Cables in the SmartSDR menu, saw the new cable, made these changes:
- Name: Antenna Genius
- Cable Type: BCD
- Source: TX Slice
- Type: HF-BCD
- Polarity: Active High (default)
Ideally, until the AG app can be run remotely on a computer to control the AG antenna switching and/or AG control added to the Maestro I would like the AG software modified to sense control method instead of having to manually select the DIP switch. So if the AG does not see a LAN connection to the App on a PC, then it should default to BCD control, if no BCD is sensed then look for Pin to Port control. Simple enough right.
Here is some links to PDFs that are needed:
3
Comments
-
Beautiful write-up! Thanks for making this contribution. Perhaps we should copy this into the Knowledge Base.
1 -
Mike, can I plagiarize your write up with the appropriate credit for the HelpDesk?0
-
Sure Tim.
0 -
Thanks Mike
0 -
make the appropriate corrections that show all 5 colors as going to VGA connector pin 15.
1 -
-
Correction as I am unable to edit a post once someone replies.
- black (ground) on adapter to VGA pin 15 on VGA connector
- brown (BIT4) on adapter to VGA pin 14 on VGA connector
- green (BIT3) on adapter to VGA pin 13 on VGA connector
- yellow (BIT2) on adapter to VGA pin 12 on VGA connector
- orange (BIT1) on adapter to VGA pin 11 on VGA connector
1 -
Edits made to HelpDesk article0
Leave a Comment
Categories
- All Categories
- 384 Community Topics
- 2.1K New Ideas
- 642 The Flea Market
- 8.3K Software
- 148 SmartSDR+
- 6.4K SmartSDR for Windows
- 188 SmartSDR for Maestro and M models
- 436 SmartSDR for Mac
- 274 SmartSDR for iOS
- 262 SmartSDR CAT
- 202 DAX
- 383 SmartSDR API
- 9.4K Radios and Accessories
- 47 Aurora
- 284 FLEX-8000 Signature Series
- 7.2K FLEX-6000 Signature Series
- 961 Maestro
- 58 FlexControl
- 866 FLEX Series (Legacy) Radios
- 935 Genius Products
- 466 Power Genius XL Amplifier
- 343 Tuner Genius XL
- 126 Antenna Genius
- 306 Shack Infrastructure
- 215 Networking
- 465 Remote Operation (SmartLink)
- 144 Contesting
- 799 Peripherals & Station Integration
- 142 Amateur Radio Interests
- 1K Third-Party Software

