Welcome to the FlexRadio Community! Please review the new Community Rules and other important new Community information on the Message Board.
Need the latest SmartSDR or 4O3A Genius Product Software?
SmartSDR v4.1.5 | SmartSDR v4.1.5 Release Notes
SmartSDR v3.10.15 | SmartSDR v3.10.15 Release Notes
The latest 4O3A Genius Product Software and Firmware
SmartSDR v4.1.5 | SmartSDR v4.1.5 Release Notes
SmartSDR v3.10.15 | SmartSDR v3.10.15 Release Notes
The latest 4O3A Genius Product Software and Firmware
If you are having a problem, please refer to the product documentation or check the Help Center for known solutions.
Need technical support from FlexRadio? It's as simple as Creating a HelpDesk ticket.
Need technical support from FlexRadio? It's as simple as Creating a HelpDesk ticket.
Unsupported SmartSDR 1.4 over WAN using OpenVPN HowTo (pfSense Firewall)

K6OZY
Member ✭✭✭
This is a guide on how to setup OpenVPN to provide a VPN solution for using SmartSDR 1.4 LAN feature remotely. This guide is fairly complex, but anything that is good is worth working on.
THIS IS UNSUPPORTED BY FLEX RADIO SYSTEMS. THEY SHOULD NOT BE CONTACTED FOR ANY SUPPORT REGARDING THIS.
Now with that disclaimer out of the way, lets continue. I like OpenVPN because PPTP is a COMPROMISED vpn solution that should never be used anymore.
Any VPN solution that allows bridged mode or "TAP" support will work. The goal is to make your remote client get an IP address that is on the same subnet as your radio. For example, if your radio's Ip is 192.168.1.100 mask 255.255.255.0, you need an IP address on your client that is between 192.168.1.1 and 192.168.1.254. Many VPN servers on routers that set up things with a few clicks, don't do that. They setup the system where your client gets an IP address on another subnet and then they route your traffic onto the home network. That will not work.
My example is using the pfSense OpenSource Firewall Solution. It is a free firewall solution that can be installed on super old hardware and is the most powerful firewall I have found for the masses. It rivals many of the commercial vendors too. I use it extensively at my father's work to interconnect many remote offices via VPN with great success.
Any old computer with two network cards will work. I recommend using gigabit network cards for any home network or with any internet connection over 100Mbps. Do not create a bottleneck! Also, I never use my router as my Wifi solution. I disperse Wifi Access points on my home network based on optimal location. Optimal location rarely is the same place where your cable modem or DSL termination point is!
This guide is using pfSense v2.2 release.
First step we need to do is create our Certificate Authority.
1. Login to the web admin
2. Goto System --> Cert Manager
3. First thing to do is create a CA
4. Hit the Plus button
5. Give it descriptive name
6. Next you can either Import an existing CA you might have or create a new one. If you have an existing cert paste it into the box. Otherwise choose Create an Internal Certificate Authority and fill in the information below.
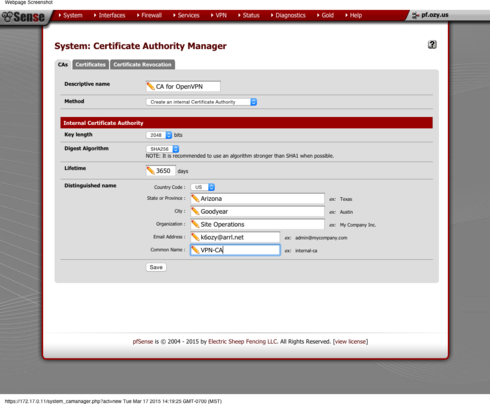
Once thats done we need to create our certificates for the OpenVPN server as well as any users we want to connect
1. While still in System --> Cert Manager, click the Certificates tab
The process for creating a Cert for the server and users are almost identical.
2. In the Method Drop down box make sure it says "Create an Internal Cert"
3. Give a descriptive name. A good idea to specify server/username
4. In the Certificate Authority drop down choose the CA you just created.
5. In Certificate Type drop down specify whether this Cert is for the server or a user.
6. Fill out the rest of the info for location
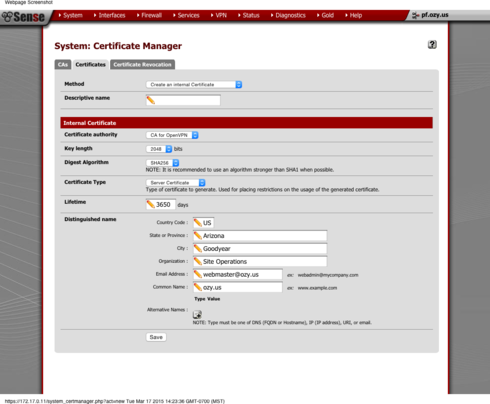
7. Repeat process again for other users keeping in mind the OpenVPN server (pfsense) must have its own cert as well as any users. Create as many certs as you need based off the original CA created earlier
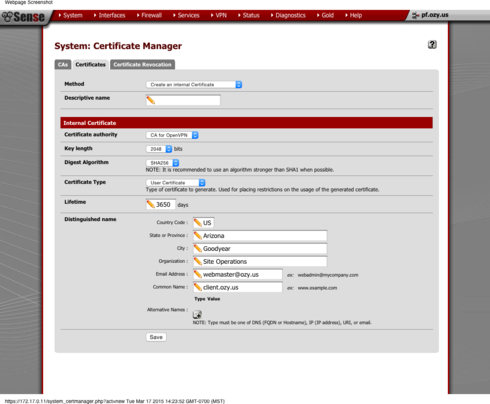
Its probably a good idea to create a revokation list. This way you can easily keep people from connecting. To create a revocation list:
1. While Still in System --> Cert Manager click the Cert Revocation tab
2. Press the plus button next to the CA you created.
3. Method should be create an internal Cert Revo list. Give it a name and verify the CA is in the drop down box.
4. Press save.
5. Youll notice a new line with an edit button. This is where you can revoke or restore certificates for users.
Now we have our Certs!
Time to setup our OpenVPN instance on pfsense.
1. Goto VPN ---> OpenVPN
2. Make sure you're on the server tab. And click the + button to add a server.
3. Going down the line:
Uncheck that disables the serer
Server Mode: Remote Access (SSL/TLS)
Protocol: UDP
Device Mode: TAP
Interface: WAN
Local port: 1194 (default port but you can choose whatever port you like)
Description: *************
Crypto Settings:
TLS Authentication: Check both check boxes
Peer Certificate Authority: Use the CA we created ealier
Peer Revoke List: use the revoke list creates ealier
Server Certificate: This is where you use the Server Certificate created ealier, NOT any of the user certs
DH Paramters Length: I have mine set to 1024
Encryption Algorithm: I use AES-128-CBC
Hardware Crypto: None
Cert Depth: One
Tunnel Settings
Tunnel Network: leave Blank. No tunnel network with Bridging
Bridge DHCP: Check this box
Bridge Interface: Your LAN interface (or whatever interface you want remote clients to be on)
Server DHCP Start/Stop: You can specify an IP range here. However since its bridging you can leave it blank. Your internal DHCP server will take care of it. I leave them blank. One thing to keep in mind is that a client's IP will not be displayed on the Dashboard Widget if you leave the range blank. I'll be brining this up on the fpsense forums.
Redirect Gateway: SEE NOTE AT THE END
Concurrent Connections: self explanatory
Compression: Enabled with Adaptive Compression
TOS: I leave unchecked
Inter-client communication: If you want different remote clients to be able to talk to each other check this box
Duplicate connections: This will allow different people with the same certs you give them to connect. Not recommended, but I'm sure theres instances where it might be required.
Client Settings:
Dynamic IP: checked
Address Pool: unchecked
DNS Default domain: if you have one enter it here
DNS Servers: specify up to 4
NTP Server: you can specify up to 2
Wins Server: if you have one
Advance config is left blank.
Press save, and your OVPN server is created.
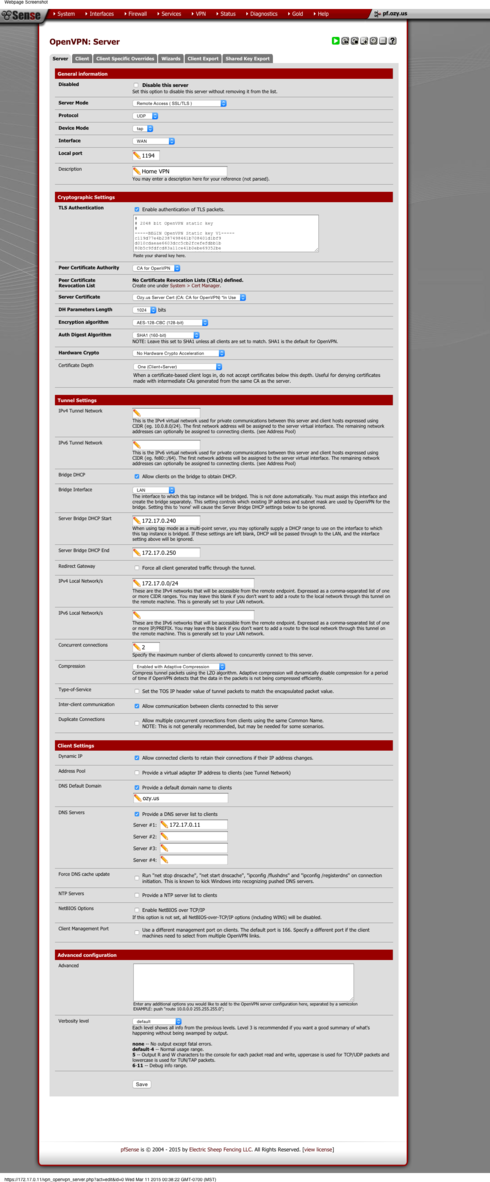
The next thing to do is create a Firewall Rule to allow your OpenVPN traffic to pass.
1. GoTo Firewall ---> Rules
2. Click the plus button to add a rule
3. Going down the line:
Action: Pass
Disabled: unchecked
Interface: WAN
Protocol: UDP
Source: any
Destination: WAN Address
Destination Port Range: This is the port of your OpenVPN server
Give it a description
SAVE!
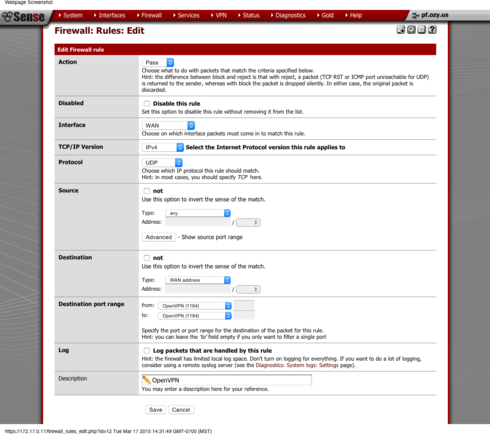
Next thing we have to do is create a bridge. When clients connect to the OpenVPN server it is connecting to the OpenVPN interface. We must bridge that interface with the LAN.
To do this:
1. goto Interfaces ---> Assign
2. Press the + button to add an interface
3. It will probably show up as OPT1, in the drop down box choose your OpenVPN instance
4. Goto Interfaces ---> OPT1
5. Enable the Interface
6. Give it a better description
7. Leave the rest default.
8. Save
9. While still in the Interfaces ---> Assign click the Bridges tab
10. Press the plus button to create a bridge.
11. Choose TWO interfaces you want to bridge (your LAN, and the interface we just made for your OpenVPN server) by clicking on them using the CTRL button, give it a description and SAVE.
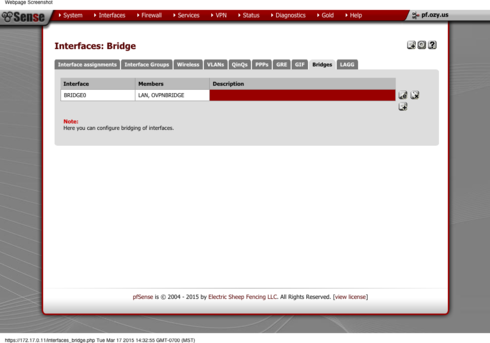
Now we need to allow traffic to flow from the OpenVPN connection to the LAN network.
Now we need to get clients connected
1. GoTo Firewall ---> Rules
2. Click the renamed OVPNBRIDGE Interface Tab and click plus button to add a rule
3. Going down the line:
Action: Pass
Disabled: unchecked
Interface: OVPNBRIDGE (Renamed OPT1 interface)
TCP/IP Version: IPv4
Protocol: Any
Source: Any
Destination: Any
Give it a description
SAVE!
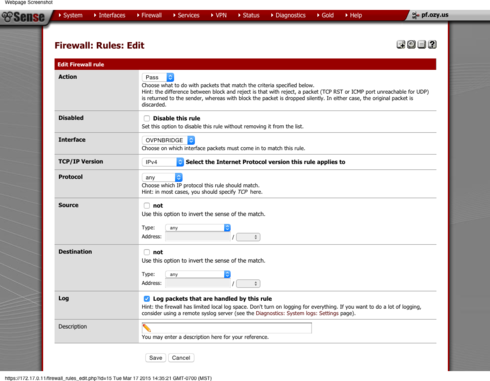
The easiest way is to install the OpenVPN Client Export Package. Using the steps outline to install the tap fix install the OpenVPN Client Export Package.
Once that is finished we can export the config files used by clients.

1. go back to VPN ---> OpenVPN
2. Click the Client Export Tab
3. If you did everything correctly you should see export Options for the Server and that of any user you created.
4. Choose your OpenVPN server in Remote Acccess Server
5. You can choose to export the config using your WAN IP or a dyndns hostname if you have that setup
6. Leave everything else default
7. Choose the user you want to export and choose the Configuration Archive.
8. Pick the version of the client you are installing it on. For Windows 7 and 8.1 x64, pick x64-win6. This will download the client installer to your computer.
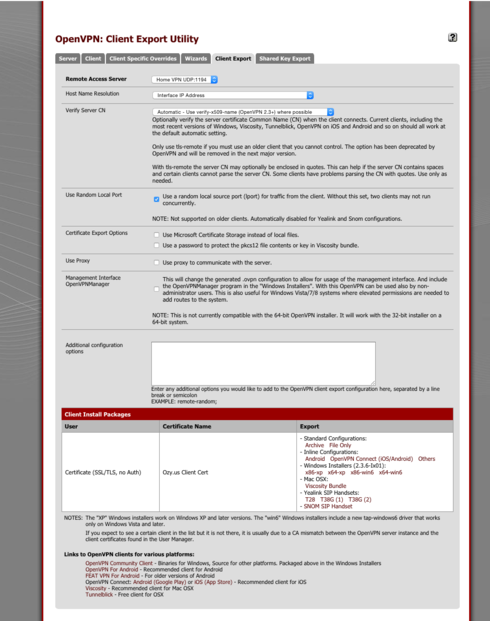
Next steps are done the remote PC's
1. Copy the installer you downloaded to the computer you want to run this on.
2. Install OpenVPN
3. Naviate to where you just installed OpenVPN. In that folder should be a config folder.
4. The contents of the config archive we just downloaded go in this folder.
5. Load up the OpenVPN GUI
6. It will place an icon in the System Tray
7. Right click the icon and choose connect.
8. DONE!
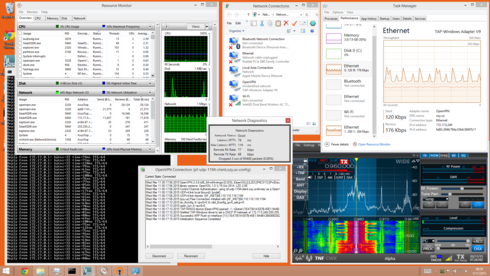
With REMOTE over WAN, you must do some things to reduce bandwidth, especially if you are on metered LTE connection as what I tested. Reducing the FPS and WF rate makes a big impact on this. Also closing DAX.exe if you don't need it saves 5KB/sec as the app seems to heartbeat even if no streams are active. Close SmartCAT as it chatters with the radio quite a bit too.
I was able to get full use of SmartSDR on my iPhone LTE tethered laptop and the quality is great. Use the windows task manager and resource monitor to watch your bandwidth as you adjust settings appropriate for your WAN connection quality. I have been using this solution for a while now during the Alpha with much success.
I know this is pretty involved, but these details are needed when setting up a VPN server. A single mistake can cause the server to not work. Again, I highly recommend not using PPTP for VPNs anymore due to the protocol being compromised.
Happy Flexing!
THIS IS UNSUPPORTED BY FLEX RADIO SYSTEMS. THEY SHOULD NOT BE CONTACTED FOR ANY SUPPORT REGARDING THIS.
Now with that disclaimer out of the way, lets continue. I like OpenVPN because PPTP is a COMPROMISED vpn solution that should never be used anymore.
Any VPN solution that allows bridged mode or "TAP" support will work. The goal is to make your remote client get an IP address that is on the same subnet as your radio. For example, if your radio's Ip is 192.168.1.100 mask 255.255.255.0, you need an IP address on your client that is between 192.168.1.1 and 192.168.1.254. Many VPN servers on routers that set up things with a few clicks, don't do that. They setup the system where your client gets an IP address on another subnet and then they route your traffic onto the home network. That will not work.
My example is using the pfSense OpenSource Firewall Solution. It is a free firewall solution that can be installed on super old hardware and is the most powerful firewall I have found for the masses. It rivals many of the commercial vendors too. I use it extensively at my father's work to interconnect many remote offices via VPN with great success.
Any old computer with two network cards will work. I recommend using gigabit network cards for any home network or with any internet connection over 100Mbps. Do not create a bottleneck! Also, I never use my router as my Wifi solution. I disperse Wifi Access points on my home network based on optimal location. Optimal location rarely is the same place where your cable modem or DSL termination point is!
This guide is using pfSense v2.2 release.
First step we need to do is create our Certificate Authority.
1. Login to the web admin
2. Goto System --> Cert Manager
3. First thing to do is create a CA
4. Hit the Plus button
5. Give it descriptive name
6. Next you can either Import an existing CA you might have or create a new one. If you have an existing cert paste it into the box. Otherwise choose Create an Internal Certificate Authority and fill in the information below.

Once thats done we need to create our certificates for the OpenVPN server as well as any users we want to connect
1. While still in System --> Cert Manager, click the Certificates tab
The process for creating a Cert for the server and users are almost identical.
2. In the Method Drop down box make sure it says "Create an Internal Cert"
3. Give a descriptive name. A good idea to specify server/username
4. In the Certificate Authority drop down choose the CA you just created.
5. In Certificate Type drop down specify whether this Cert is for the server or a user.
6. Fill out the rest of the info for location

7. Repeat process again for other users keeping in mind the OpenVPN server (pfsense) must have its own cert as well as any users. Create as many certs as you need based off the original CA created earlier

Its probably a good idea to create a revokation list. This way you can easily keep people from connecting. To create a revocation list:
1. While Still in System --> Cert Manager click the Cert Revocation tab
2. Press the plus button next to the CA you created.
3. Method should be create an internal Cert Revo list. Give it a name and verify the CA is in the drop down box.
4. Press save.
5. Youll notice a new line with an edit button. This is where you can revoke or restore certificates for users.
Now we have our Certs!
Time to setup our OpenVPN instance on pfsense.
1. Goto VPN ---> OpenVPN
2. Make sure you're on the server tab. And click the + button to add a server.
3. Going down the line:
Uncheck that disables the serer
Server Mode: Remote Access (SSL/TLS)
Protocol: UDP
Device Mode: TAP
Interface: WAN
Local port: 1194 (default port but you can choose whatever port you like)
Description: *************
Crypto Settings:
TLS Authentication: Check both check boxes
Peer Certificate Authority: Use the CA we created ealier
Peer Revoke List: use the revoke list creates ealier
Server Certificate: This is where you use the Server Certificate created ealier, NOT any of the user certs
DH Paramters Length: I have mine set to 1024
Encryption Algorithm: I use AES-128-CBC
Hardware Crypto: None
Cert Depth: One
Tunnel Settings
Tunnel Network: leave Blank. No tunnel network with Bridging
Bridge DHCP: Check this box
Bridge Interface: Your LAN interface (or whatever interface you want remote clients to be on)
Server DHCP Start/Stop: You can specify an IP range here. However since its bridging you can leave it blank. Your internal DHCP server will take care of it. I leave them blank. One thing to keep in mind is that a client's IP will not be displayed on the Dashboard Widget if you leave the range blank. I'll be brining this up on the fpsense forums.
Redirect Gateway: SEE NOTE AT THE END
Concurrent Connections: self explanatory
Compression: Enabled with Adaptive Compression
TOS: I leave unchecked
Inter-client communication: If you want different remote clients to be able to talk to each other check this box
Duplicate connections: This will allow different people with the same certs you give them to connect. Not recommended, but I'm sure theres instances where it might be required.
Client Settings:
Dynamic IP: checked
Address Pool: unchecked
DNS Default domain: if you have one enter it here
DNS Servers: specify up to 4
NTP Server: you can specify up to 2
Wins Server: if you have one
Advance config is left blank.
Press save, and your OVPN server is created.

The next thing to do is create a Firewall Rule to allow your OpenVPN traffic to pass.
1. GoTo Firewall ---> Rules
2. Click the plus button to add a rule
3. Going down the line:
Action: Pass
Disabled: unchecked
Interface: WAN
Protocol: UDP
Source: any
Destination: WAN Address
Destination Port Range: This is the port of your OpenVPN server
Give it a description
SAVE!

Next thing we have to do is create a bridge. When clients connect to the OpenVPN server it is connecting to the OpenVPN interface. We must bridge that interface with the LAN.
To do this:
1. goto Interfaces ---> Assign
2. Press the + button to add an interface
3. It will probably show up as OPT1, in the drop down box choose your OpenVPN instance
4. Goto Interfaces ---> OPT1
5. Enable the Interface
6. Give it a better description
7. Leave the rest default.
8. Save
9. While still in the Interfaces ---> Assign click the Bridges tab
10. Press the plus button to create a bridge.
11. Choose TWO interfaces you want to bridge (your LAN, and the interface we just made for your OpenVPN server) by clicking on them using the CTRL button, give it a description and SAVE.

Now we need to allow traffic to flow from the OpenVPN connection to the LAN network.
Now we need to get clients connected
1. GoTo Firewall ---> Rules
2. Click the renamed OVPNBRIDGE Interface Tab and click plus button to add a rule
3. Going down the line:
Action: Pass
Disabled: unchecked
Interface: OVPNBRIDGE (Renamed OPT1 interface)
TCP/IP Version: IPv4
Protocol: Any
Source: Any
Destination: Any
Give it a description
SAVE!

The easiest way is to install the OpenVPN Client Export Package. Using the steps outline to install the tap fix install the OpenVPN Client Export Package.
Once that is finished we can export the config files used by clients.

1. go back to VPN ---> OpenVPN
2. Click the Client Export Tab
3. If you did everything correctly you should see export Options for the Server and that of any user you created.
4. Choose your OpenVPN server in Remote Acccess Server
5. You can choose to export the config using your WAN IP or a dyndns hostname if you have that setup
6. Leave everything else default
7. Choose the user you want to export and choose the Configuration Archive.
8. Pick the version of the client you are installing it on. For Windows 7 and 8.1 x64, pick x64-win6. This will download the client installer to your computer.

Next steps are done the remote PC's
1. Copy the installer you downloaded to the computer you want to run this on.
2. Install OpenVPN
3. Naviate to where you just installed OpenVPN. In that folder should be a config folder.
4. The contents of the config archive we just downloaded go in this folder.
5. Load up the OpenVPN GUI
6. It will place an icon in the System Tray
7. Right click the icon and choose connect.
8. DONE!

With REMOTE over WAN, you must do some things to reduce bandwidth, especially if you are on metered LTE connection as what I tested. Reducing the FPS and WF rate makes a big impact on this. Also closing DAX.exe if you don't need it saves 5KB/sec as the app seems to heartbeat even if no streams are active. Close SmartCAT as it chatters with the radio quite a bit too.
I was able to get full use of SmartSDR on my iPhone LTE tethered laptop and the quality is great. Use the windows task manager and resource monitor to watch your bandwidth as you adjust settings appropriate for your WAN connection quality. I have been using this solution for a while now during the Alpha with much success.
I know this is pretty involved, but these details are needed when setting up a VPN server. A single mistake can cause the server to not work. Again, I highly recommend not using PPTP for VPNs anymore due to the protocol being compromised.
Happy Flexing!
5
Comments
-
I'm glad you typed that up! We were just discussing over Skype about documenting our process - but you just saved us a whole load of work! :-)
We did it all via the command line as well, so not for the faint of heart!
We've been playing on OpenVPN all day with my 6500 - UK to NC and its great.Thanks for that effort!
0 -
Great write up! Thank you!0
-
Chris,
Thanks for your very helpful detailed complete with screenshots solution. I will do my best to implement it soon.
73
John
W9KXQ
0 -
you mentioned data load. I am very data limited on a 16GB/mo Verizon LTE wireless setup (the only option out here on my ranch besides,ugh, satellite). Is this something that might work for me?
Does your method require static IP's or does your method overcome the need for such?
I am pretty fumble fingered when it comes to setting up complex systems like this. Is there any way I could get personal mentoring if it turns out this would work for me?
0 -
Wow, I'm impressed. I spent a few minutes (very few) earlier today trying to find a vpn or tunnel solution that would do this but nothing jumped out at me. I'll probably just end up waiting for official WAN support from flex unless I get bored on some weekend and want to give this a shot. :-)0
Leave a Comment
Categories
- All Categories
- 384 Community Topics
- 2.1K New Ideas
- 641 The Flea Market
- 8.3K Software
- 148 SmartSDR+
- 6.4K SmartSDR for Windows
- 188 SmartSDR for Maestro and M models
- 436 SmartSDR for Mac
- 274 SmartSDR for iOS
- 262 SmartSDR CAT
- 202 DAX
- 383 SmartSDR API
- 9.4K Radios and Accessories
- 47 Aurora
- 283 FLEX-8000 Signature Series
- 7.2K FLEX-6000 Signature Series
- 960 Maestro
- 58 FlexControl
- 866 FLEX Series (Legacy) Radios
- 935 Genius Products
- 466 Power Genius XL Amplifier
- 343 Tuner Genius XL
- 126 Antenna Genius
- 306 Shack Infrastructure
- 215 Networking
- 464 Remote Operation (SmartLink)
- 144 Contesting
- 799 Peripherals & Station Integration
- 142 Amateur Radio Interests
- 1K Third-Party Software


