SmartSDR v4.1.5 | SmartSDR v4.1.5 Release Notes
SmartSDR v3.10.15 | SmartSDR v3.10.15 Release Notes
The latest 4O3A Genius Product Software:
The latest 4O3A Genius Product Software and Firmware
If you are needing assistance with FlexRadio products, please refer to the product documentation or check the Help Center for known solutions. Need technical support from FlexRadio? It's as simple as creating a HelpDesk ticket.
End of Transmission Cut Off After Foot Switch Release – Flex6000 with VoiceMeeter

Hello everyone!
I operate a Flex6000 radio remotely from home. Recently, I've noticed that when I release the foot switch (connected to a virtual COM port defined in CAT) after speaking, the end of my transmission is cut off. To avoid this, I have to hold the foot switch down for an extra fraction of a second, which is quite difficult to get used to. I suspect this issue began after I installed the mixer program (details below).
I see some timer settings in SSDR (Radio Setup > TX tab), but I'm not sure if they're relevant or if I should adjust them. My TX delay is currently set to 20 because I believe that's required for the connected linear amplifier.
Can anyone advise on how to fix this cutoff issue?
Background:I recently installed VoiceMeeter (Banana) to use VoiceKeyer for prerecorded voice messages. The solution was described here.
I'm not using DAX for this because it would require frequently switching back and forth between using DAX and not using DAX.
Comments
-
VoiceMeeter is adding latency (delay) to your TX audio path.
Dave wo2x0 -
Thanks for the response! I suppose I could tolerate a little latency in the TX audio path if there were an easy way to add a delay after releasing the foot PTT switch. However, what concerns me more is a potential additional small delay in the TX receive path when routing sound through VoiceMeeter. That would be completely unacceptable in a CW contest scenario.
Based on this, I’ve decided to remove VoiceMeeter entirely and hope that SmartSDR adds a built-in feature for sending pre-recorded messages in the future.
0 -
For CW, use CWX.
I have not us3d it but have you tried the K9DUR voice keyer?
Also N1MM+ and other logging programs support voice files. And N1MM manages the PTT to Flex so no truncation of recording.
73 Dave wo2x
0 -
How I Eliminated Latency When Using a Focusrite Scarlett 2i2 + VoiceMeeter Potato with SmartSDR for Windows
- Install and run VoiceMeeter Potato as administrator
Download and install VoiceMeeter Potato (x64) from VB-Audio. Then right-click the VoiceMeeter icon and choose “Run as administrator.” This ensures Potato can detect and use the Scarlett’s ASIO driver correctly. - Install VB-CABLE Virtual Audio Device.
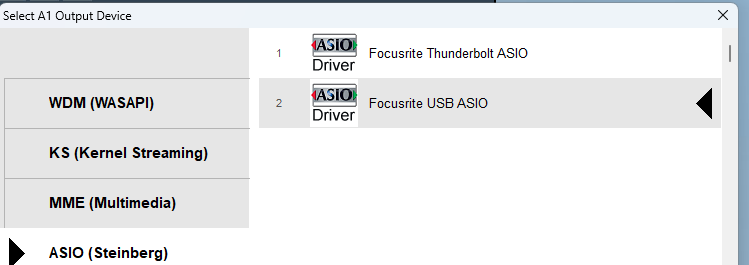
https://vb-audio.com/Cable/ - Set A1 hardware output to Focusrite USB ASIO
In the main Potato window, click the A1 button (upper right). From the dropdown, choose “ASIO: Focusrite USB ASIO.” Now Potato is using the Scarlett’s native ASIO driver, instead of going through Windows WDM. You’ll see this confirmation under “OUT A1 Main Device” in System Settings.
- Patch Scarlett inputs to Potato strips

- Open Menu → System Settings / Options… and scroll down to “PATCH ASIO Inputs to Strips.”
Make changes seen above and close the Settings.
After this,you will see:
- Open Menu → System Settings / Options… and scroll down to “PATCH ASIO Inputs to Strips.”
- Disable any WDM/MME inputs on those ****s
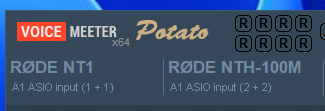
In the main Potato window, open the dropdown above the fader for “Stereo Input 1.” Click remove selection. That ensures **** 1 only listens to ASIO In 1. Do the same under “Stereo Input 2” so **** 2 only listens to ASIO In 2. - Route each **** to VB-Cable (Virtual Audio Cable)
- Under “Stereo Input 1,” click the A3 button so it lights up green. That means “Send everything on **** 1 out via A3.”
- Go back to Menu → System Settings / Options…, scroll down to “OUT A3,” and choose “WDM: CABLE Input (VB-Audio Virtual Cable).” Now RØDE NT1 (Scarlett In 1) is sent out to VB-Cable.
- Under “Stereo Input 2,” click the A4 button so it lights up green. Then in System Settings → “OUT A4,” choose “WDM: CABLE Input (VB-Audio Virtual Cable).” Now RØDE NTH-100M (Scarlett In 2) is sent out to VB-Cable as well. (If you only have one VB-Cable installed, you can use A3 for both strips, but using A3+A4 lets you adjust two mics independently.)
- Tell Windows to use VB-Cable as your microphone
Open Settings → System → Sound → Input. Under “Choose your input device,” select “CABLE Output (VB-Audio Virtual Cable).” In SmartSDR (Windows), set Mic Source to “PC,” so it reads from your Windows microphone, i.e. VB-Cable.
Why SmartSDR’s Mic Volume Slider No Longer Works
Once your mic is routed through VB-Cable, SmartSDR sees a “fixed-level” virtual audio stream. Its Mic Volume slider only adjusts physical Windows mic gain; VB-Cable has no built-in gain control, so SmartSDR cannot change that level. You must control your mic level in VoiceMeeter Potato, via the **** fader before it hits VB-Cable.Banana vs. Potato
If you only use a single mic and don’t mind about 10 ms of latency, VoiceMeeter Banana would have been simpler. I wouldn't do it.Key Points & Tips
• Run VoiceMeeter Potato as administrator so it can see the Scarlett ASIO driver.
Following these steps eliminated both latency and weak-mic issues. I tested it this evening, no lag, strong mic levels, and I can even monitor my own mic with zero latency. I hope it helps. Good luck on the air!
Some more reading FWIW…Using ASIO is the key because it bypasses Windows’s generic audio layers (WDM/MME), giving you:
- Ultra-Low Latency
ASIO talks directly to the Scarlett’s hardware, so your mic audio reaches VoiceMeeter and SmartSDR in under 5 ms—no perceptible lag. - Dedicated Channel Routing
You get direct access to each physical input (In 1 vs. In 2) without Windows mixing them together. That means you can put your RØDE NT1 on one **** and your headset mic on another, with zero crosstalk. - Stable, Consistent Sample Rates
ASIO locks onto the Scarlett’s native 48 kHz clock. You eliminate sample-rate drift, dropouts, and resampling artifacts that often plague WDM. - Full Dynamic Control
Because ASIO hands off a clean, unaltered “bit-perfect” stream to VoiceMeeter, you can use VoiceMeeter’s fader, compressor, gate, and EQ to shape your signal—SmartSDR sees exactly what you send, with no hidden Windows gain staging.
In short, ASIO gives you a direct, high-performance path from microphone → VoiceMeeter → SmartSDR. Without it, you’ll suffer higher latency, weaker/unstable levels, and less precise control
Cheers!
0 - Install and run VoiceMeeter Potato as administrator


Leave a Comment
Categories
- All Categories
- 388 Community Topics
- 2.2K New Ideas
- 658 The Flea Market
- 8.4K Software
- 156 SmartSDR+
- 6.5K SmartSDR for Windows
- 186 SmartSDR for Maestro and M models
- 439 SmartSDR for Mac
- 275 SmartSDR for iOS
- 265 SmartSDR CAT
- 204 DAX
- 386 SmartSDR API
- 9.4K Radios and Accessories
- 52 Aurora
- 297 FLEX-8000 Signature Series
- 7.2K FLEX-6000 Signature Series
- 970 Maestro
- 58 FlexControl
- 866 FLEX Series (Legacy) Radios
- 944 Genius Products
- 471 Power Genius XL Amplifier
- 347 Tuner Genius XL
- 126 Antenna Genius
- 306 Shack Infrastructure
- 215 Networking
- 468 Remote Operation (SmartLink)
- 142 Contesting
- 811 Peripherals & Station Integration
- 144 Amateur Radio Interests
- 1.1K Third-Party Software