Welcome to the new FlexRadio Community! Please review the new Community Rules and other important new Community information on the Message Board.
Need the latest SmartSDR, Power Genius, Tuner Genius and Antenna Genius Software?
SmartSDR v3.7.4 and the SmartSDR v3.7.4 Release Notes | SmartSDR v2.12.1 and the SmartSDR v2.12.1 Release Notes
SmartSDR v1.12.1 and the SmartSDR v1.12.1 Release Notes
Power Genius XL Utility v3.8.8 and the Power Genius XL Release Notes v3.8.8
Tuner Genius XL Utility v1.2.11 and the Tuner Genius XL Release Notes v1.2.11
Antenna Genius Utility v4.1.8
If you are having a problem, please refer to the product documentation or check the Help Center for known solutions.
Need technical support from FlexRadio? It's as simple as Creating a HelpDesk ticket.
Need technical support from FlexRadio? It's as simple as Creating a HelpDesk ticket.
How to use RigExpert Plus with 6000 Radio
Options

Paul RN3A
Member
Here is the step-by-step procedure how to link RigExpert Plus with 6000 radio. What you will need - RigExpert Plus and USB patch wire, DB25 Mle connector, High Density DB15 Male connector, appx, 3 meters of shielded cable, soldering iron and soldering stuff, Flex-6000 radio and a bit of a patience. 1. Starting with cable. RigExpert Plus (REP) allows you to use it's internal K1EL keyer amd USB Sound devices. REP generates HW CW manipulation signal, PTT and deals with input/output analog sound. More information here: http://www.rigexpert.com/index?s=plus So we need to make a cable. Cut your 3 meter cable into 4 even pieces and **** them. We will use: Cable 1 - Radio Input audio (TX) Cable 2 - Radio Output audio (RX) Cable 3 - PTT signal to Radio Cable 4 - CW manipulation to Radio Solder the cables to connectors in the following way. Cable 1 central conductor. DB15 pin 1 - DB25 pin 25 Cable 1 shield DB15 pin 6 - DB25 pin 13 Cable 2 central conductor DB15 pin 2 - DB25 pin 12 Cable 2 shield DB15 pin 7 - DB25 pin 13 Cable 3 central conductor DB15 pin 14 - DB25 pin 17 Cable 3 shield DB15 pin 5 - DB25 pins 11,24 Cable 4 central conductor DB15 pin 4 - DB25 pin 4 Cable 4 shield DB15 pin 5 - DB25 pins 11,24 Your cable is ready. Now you may safely connect it to both radio (DB15) and REP (DB25) 2. Installing RigExpert Plus. - Download the drivers for REP from here: http://www.rigexpert.com/index?f=downloads Drivers work OK with just about any version of Windows. (I have recently upgraded me to Windows 8 64bit - al works with flying colors). - Run the setup, and reboot (I ALWAYS reboot - just in case..) - Run "Show Serial Ports" routine from REP folder.You will see something similar to this. 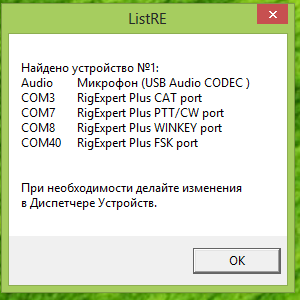 (Sorry, some parts are in Russian, but most of the picture is pretty much self-explainable). You can see 4 Virtual Serial Ports, created by REP installer - CAT (you don't need it), PTT/CW (you will need PTT part), WINKEW (needed) and FSK (don't need it either). - Important!!! Please note that REP assigns it's VSPs without any concern to other ports already in the system. What you need to do now, is to find new ports in Device Manager and MANUALLY re-assign port numbers. In my example I assigned COM3 to CAT (for other purposes, you don't need it for Flex-6000), COM7 to PTT and COM8 to WINKEY. I moved FSK to COM40, way above any other ports I have in the system. Here is the image.
 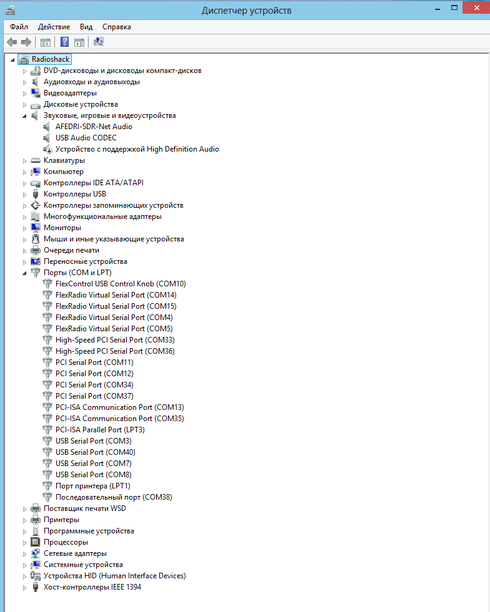 - Please also note, that REP installer has added new sound device - USB Audio Codec. This is the one which will be used for Digital modes. 3. Comfiguring the Radio. All you need to do is to select the Mode (CW or DIGU/DIGL) and select ACC in Audio source selection on TX panel. (For Digital operation only). COMP and VOX buttons will be disabled in DIGU/DIGL modes. 4. Configuring your Application. (Winwarbler as an example). - Start DXLab WinWarbler and go to Config. - Select CW tab and choose WinKey for Keying. Select your WinKey COM port (8 in my example). - You may leave everything else by Default.
  - Select PTT tab and choose PTT Mode (RTS in my case) and Port (Com 7)
 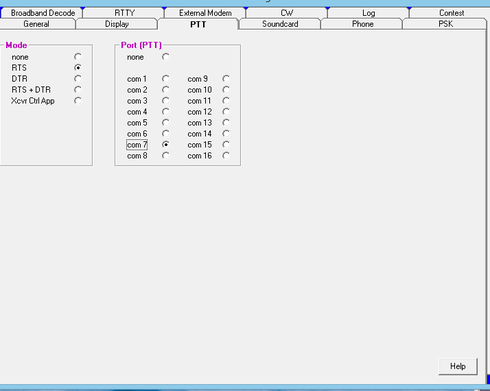 - Select SoundCard tab and choose USB Audio CODEC for both RX and TX devices.
 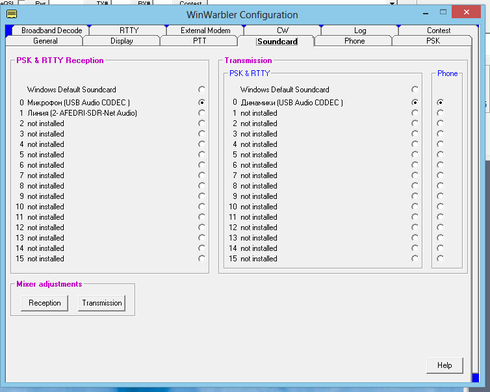 You are done, If you use other Applications, simply make sure that you select the right Com ports and Audio devices in the settings, CW paddles remain to be connected to KEY jack on the front panel of the Radio. You can vary CW speed with either SPEED **** on REP or Speed slider on the TX pane in SSDR. These do not conflict with each other, Make sure that you have your audio levels correct - you can use Windows Sound devices pane, SSDR, REP pots, or a combination of all. Once your levels are set, you will seldomly need to adjust anything. Windows by default may mute USB Audio Codec output - make sure you turn it on. I use this setup with WinWarbler, WSJT, N1MM, MixW and some other Apps - all works well. You will really like Flex-6000 quality of RX in Digital modes, simply superb!. Enjoy.
 (Sorry, some parts are in Russian, but most of the picture is pretty much self-explainable). You can see 4 Virtual Serial Ports, created by REP installer - CAT (you don't need it), PTT/CW (you will need PTT part), WINKEW (needed) and FSK (don't need it either). - Important!!! Please note that REP assigns it's VSPs without any concern to other ports already in the system. What you need to do now, is to find new ports in Device Manager and MANUALLY re-assign port numbers. In my example I assigned COM3 to CAT (for other purposes, you don't need it for Flex-6000), COM7 to PTT and COM8 to WINKEY. I moved FSK to COM40, way above any other ports I have in the system. Here is the image.
  - Please also note, that REP installer has added new sound device - USB Audio Codec. This is the one which will be used for Digital modes. 3. Comfiguring the Radio. All you need to do is to select the Mode (CW or DIGU/DIGL) and select ACC in Audio source selection on TX panel. (For Digital operation only). COMP and VOX buttons will be disabled in DIGU/DIGL modes. 4. Configuring your Application. (Winwarbler as an example). - Start DXLab WinWarbler and go to Config. - Select CW tab and choose WinKey for Keying. Select your WinKey COM port (8 in my example). - You may leave everything else by Default.
  - Select PTT tab and choose PTT Mode (RTS in my case) and Port (Com 7)
  - Select SoundCard tab and choose USB Audio CODEC for both RX and TX devices.
  You are done, If you use other Applications, simply make sure that you select the right Com ports and Audio devices in the settings, CW paddles remain to be connected to KEY jack on the front panel of the Radio. You can vary CW speed with either SPEED **** on REP or Speed slider on the TX pane in SSDR. These do not conflict with each other, Make sure that you have your audio levels correct - you can use Windows Sound devices pane, SSDR, REP pots, or a combination of all. Once your levels are set, you will seldomly need to adjust anything. Windows by default may mute USB Audio Codec output - make sure you turn it on. I use this setup with WinWarbler, WSJT, N1MM, MixW and some other Apps - all works well. You will really like Flex-6000 quality of RX in Digital modes, simply superb!. Enjoy.
 2
Comments
-
Paul. Thanks for this detailed set of instructions!0
-
Hi Paul, RN3A, thanks for the setup. It was very helpful. After soldering the cable and trying some adjustments with ACC and DIGu it seams to me that all is fine. After connecting my old RigExpert Standard I had run MiXW 3.1 and also HRD 6.. With HRD I have still problems /Crashs when the Logbook is started. But tomorrow is another day. With my external K1EL keyer CW is ok too, also with N1MM. Waiting for the DAX to use CW Skimmer with the IQ signals. Vy 73 Norbert, DJ7JC0


Leave a Comment
Categories
- All Categories
- 246 Community Topics
- 2.1K New Ideas
- 488 The Flea Market
- 7.1K Software
- 5.9K SmartSDR for Windows
- 134 SmartSDR for Maestro and M models
- 331 SmartSDR for Mac
- 243 SmartSDR for iOS
- 222 SmartSDR CAT
- 163 DAX
- 348 SmartSDR API
- 8.6K Radios and Accessories
- 6.9K FLEX-6000 Signature Series
- 766 Maestro
- 41 FlexControl
- 836 FLEX Series (Legacy) Radios
- 733 Genius Products
- 393 Power Genius XL Amplifier
- 255 Tuner Genius XL
- 85 Antenna Genius
- 229 Shack Infrastructure
- 153 Networking
- 370 Remote Operation (SmartLink)
- 120 Contesting
- 583 Peripherals & Station Integration
- 115 Amateur Radio Interests
- 813 Third-Party Software